It has been the most requested feature and the product team have listened. As a MVP I was invited to review and provide feedback to the new October Release 2018 features for Dynamics 365 for Portals. I demonstrated the three new features in the October Melbourne User Group.
- SharePoint Document Management
- Embedding PowerBI
- New modern Portal editor
In this blog post I will go through the configuration steps required to enable SharePoint Document Management.
Entity I am using
I used the Case entity for enabling SharePoint Document management. This was shown in my vlog and will be used for screenshots in this blog post.
Step 1
Enable the document management for the Case entity in the entity configuration record either by opening up solutions from within Dynamics 365 or PowerApps (through https://web.powerapps.com).
Step 2
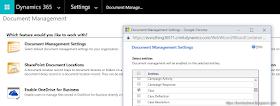
Enable entity in Document Management Settings. There will be a wizard you follow.
Step 3
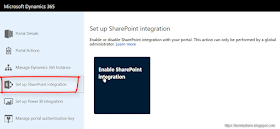
Enable SharePoint Integration through Portal Details. Head over to the Dynamics 365 Admin Centre and in the Application tab, select your Portals instance to open up Portal Details.
In here you'll see a new option called "Set Up SharePoint Integration."
In here you'll see a new option called "Set Up SharePoint Integration."
Click on this and you'll see an Enable SharePoint Integration option.
You'll be prompted to select your user account to enable required permissions.
Accept the required permissions presented.
Step 4
Configure the entity form to display a sub-grid of Document Locations in the Case entity configuration record either by opening up solutions from within Dynamics 365 or PowerApps (through https://web.powerapps.com).
- Make sure you configure the correct entity form that your Dynamics 365 for Portals references.
- Make sure you select Active Document Locations as the view as by default My Active Document Locations will be selected.
Step 5
The final step is to create a Child Entity Permission record. The Dynamics 365 for Portals entity form will need to have the "Enable entity permissions" checkbox enabled so that the Portals user can upload files though the sub-grid
There will be a Parent Entity Permission that will drive access to the Case entity. In my scenario, it is an entity permission that allows contacts to create, view, edit and delete Cases if they are the customer in the Customer field of the Case. Against this entity permission, I create a child entity permission.
SharePoint Document Management in action
After the above steps, you're now able to see it in action.
Sign into your Portals instance and create a new case. After the case is created, you'll now be able to upload files. Remember, Dynamics 365 for Portals respects Dynamics 365 functionality so you cannot interact with a sub-grid until the records is created and saved.
By the sub-grid you'll see two buttons,
By the sub-grid you'll see two buttons,
- Add files which will allow you to upload files
- New folder which will allow you to create a new folder to upload files into
Awesome sauce, you're all set to upload files now 🙂
Once uploaded you can also browse to the SharePoint document location from the Case record.
As demonstrated in my vlog, files portals users delete if they have the permission to do so, will also be deleted in Dynamics 365 and in SharePoint online.
Summary
The most requested feature for Dynamics 365 for Portals returns and is all configurable. I am not a SharePoint configuration expert in the context of Dynamics 365 so if you have questions, it's better suited for the Dynamics Community forum. Please also refer to https://docs.microsoft.com for more information on managing SharePoint documents.
Stay tuned for my next blog post on Dynamics 365 for Portals October Release 2018.
Shout out to the Dynamics 365 for Portals product team for inviting me to play with these features in advance 😁 #thankyou


No comments:
Post a Comment