Monday, 13 April 2015

Help(ing you) in Microsoft Dynamics CRM 2015 using Office 365 and Microsoft SharePoint online

19:25 Posted by Benitez Here , ,
In my last post, I covered how you can use Microsoft Word and Customized Help in Microsoft Dynamics CRM 2015. Since then, Andre (another jedi in the CRM relm) and I came up with the idea to blog about utilizing Office 365 and Microsoft SharePoint online for Customized Help. We caught up with each other after the February's Melbourne CRM User Group as both of us presented in last month's session. Here's a couple of snaps from the Melbourne CRM User Group :).


After the CRM User Group ended, we talked about what has happened recently and I mentioned my recent vlog on Customized Help. Andre then suggested doing another follow-on vlog on using Office 365 and Microsoft SharePoint online so this is what I'm covering this time round with input from Andre.

Recap

The “?” icon on the top left hand corner of Microsoft Dynamics CRM can now be customized where you can provide a URL reference to a guide that you have created and is hosted in an accessible web page. You can use Microsoft Word to create your end user guide and then either convert it to an .HTML page, use a CRM Web Resource or upload into OneDrive or GoogleDrive where you use the URL as the Help reference. This is what I covered in my last vlog post.

Office 365 goodie bag

Office 365 has a number of applications you can use (based on your subscription) such as Microsoft Office, Yammer and Skype for business as well as combining other Microsoft Products online. These other Microsoft products can be Microsoft Dynamics CRM 2015 online or Microsoft SharePoint online. If you are a current Office 365 user and you have access to both Microsoft Dynamics CRM online and Microsoft SharePoint online, there’s more alternatives that you can apply for Customizing Help in Microsoft Dynamics CRM 2015. Check out my vlog on a detailed explanation of these alternatives.


Alternatives for Customized Help

1. How to use OneDrive for Business

This is a different version of consumer OneDrive from the one you have access to if you have an Outlook online email account. Do you have a "hotmail" email address? This is essentially now www.outlook.com. This is the consumer OneDrive, accessible within your Outlook account.

OneDrive for business is based on Microsoft SharePoint Online (notice the layout) where you can synchronise the folder with a local drive folder from your laptop/PC. For this method, you can apply the same steps as my last post where you create your end user guide using Microsoft Word. One thing I forgot to mention my vlog is that if you are using Word Online within Office 365, you won't be able to insert a Table of Contents. I opened the document locally on my desktop and inserted the Table of Contents. I then uploaded the Word document back into Word Online. This file is saved in the Office 365 OneDrive.

Steps
1.  Navigate to OneDrive in Office 365.


2. You will see your Word document (that will be used as the Microsoft Dynamics CRM end user guide) created from using Word Online in Office 365. Or you can upload your Word document from you laptop/PC if you have not used Word Online in Office 365.

3.  Click on the ". . ." which is also known as an ellipsis. Here you will see a URL that references the file. However we want to "share" access to the file so click on the "Share."

4. Click on "Get a link," where a URL will be generated which you can copy and paste into the Help URL in Microsoft Dynamics CRM 2015.

2. How to use Microsoft SharePoint Online for Customized Help

2.1 Using Microsoft SharePoint as Document Repository 

This is the same functionality as using OneDrive for business, however the scope of document ownership will be based on Team Site.

Steps
1. Navigate to Microsoft SharePoint online in Office 365.

2. Select the Microsoft SharePoint site that will be the source of the Word document.

3. Click Documents in Microsoft SharePoint online. Upload Word file (not the file from Microsoft Word online).

4. Click on the ". . ." and click on "Share." This is the same as Step 3 in the previous OneDrive instructions.

5. Click on "Get a Link" and then click on "Create a Link." Copy and Paste this link into the Help URL of Microsoft Dynamics CRM 2015. This is the same as Step 4 in the previous OneDrive instructions.

2.2 Leveraging Microsoft SharePoint Site pages

The final method suggested by Andre is using Microsoft SharePoint Site pages. I had a lot of fun with this one as I explored the functionality available in Microsoft SharePoint Site pages which was outside of the scope of what we wanted to cover. I have not used Microsoft SharePoint online before so I wanted to have a play around and that's how I came up with some additional functionality that can be applied in the Microsoft Site page to be used for the end user guide for Microsoft Dynamics CRM 2015. Curiosity got the best of me :)

2.2.1 Create Site page

A Site page is what will be used as the end user guide for Microsoft Dynamics CRM 2015, no document will be used in this method.

Steps
1.  Navigate to Site Contents in Microsoft SharePoint online.


2. Click on Site Pages.
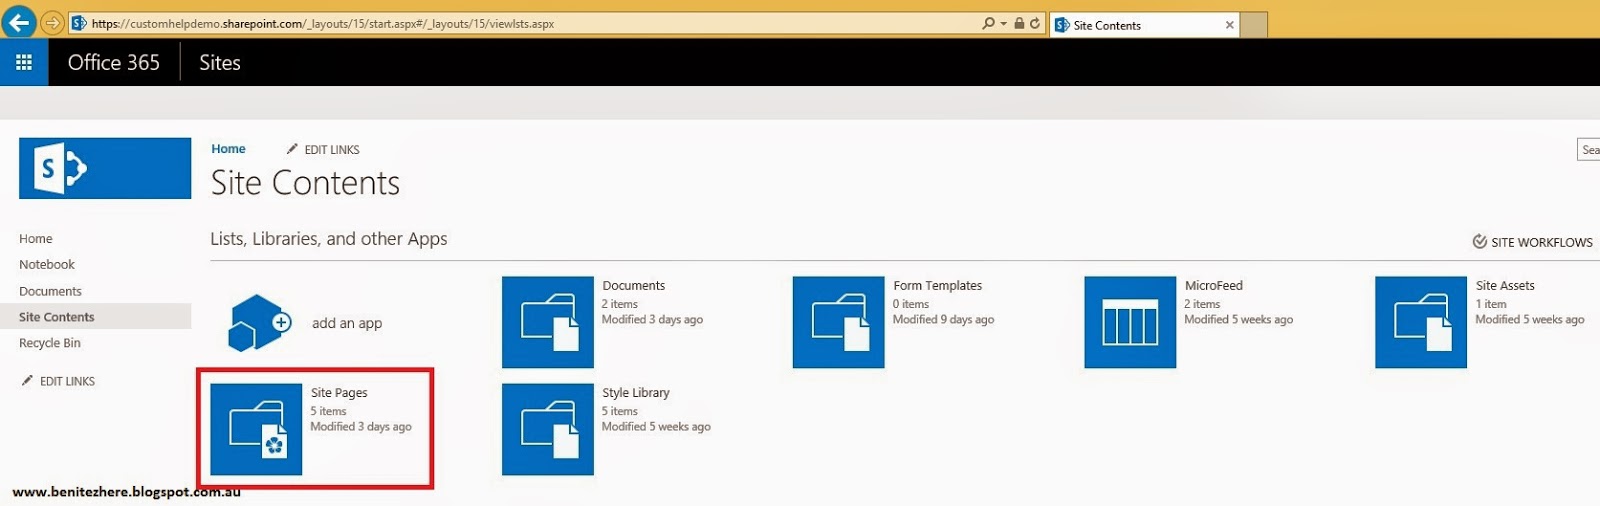

3. Click on + New.

4. Enter a Site page name. Click on Create.

5. Voila! Your Site is created instantly. Start entering your content. Using the editor in the ribbon, apply formatting Styles. This is things like applying different Header styles, change colour of text etc.
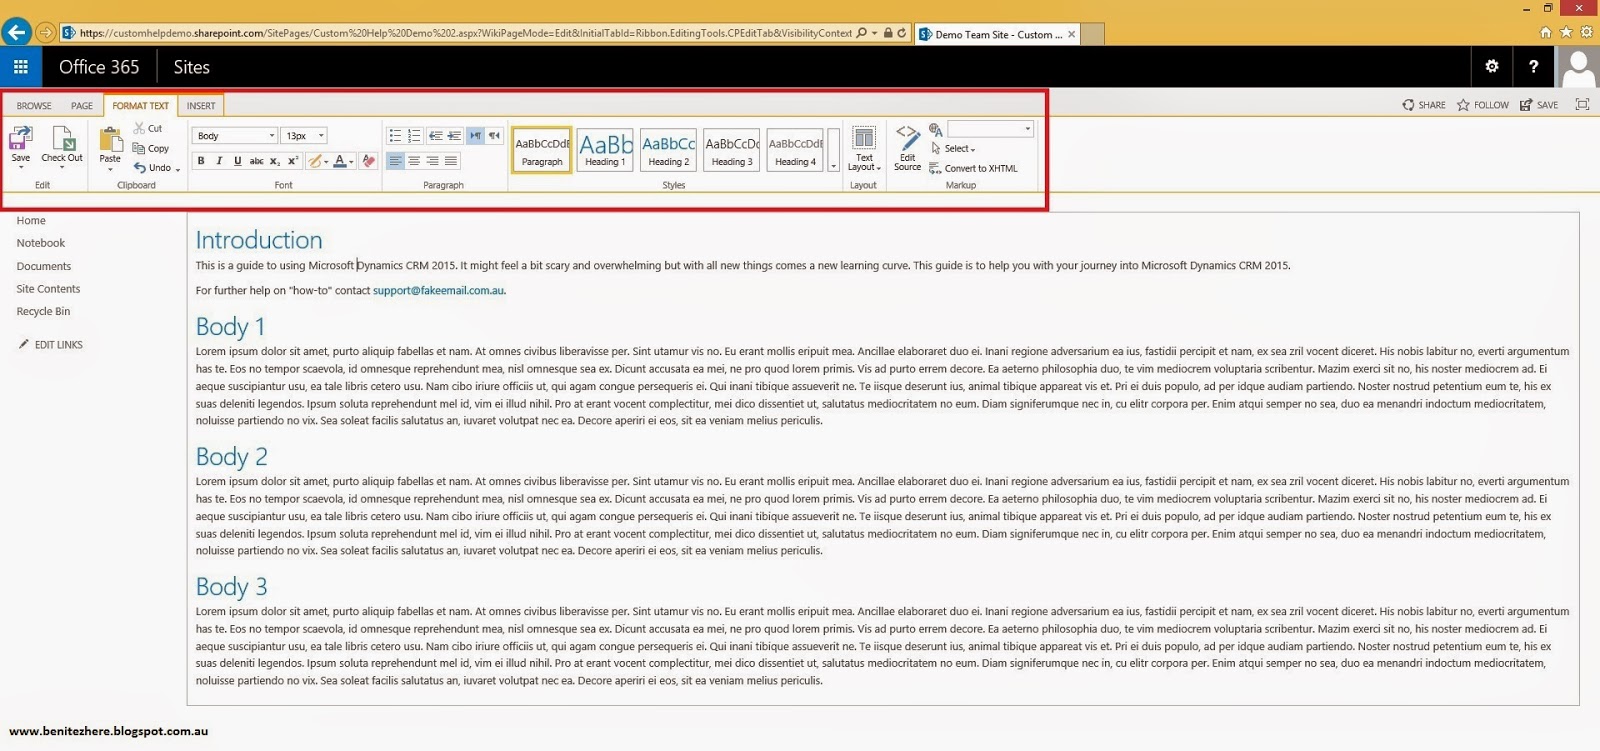

**Don't forget to Save your Site page when you're done editing.

2.2.2 Embed media files

You can embed media file such as videos. In my vlog I showed how to embed a YouTube video.

Steps
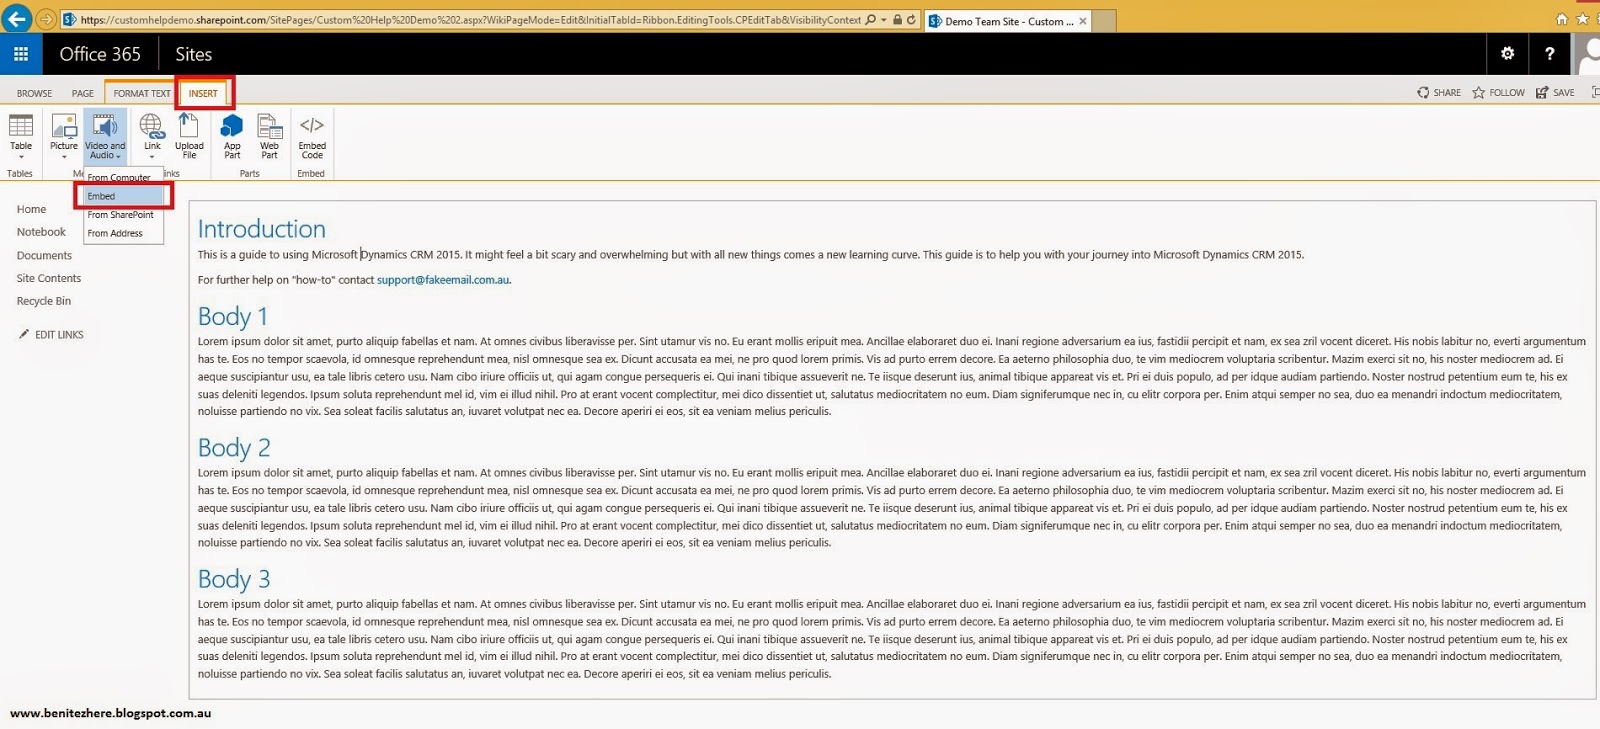
1. Click Insert and click on "Video and Audio." Select "Embed."

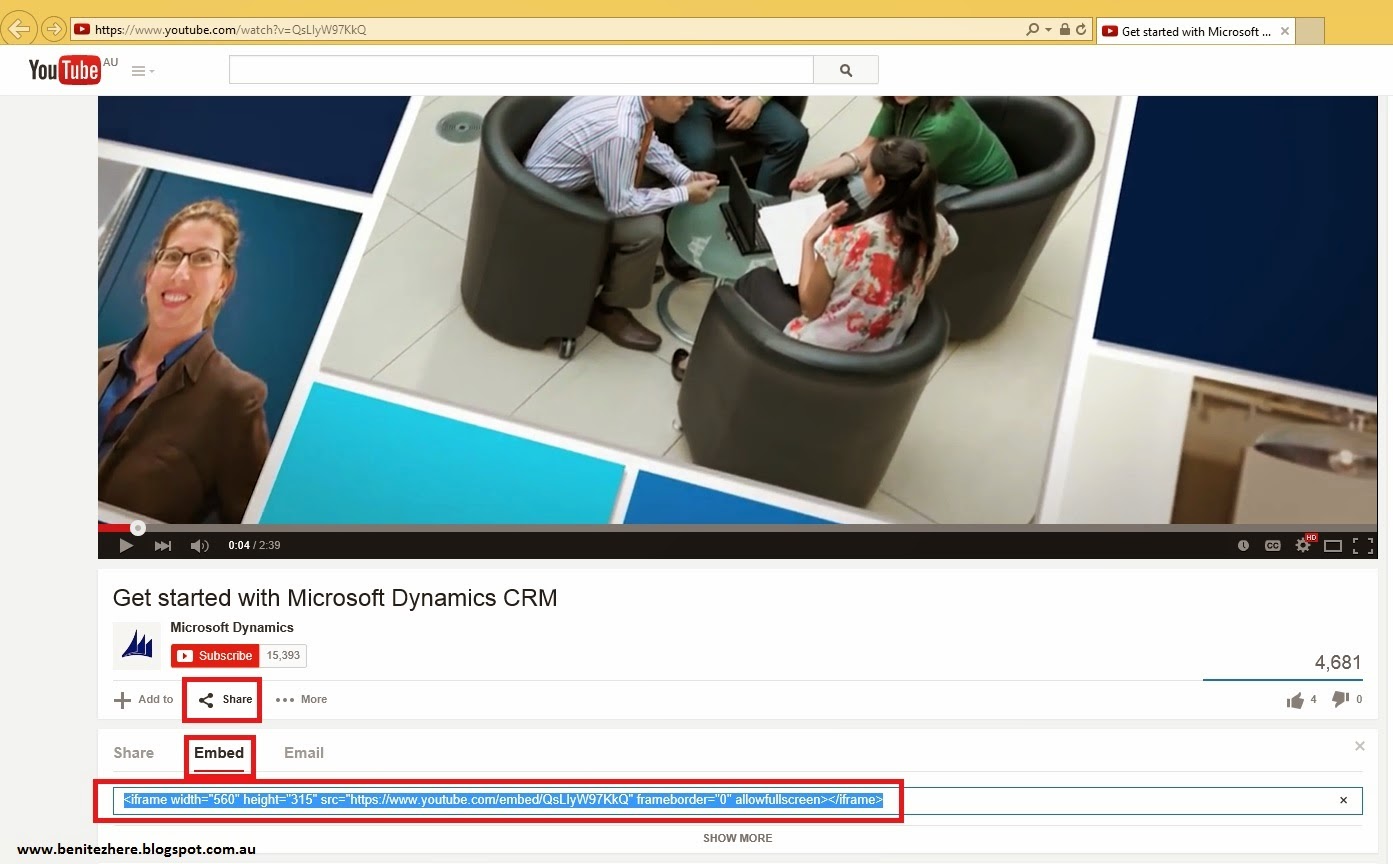
2. In another browser session, navigate to the YouTube video. Click On Share, followed by Embed. Here some script will appear which you will need to Copy.

3. Go back to your browser where you had the embed window open in Microsoft SharePoint online. Paste the script into the Embed window and a preview of the video will appear. Click on Insert.
4. The YouTube video will now be embedded into the Microsoft SharePoint online Site Page.

2.2.3 What about a Table of Contents?

This one I investigated as I wanted to know how to replicate the Table of Contents in a Microsoft SharePoint online Site Page. The editing options in Microsoft SharePoint online are limited from the Microsoft SharePoint On-Premise version. I could not see the option to add a Bookmark, however this didn't stop me from wanting to find out more. I put on my "I'm in a mission" hat and did some further investigation.

After a going through every edit option available, the one that stood out for me was  "Edit Source" in the Format Text tab. I felt like I could possibly use HTML to create a Table of Contents. So then I did the next best thing, turned to Google and I found a great blog post by another services provider that explains how to achieve a Table of Contents with Microsoft SharePoint online. I followed the post and achieved a Table of Contents in the Site Page I created using Microsoft SharePoint online. I thank the author of the blog post!

Here's what I did
1. Make sure you are in Edit mode in your Site page.

2. I clicked on Text Layout in the Format Text tab and selected the "One column with sidebar" layout.

3. Highlighted my Body 1 heading and click on "Edit Source," in the Format Text tab. the following is my html code from following the instructions from the blog post.
<h2 id="section1">Body</h2>

4.Click OK.

5. For the Table of Contents I highlighted Body 1 in the sidebar that represents my Table of Contents and the following is my html code from following the instructions from the blog post.
<a href="/SitePages/This%20is%20a%20test.aspx#section1">Body</a></p>

5. Click OK.

6. Save your Site page.

7. Test your Table of Contents.

Do the opposite if you want to apply a "Back to the Top" URL, follow the blog post instructions.

Things you need to be aware of

OneDrive/Microsoft SharePoint Documents

Pros
  • Document co-authoring
  • Can share the document to be accessed anonymously
Cons:
  • I was not able to create a table of contents in Word online, I had to download my file onto my laptop and insert a table of contents using Word installed on my laptop. If you don't have Word installed and you're only using Word online, you won't be able to insert a table of contents.
  • Even though a table of contents can be provided, you can't get the individual URL reference if you want to provide a unique URL for customised help of a specific entity as mentioned in my vlog.

Microsoft SharePoint Site pages

Pros
  • There is a simple text editor with WYSIWYG editor online which can replace the need of using Microsoft Word to edit the content. Below is a screenshot of the two side by side. As you can see, the edit options are quite similar (please note the Microsoft Word screenshot is not Microsoft Word online, it's Microsoft Word installed on laptop/PC)
  • You can embed media file. I embedded a YouTube video. This is something you can't do in a Word document. 


EDIT 14/04/15 

Matt one of my CRM buddies (hey Matt!) messaged me saying that you can embed videos into Microsoft Word. Check it out here.

So I tried this myself and here are my findings,
1.YouTube video can be embedded in Microsoft Word installed on your laptop/pc. The end user clicks on the video without a browser being opened.
2. Embed Online Video is not available on Microsoft Word online so if you don't have Microsoft Word installed and only have Microsoft Word online through Office 365, you can't use this option.
3. If you do have Microsoft Word installed on your laptop/pc, you can upload the file that has the video embedded into Office 365 through OneDrive or Microsoft Word online. HOWEVER... clicking on the video in Microsoft Word online document will redirect you to the YouTube video page URL, so you are leaving Word Online. The experience is different to Microsoft Word installed on your laptop/PC.

Thanks Matt!

    Cons
    • There is no immediate method of adding a Table of Contents in Microsoft SharePoint online compared to Microsoft Word (not online), however a solution has been provided. However a pro of using the solution provided is that you can grab the individual bookmarks to use for customised help of a specific entity as mentioned in my vlog.
    • People who are accessing these pages need to have a valid Microsoft SharePoint online license. This alternative might be good for an organisation that provisioned Microsoft SharePoint online to all of their CRM users.

    Summary

    Pretty cool alternatives. I think it's great that there's more than one way of providing Customized Help in Microsoft Dynamics CRM 2015 using different available methods within the Microsoft family. My last post showed you a particular path and now I've shared with you another path if you are an existing customer of Office 365 and you have both Microsoft SharePoint online and Microsoft Dynamics CRM 2015 online.

    Shout-out to Andre for collaborating with me for this post. Andre set up the Office 365 trial for this post and provided the alternatives. I learnt how to do the alternatives myself and explored functionality in the Microsoft SharePoint online Site pages. Andre will be doing a follow-on post around the pros and cons of using global custom help vs individualised custom help.

    I may do another joint post with another CRM guru so watch this space :) Also, congratulations again to Andre for having his Microsoft Dynamics CRM MVP renewed, high-five!

    Other - thank you

    About a year ago I started vlogging thanks to Ben Hosk. Ben also started vlogging a year ago, you can check his vlogs out here. It all started from me commenting on one of his LinkedIn post updates on how I've always wanted to vlog but didn't have the courage for it. Ben reached out to me where he encouraged me, guided me and provided recommendations on ways to improve my blog craftmanship. I am grateful he took the time in helping me as I did not know him personally, so I would like to say "Thank you Ben, you are an inspiration. You rock."

    I'm still learning in improving my vlogging and blogging. Vlogging takes up more time and effort due to the planning, recording and editing. It's quite challenging doing a walkthrough when I know I'm being recorded and there's a risk I might stuff up (which I have done but it's normal). Here's a fun example from Ben's experience.

    But I love it, I love that I am sharing my knowledge with others and that others may get more out of their Microsoft Dynamics CRM from something I've shared. I am so passionate about sharing what I know in the hope of influencing some other soul out there that uses Microsoft Dynamics CRM. So thank you dear reader for following me and please do share with others whom you think may benefit from my posts.

    Toodles.

    Wednesday, 4 March 2015

    Help(ing you) in Microsoft Dynamics CRM 2015 with Microsoft Word

    17:40 Posted by Benitez Here , ,
    Help, I need somebody
    Help, not just anybody
    Help, you know I need someone
    Help!

    Some of you may recognize the above words from the lyrics to "Help!" by the Beatles. This is the theme for today's vlog, Help! in Microsoft Dynamics CRM 2015. But I also help you by sharing some more tricks up my sleeve in providing an alternative solution for an end user guide as part of customizing Help for Microsoft Dynamics CRM 2015.

    You can now customize what is to be displayed when end users click on the "?" icon a the top right hand side of the window in Microsoft Dynamics CRM 2015. It would have been really cool to see Clippy in Microsoft Dynamics CRM (this is just my personal opinion as someone who grew up in the 90's with Clippy, Power Pup, Rocky, The Genius, Scribble and that red bouncing ball called Dot). Some people thought the Office Assistants were annoying but being a kid at the time, I was sucker for the animated characters. I would be so thrilled to see an animated character help me in CRM. Here's a flashback to those characters.


    Alas, this is not the type of help I'm referring to. Customized help in Microsoft Dynamics CRM 2015 provides the following abilities:
    1. have a global reference to a website/webpage that essentially acts as an e-Guide for the CRM environment as a whole
    2. have entities (including custom entities) reference a webpage that essentially acts as e-Guide for that particular entity

    How do I do this?

    The following are the steps to achieve customized help.

    Global reference

    1. To make your help information available on a website or webpage and copy the URL.Navigate to Settings > Administration > System Settings.

    2. Scroll down in the General Tab and locate the heading "Set custom Help URL."

    3. Change the field "Use Custom Help for customizable entities" to Yes.

    4. Paste your URL in the "Global Custom Help URL" field.

    5. Change the field "Append parameters to URL" if you want CRM URL references to appear on your browser.

    6. Save and exit System Settings.

    7. Refresh your browser that has CRM open.

    8. Click on the ? icon and you should now see your website or webpage in a new browser window.

    Individual entity reference

    1. To make your help information available on a website or webpage and copy the URL. Navigate to Settings > Customizations > Customize the System.

    2. Expand Entities on the left hand side navigation pane and select the entity of your choice. In my screenshot example I am selecting "Product."

    3. Scroll down and locate the heading "Help."

    4. Tick the field "Use Custom Help."

    5. Paste your URL in the "Help URL:" field.

    6. Refresh your browser that has CRM open.

    7. Click on the ? icon and you should now see your website or webpage in a new browser window.

    Ideas for your website or webpage

    You could use Microsoft SharePoint to host a SharePoint Site that contains the Help information.
    If you use a Learning Management System for your Organisation and it's a web application, you can use the URL of this too.

    But some Organisation's don't have the budget to have Microsoft SharePoint or a Learning Management System. Or have the budget to invest in another type of application that can be the ecosystem of Help for Microsoft Dynamics CRM. I have an alternative solution from using my problem solving powers.

    I have always been an advocate of the Microsoft Office suite. My dad introduced a Windows PC in our household back in 1993 and he taught me how to use Microsoft Word and Excel (he makes his own wallet sized itineraries. He still does. I'll take a screenshot and post it at the bottom of this post so that you can see how precise he is, prepare to be amaze-balled). Also, who else remembers that 90's Windows PC game Hover? I loooooved that game.

    Anyways, there are some things I know intimately about Microsoft Office thanks to my Dad (hi Dad if you're reading this! I miss you!). Files in the Microsoft Office suite can be saved in different formats. Did you know you can save Microsoft Word into another file format? One of them is ".htm" or ".html." Did you also know you can create hyperlinks to sections in the document?

    My workaround is creating an end user guide in Microsoft Word. Microsoft Word. It's commonly used in most Organisations. There will be some administration time (which I'll explain later) but it's a working solution to not having a learning site.

    In this vlog I cover what I've mentioned above but also an alternative in creating a help guide using Microsoft Word.


    So how do you use Microsoft Word as an alternative? 

    The following is what I have done and will cover in the remaining of this post:

    1) Use Headings
    2) Use Table of Contents
    3) Create hyperlinks
    4) Save As .htm or .html
    5) Upload web files onto a server
    6) Create a web site in Internet Information Services (IIS)

    My screenshots in the steps will be from Microsoft Word 2013.

    1) Use Headings
    The Style function in Microsoft Word is where you can format text in your document. You can change the font, colour, size, make the text italics etc based on the Style settings.


    When you use Headings, it provides a means of being able to quickly access different areas of the document as well as providing formatting to the document. For example, if you click on View and tick the Navigation Pane checkbox, you'll see your headings on the left handside. Once you click on a heading, Word will jump to the page of that Heading and you can update/delete your content.


    Use Headings throughout your document that will be used as the Help guide for your Microsoft Dynamcis CRM 2015 environment. My suggestion is to name your headings that can relate to what the end user is looking at in Microsoft Dynamcis CRM 2015.

    2) Use Table of Contents
    You can insert a Table of Contents in Microsoft Word which will retrieve the Headings in your document.

    Click References tab and click on Table of Contents.

    The Table of Contents will appear on your page. Table of Contents is usually placed at the beginning of the document so make sure you insert the Table of Contents in the beginning of your Word document.

    3) Create hyperlinks
    Headings will also appear when you want to create hyperlinks. To provide the end user to go back to the Table of Contents in the document/website/webpage, you can create a "Bookmark" back to the Table of Contents. Think of a "Bookmark" as an Anchor, Anchors are used in websites or even in Microsoft Outlook in your emails. Same concept in Microsoft Word using a Bookmark.

    Go to the page in Microsoft Word that contains the Table of Contents. Click on the Insert Tab in Word and select Bookmark.

    Enter a Bookmark Name and click Add. For example I'm using TOC as the Bookmark Name. You have now created a Bookmark for you Table of Contents.

    The next thing I suggest to do is create a "Back to Table of Contents" hyperlink in each of the sections of the document. I have a hyperlink of "Back to Contents" in each of my sections. Being the nerd I am, I have also inserted an arrow Symbol too.

    Highlight your text, click on the Insert Tab in Word and select Hyperlink.

    A new Window will appear, by default you'll see "Existing File or Web page." Click on the option "Place in This document."

    Now, select your Bookmark that you created at the bottom of the window. Click OK.


    Repeat for every section in your Word document.

    4) Save As .html or .html
    Navigate to the File tab and click on Save As.

    Name the file as "Index" and select the file type as Web Page (*.htm;*.html). You need to name the file Index otherwise it will not work in Step 6.

    Click Save. Two files will then be created.

    5) Upload web files onto a server
    The next bit is to copy the two files created after you save the Microsoft Word document as a .htm file on to a server that will host the web page. I have done this in our development server otherwise this is where you kindly ask your IT team or hosting provider to do this for you.

    Copy it onto the server into a new folder in the wwwroot folder within the inetpub folder located in the Local Disk (C:) drive. So C: drive > inetput > wwwroot > new folder

    You may get the following error,

    Don't panic (I did). One of my developer ninjas calmed me down and said all I had to do was copy the files onto the desktop of the server instead of directly in the folder. Once the files have been copied onto the desktop of the server, then cut/copy the files into the folder you've created in the wwwroot folder in the C: drive.

    6) Create a web site in Internet Information Services (IIS)
    Open Internet Information Services (IIS) Manager. Right click on Sites and click Add Web Site.

    Enter a Site Name.

    In the Physical path field, click on the ". . ." and select your folder that you created in the wwwroot folder in the C: drive.

    This next part may or may not confuse you.
    a) If you want to have the web site externally facing or give it a branded name, enter it into the "Host Name:" field and leave the Port as 80. You will then have to request an Infrastructure change to the DNS. This is so that the web site can be called by it's Host Name when an end user is directed to the URL. (I may not have explained this great as I'm not an Infrastructure know-it all but hopefully you some what understand me).

    b) If you don't care about the web site being accessed outside of your network or having a branded name (such as https://helpingyou.com.au) then you can just change the Port number and leave the "Host Name:" field blank. Generally anything that is above 5000 is OK. I've used 5514.

    Click OK.

    Test your Web Site by browsing to it, click on "Browse *:<portnumber>" on the right handside of IIS Manager.

    The web page will open in a new window.

    If you went with option b), notice that it reads "http://localhost:5514/". Replace "local host" with the name of the server. So it will be "http://<servername>:<portnumber>".

    OK, so now you can copy and paste your newly created website URL from IIS Manager into the "Global Custom Help URL" field in the System Settings of Microsoft Dynamics CRM 2015. Now when end userrs click on the ? icon, they will be directed to the lovely web page that you created using Microsoft Word.

    To customize the help for the individual entities, just grab the URL generated from the Table of Contents. The trick is to do this when you are logged into the server that is hosting the web site. So browse to the web site, click on one of your headings. If you look at the browser address field, you'll see that the Bookmark Name and digits have been appended to the URL path. Copy this and paste it onto the "Help URL: field" as mentioned at the beginning of this post.

    Other alternatives suggested by @andz_88

    Andre and I were chatting after the CRM Melbourne User Group earlier this week about my recent post and he’s come up with more magic Microsoft Word combo’s. With his permission, I’m adding his suggestions in here too.

    Web Resource

    I made a comment earlier about one of my developer ninja’s suggesting using a Web Resource. Andre’s thoughts around this is that if a Web Resource is used, the benefit is that it will be solution aware. This allows the document to be deployed and hosted in any Microsoft Dynamics CRM 2015 environment within a CRM solution, therefore does not need a dedicated web server (IIS Manager is what I suggested in my alternative).

    Andre tested to see if this works by creating a simple Word document to be used for custom help on the Account entity. Then following my alternative, he uploaded the files into Microsoft Dynamics CRM 2015 as a web resource - note on the "virtual folder" structure to replicate the output file from the Microsoft Word document. He created the Help folder then the Name of the folder where the images of the .html file generated from the Save As feature from Microsoft Word. This way you don't need to change the .html file at all to point to the image location.

    Update the Custom Help URL for the Account entity using the URL of the web resource:


    When you now click on the Help icon when you are in an Account record, it will open up the document where the path is pointing to the web resource. Andre’s Web Resource alternative was applied to his Microsoft Dynamics CRM online instance.


     A couple of things to note about this alternative is
    1. The solution file might increase if there are many images used in the Microsoft Word/.htm/.htm file.
    2. Andre has not tested what happens if this is used for a multi-tenant On-Premise deployment. Will the web resource still work?

    Using One Drive (or Google Drive, etc that has capability to open document online and have proper security config)

    Another alternative for those who do not have Microsoft SharePoint to host the Microsoft Word Document/.htm/.htm file is to use Microsoft One Drive.

    First, create a folder, then upload the document to that folder:
     

    Once uploaded, select the document and click on Share to manage the sharing option.


    To make the link to this document, Click “Get a link” then make the link for View Only.
     

    Copy the link and put it in the CRM entity custom help:


    Now you can view the word document online:
     

    For this alternative, someone in the customer Organisation or your Organisation will need a Microsoft OneDrive account or Google account if you’re using Google Drive. Or you can create a new Microsoft Outlook account and use OneDrive from there.

    Cheers Andre for sharing your thoughts with me and allowing me to share it with others reading this post. Please look out for the next post as Andre and I will do a joint post on how to achieve Custom Help using Microsoft SharePoint if you have Office 365.

    Summary

    Microsoft Word is your friend if you (or your customer) does not have the budget for a learning management system. It is a working solution and I think it's a suitable alternative.

    When I showed this to my team at work they thought it was a good alternative. One of the developer ninja's asked whether a web resource could be used that's in the CRM. The answer is Yes, a web resource can be used but any images would require a reference to the file path of where the image is stored - it could either be another web resource or the images could be stored in an image library elsewhere. Since I've converted the Word file into a .htm/.html file, it has automatically created the folder that contains the image references. When you copy the two files across to the server tie wwwroot folder and have the Website that you create in IIS Manager point to this folder, the webpage when clicked on in Microsoft Dynamics CRM 2015 will display the images (for example, the diagram of the Microsoft example of the new Product Structure). I didn't have to do any additional configuration in making references to the images. The webpage displays any images I had in the Word document with minimal configuration.

    You do have to keep in mind that each time you need to update the Word document, you have to delete the two old files on the server and copy over the updated Word .htm files. If your Table of Contents is updated with new headings, there may be new links for each heading. This is an administration task you have to be aware of.

    So there you have it, combine Microsoft Word and Microsoft Dynamics CRM 2015 for customized help. Thank you Microsoft Word :)

    If you have a customer that expresses interest in wanting a better learning method of the CRM for their end users, think of this alternative if the customer does not have a dedicated learning management system.

    PS: Big thanks to one of my developer ninja's who helped me out with the web site bit in IIS. I needed help with making my file accessible within our work network using IIS. I didn't know how to do it but now I do :) so kudos to you my friend. Cheers!

    Other

    OK so here's the screenshot I promised of my Dad's neat skills in Microsoft Excel. It's his flight details all organized in a single table, it even has the detail of the flight seat number (I know right!). He does this to see all his information instantly. I've always admired his dedication in preparing his version of a travel itinerary for every trip. That's my Dad and he is nerdy cool like me :) There probably is a smartphone app that can do this for him but he will still do this without fail.

    Note: I have replaced the actual flight details and destinations with made-up ones. If these are real, it is pure coincidence.

    Friday, 27 February 2015

    Diving into the Product Structure of Microsoft Dynamics CRM 2015 (and meet ET)

    09:46 Posted by Benitez Here
    In my last vlog I went through Hierarchical Security in Microsoft Dynamics CRM 2015. This time round, I'm doing a deep dive into the new Product Structure in CRM 2015. This was my biggest learning curve for Microsoft Dynamics CRM 2015. The processes you have to go through is very different from CRM 2013 and earlier versions. You have to understand the steps in creating certain records to ensure your Product Structure is set up correctly.

    Where do I go to create a Product? How do I create a Product relationship and where? Why do I need to create a Product Family? These are all revealed in this vlog post.

    I couldn't afford to cut information out in this detailed walk through. If you don't have the time available right now to watch my vlog, try watch it when you do have time as it will help you understand the Product Hierarchy in CRM 2015.

    Outline of the different components

    Product

    • A Product is the item/unit you are selling. This is the base level of the Product Hierachy.
    • You can create a Product within a Product Family or Product Bundle.
    • You can create the Products prior to creating a Product Bundle.
    • Products still use the same set up from earlier versions of CRM where a Unit and Price List is required.
    How do I know I'm in the Product?

    Product Bundle

    • A Product Bundle allows you to sell multiple products together.
    • When you create a Product Bundle, the Product Bundle becomes a Product linked to a Price List.
    • You need to make sure your Product Bundle is created from the correct Product Family that will be the Parent.

    How do I know I'm in the Product Bundle?

    Product Family

    • A Product Family is where you can group your Products and Product Bundles. 
    • You can create a Parent Family with zero products initially.
    • After you create a Product, Product Bundle, or a Product Family within a certain Product Family, that Product Family becomes the Parent Family. 

    How do I know I'm in the Product Family?

    Product Properties

    • In the Product Family you can set up the Product Properties. Product Properties are the variances, things like size, colour, texture etc.
    • Properties are added at the Product Family level in Draft or Revision state.
    • Child Products, Product Bundles and Product Families inherit from Product Properties from the Parent Family.
    • Can override Product Properties of child Products, Product Bundles and Product Families.
    • Child families can have their own Product Properties in addition to inherited ones.

    How do I know I'm in the Product Property?

    Activate Product Family

    To apply the Product Family in Opportunities, Quotes, Orders and Invoices, make sure you Publish the Parent Family. The top of the Product hierarchy has to be Published first before any Child Product Families can be published. Otherwise an error will be thrown (refer to my vlog).

    Product Relationship

    Product Relationship allows a Product or Product Bundle to be linked to other Products that can be suggested to the end user for the purpose of upselling, cross-selling, providing a substitute or accessories.

    How do I know I'm in the Product Relationship?

    Have a Price List default for an end user

    You can automatically default Prices List’s based on the Territory record associated to the CRM end user profile.
    The Price List entity has a Sub-Grid with the Connections Entity as the source.

    Icons

    The following are the icons to help distinguish the differences in the Products entity view.

    How-to scenarios

    OK so I've put together some scenarios and the end user process in CRM for these scenarios.
    1. How to create Products
    - I want to create a stand-alone Product
    - I want to create a Product within a Product Family
    - I want to create a Product Bundle within a Product Family
    2. How to create Product Properties
    3. How to create Product Relationships
    4. How to default a Price List for an end user

    The assumption is the Price List and Units have been set up, I am not covering this in these scenarios as this is not new functionality.

    1. How to create Products

    - I want to create a stand-alone Product

    The steps are
    a) Create Product from Products View by clicking on “Add Product.”
    b) Create Price List Items

    - I want to create a Product within a Product Family

    The steps are
    a) Select Product Family record from Product View.
    b) Click on “Add Product.”
    c) Enter relevant details and Save Product.
    d) Create Price List Items.

    - I want to create a Product Bundle within a Product Family

    The steps are
    a) Select Product Family from the Product View.
    b) Click on “Add Bundle.”
    c) Add the Products you want in the Product Bundle.
    d) Create Price List Items.

    This following is the sample Product Structure I have applied in my vlog post.

    2. How to create Product Properties

    The steps are
    a) Open the Product Family record.
    b) Click on the "+" icon of the Product Properties sub-grid.
    c) Enter the relevant details.

    Click here for more information on the different fields in the Product Properties record.

    3. How to create Product Relationships

    I want to suggest a cross-sell of a Product only from one particular Product.

    a) Open the Product or Product Bundle.
    b) Click on “+” Icon.
    c) Selected related Product.
    d) Set the Sales Relationship Type to Cross-selling.
    e) Set the Direction to Uni-Directional.

    My tip for Product Relationships

    When you click on the Lookup, it might not be easily deciphered what records on the list are Products or Product Bundles by looking at the icon. I found it easier to add the Product Structure field as a column to the Product Lookup View.

    The following is the sample Product Relationship I have applied in my vlog post.

    4. How to default a Price List for an end user

    a) Open the Price List.
    b) Refer to the Territory Relationships tab and click on the “+” icon.
    c) Either type the Territory Name
    Or click on “Search For More Records.” [bug which I explain later]
    Click on “Look Up More Records.”
    d) Select a Territory.
    Only assign a Territory to ONE PRICE LIST. If you assign a Territory to more than one price list, CRM will not apply the price list automatically to an Order, Invoice or Quote as CRM does not know which price list to apply. Don't confuse CRM.

    Things you need to be aware of

    Product Family

    You can't later select a different parent product family for the child products, bundles or families.

    Product Properties

    • Can only be configured in the Product Family.
    • Different prices for each property cannot be set. So if you want to price a Green Bag as $100 and Blue Bag as $200 based on the Product Property, it won't work using Product Properties. You have to create them as two separate Products.
    • Opportunities, Quotes, Order and Invoices display the Properties, you can't use it in a custom entity. 
    • Properties not displayed in Advanced Find.

    Product Relationship

    In my vlog post I could not figure out why I wasn't able to see the cross-sell relationship from the Adult Gym Membership product to the Towel Apparel Merchandise Product. This is because the Price List Item I originally created for the Towel Product was associated to the "Retail" Price List. The Order I used in my vlog post was using the "Retail Membership" Price List. Therefore the Adult Product was not displaying the suggestions of cross-selling the Towel Product due to the Price List Item being associated to the "Retail" Price List. As soon as I created a Price List Item associated to the "Retail Membership" Price List, I was then able to see the suggestion of selling the Towel Product in the Order.

    So if you create a Product Bundle and any associated Product does not have a Price List Item associated to the Price List linked to the Order, Invoice or Quote, it will not show as a suggestion.

    Summary


    Products in Microsoft Dynamics CRM 2015 took me a while to understand and from my vlog post, you can see I slipped up when I wanted to show you how to create a Product Relationship by going to the Product Family. I had forgotten I needed to do it as the Product level.

    So to help with your learning in understanding and remembering how things work in Microsoft Dynamics CRM 2015, I have conjured up a magic triangle which I have called "ET," Elaiza's Triangle. Ta da!


    The following is outlined in ET:
    • Product Families are at the top of the hierarchy
    • Products and Product Bundles are underneath Product Families
    • Product Properties are created at the Product Family level and is inherited by Products and Product Bundles
    • Product Relationships are created at the Product and Product Bundle area
    For further information on the Product Structure, refer to the Microsoft Customer Centre.

    Thank you for watching and reading this long post. I have shared my knowledge with you and I hope you have a better understanding of the Product Structure in CRM 2015. Awesome sauce!

    Toodles.