Fast forward to today, there’s now Power Apps Cards in preview. Power Apps Cards is the next step up from Adaptive Cards and you can use them with Power Automate cloud flows. In this WTF episode I’ll share how to open model-driven app forms and views from Power Apps Cards.
If you want to learn more about Power Apps Cards, I recommend watching a couple of videos.
I’m going to use the same use case in the last WTF episode. Whenever a new Challenge is created in Dataverse, post a Card into a Microsoft Teams channel with two hyperlinks to open the model-driven app form and view.
What I'll cover
Create a Power Apps Card
How to reference environment variables using PowerFx in Cards
Using the Card in Power Automate cloud flow
Create a new Power Apps Card
The starting point is similar to when you build a Canvas App, Cards can be created from make.powerapps.com.
Now initially, you may think that you can create a card inside a solution by clicking on +New, select More, select Other and then select Card.
However when you do this, you end up with the below, which isn’t correct.
Keep in mind that this is the current experience when filming this WTF episode, it could change in the future. **EDIT 20/11/2023 - Cards can now be created in a solution as of Nov 2, 2023. Read more here.**
What you need to do is click on More in the left-hand side menu pane, and you’ll see Cards. You can then pin it and it will display permanently in the menu.
When you select Cards form the menu, you will first see your cards, and the next tab will display both yours and your team’s cards.
Click on New Card or Create a Card, followed by entering a Name and Description for your Card.
After you click on create, the Power Apps Card designer will appear. It will look familiar because it’s similar to the Power Apps studio user interface. You have,
The tree view to see your screens and elements.
There’s the drag and drop UI elements, such as adding inputs and changing the layout. There are some UI elements that aren’t available compared to the ones available in Power Apps studio so keep that in mind.
You also have the same ability of adding data sources.
There’s variables, which I’ll cover shortly.
1. Add data source
The first thing to do is add your data source. As of when this WTF episode was filmed, Dataverse is the only connection available, but the product team will be enabling other connections in future updates.
Since we’re applying the same technique from the last WTF episode of using environment variables to build URLs for model-driven apps, we'll need to reference the relevant tables using the Dataverse connector. Add the following Dataverse tables,
Environment Variable Definition - This is the table that contains the Environment Variables that have been created in a solution.
Environment Variables Value - This is the table that contains the current value of an Environment Variable.
2. Create variables
The second thing to do is create variables for the cloud flow. These variables will become input values in the Power Apps Cards action in the cloud flow.
Several variables are required to be created. First, there's variables that will be used on the interface of the card, I’ll refer to these as visible variables. Secondly, the other variable will be one that won’t be used in the interface of the card, but in the background. I’ll refer to this as an invisible variable.
For the visible variables, they will be the values from the table columns of the newly created Challenge in Dataverse. I’ll display the following from Dataverse,
Name of the Challenge
Description of the Challenge
Owner of the Challenge
I’ll create a variable for the Name of the challenge by selecting Variables in the menu and click on + New variable.
This is the variable for the Name of the challenge,
I'll explain what some of the fields are.
Type
For the Type dropdown field I’ll keep it as Text.
Default Value
The Default Value field implies what you want the value to be when the Power Apps Card is created. It’s optional and for my use case, I want to leave it blank since it will be populated by the cloud flow.
Value settings - Persistence
Next, there’s two options on whether the value of the variable is either reset each time the card is opened or is left as-is. For my use case I will be using the Permanent option.
Value settings - Customization
Now the next couple of checkboxes were confusing initially. I reached out to Matt Maclaurin and Anthony Uitz in the Power Apps product team.
For the When sending this card, this value can be cutsomized checkbox, this will turn the variable into an input for the card.
For the Customization is required checkbox, the value of the variable is required, in other words mandatory, to be set by the cloud flow, power virtual agent bot or from the Cards play page. The play page is when you are copying and pasting the link to send through a Microsoft Teams message. Since the variables will be populated through the cloud flow, I’ll tick these two checkboxes.
Additional variable information
When you expand the additional variable information, Title and Description appears. These will be visible in cloud flows and in bots for Power Virtual Agents.
Repeat the above to create the rest of the visible variables, Description and Owner, and for the invisible variable, the GUID of the challenge.
3. Add controls to the Card
After the data source has been added and the variables have been created, it's time to create the Card.
By default, there will be a couple of controls already added to the screen of the card.
For the first control,
I updated the name of the Text Label where I've followed Matt Devaney's Power Apps coding standards for canvas apps when naming controls. Highly recommend you check out this free resource when building your apps or cards.
I also updated the text to be the title of the card. For a bit of fun, I inserted the lightbulb 💡 emoji.
I then updated the style by making the text larger.
I'll next update the second control,
I updated the name of the text label
I updated the text as the Name of the Challenge
I also updated the style by making it bolder
Next, I added a few more controls.
Under the Name text label, I added another text label with a name of txt_varChallengeName
For the text property, this is set to the varChallengeName variable. This will be populated through the cloud flow.
The spacing of the text label was updated to none.
This will be the structure I apply to mimic key-value pairs like in Adaptive Cards where I have one text label acting as the key, and the other acting as the value.
I’ll repeat the steps for the two other visible variables of Description and Owner. I’ll have a text label that acts as the key, and another text label that will be the value which will reference the input variables created earlier in this episode.
The last two controls are the buttons that a user can click/tap on to open the challenge form in the model-driven app, or view all Active Challenges in the model-driven app. This will be the same functionality as you saw in my previous WTF episode where a user will click on the hyperlink, and it will open either the form or the view in the model-driven app.
Add the button control and name the button, followed by entering a title for the button.
As a reminder the following are the query parameters when opening a form in model-driven apps.
You need the Dataverse or Dynamics 365 environment URL.
The appid or appname query parameter.
The value of the appid or appname query parameter.
The pagetype query parameter where the parameter value is entityrecord.
The etn query parameter which is the logical name of the table.
And the ID of the challenge.
For opening a system view in model-driven apps, it’s the same except the pagetype query parameter is entitylist, the viewid is the id of the view, and the viewType is 1039 which is the definition for system views.
The URL is going to be built within the property of the button using PowerFx. The formula will be very similar to what I showed in the last episode where I shared how to build deep links to open model-driven apps in Power Apps mobile. Environment Variables will be referenced again using PowerFx. I’ll be using the same environment variables in a solution that you saw from the last WTF episode.
If you’re familiar with canvas apps, the launch function can be used to direct a user to a browser and load the URL which I showed you in the last episode. However, in Power Apps Cards, if you try entering the Launch function in the On Select property of the button control, you’ll come across this error message because it’s currently not supported in Power Apps cards.
So, what can we use since the launch function is not currently supported? Well, we can switch the Type over to Open Url, and then use PowerFx to build the URLs.
Shout out again to Anthony Uitz for answering my question when I was scratching my head over why I couldn’t use the launch function and he guided me towards this. One thing to be aware of is that the URL string must start with https, colon, and forward slashes (https://) otherwise it won’t work.
To build the URLs, I’ll be concatenating strings again as seen from the last two episodes. I’ll use string interpolation rather than the concatenate function or the ampersand operation. I’ll refer you again to Matt Devaney’s blog post, where he explains how to use the string interpolation method in detail.
The following is the PowerFx expression for the View Challenge button.
Tip: Currently the PowerFx bar in Power Apps Cards doesn't have formatting or the ability to drag the bar to expand it, like in Power Apps studio. What I like to do is build my expression in Power Apps studio, format it, and then copy it over.
Note: You'll also see yellow squiggly lines which is a delegation warning that you can safely ignore. Delegation in PowerFx cards doesn’t have the same support as delegation in canvas apps but because the expression is only performing a string comparison on a single field, it’s fine.
The following is the PowerFx expression for the View Active Challenges button.
Now, the cool thing about Power Apps Cards is that you can preview your card in real-time with the data which you can’t do in Adaptive Cards. This is through the Play button. A new browser tab will open, and you’ll first be prompted to enter the values for the required input variables. You can copy and paste the values from a row/record in your model-driven app.
The Card will then load, and you can see the data.
This Send button will generate a link that you can copy and paste into a Microsoft Teams message. Since this card will be populated by a Power Automate cloud flow, we won’t be using this feature. Let’s next learn how to pass values from cloud flow to the input variables in the card.
Building the cloud flow
In my cloud flow I have my trigger which is when a new Challenge is created in Dataverse, followed by an action that will retrieve the user details of the Owner associated to the Challenge.
To call the Power Apps Card, add a new step and search for Cards for Power Apps and select the connector. You’ll see two actions and the one to select is Create card instance. In the dropdown field, select the card that you want to create.
You’ll then see the input variables as input values for the action. This is the title and the description of the input variables from the Card.
I’ll use dynamic content from the trigger to as the input values for the Challenge Name, Description, and Challenge ID.
For the Owner, I’ll use dynamic content from the previous action to reference the full name from the User table.
Next, add a new step and search for the action, Post card in a chat or channel. In the Post as dropdown field, select Power Apps. Then select where you want to post the card to. I’m posting to a Channel, and I’ll select the Team and the channel. Lastly, select the Card input value as dynamic content. And that’s it, save the cloud flow and it’s ready to be triggered.
Card in action
I create a new Challenge in Dataverse in the Innovation Challenges model-driven app, this will trigger the cloud flow. The cloud flow will then create a Power Apps Card and using the dynamic content from the trigger and previous action, it will populate the input variables of the card. The Power Apps Card will then be posted to a channel in Microsoft Teams.
Summary
Power Apps Cards allows you to create reusable cards that can be saved in the Power Apps maker portal which makes it easier to maintain compared to Adaptive Cards. You can also create variables in cards, and use them as visible or invisible variables which can be populated by a cloud flow or a bot in Power Virtual Agents.
Power Apps Cards is one method that you can use to create Dataverse notifications for users by making use of
variables to display data from Dataverse through a cloud flow
embed hyperlinks in the buttons using PowerFx that reference Environment variables in a solution
All of this is achieved without code with Power Platform 😊
Hope you learnt something new and thanks for stopping by 👋🏻
In the last WTF episode I shared how to build URLs to open forms and views in model-driven apps using environment variables.
Now I did say that I would next cover Power Apps Cards towards the end of the WTF episode but I came across a bug 😓 which I reported and the fix is going to be rolled out (maybe by the time this blog post is published). I had to pivot and brought this episode forward.
This time round, I’ll share how to open model-driven app forms and views from a canvas app in a model-driven app within Power Apps mobile. Switching from canvas apps to model-driven apps in Power Apps mobile is so simple. This is achieved by using deep links inside buttons in canvas apps using Environment Variables. There can be use cases where you want to direct users from a canvas app, to the data in a model-driven app form or view.
The technique is similar to what I shared in the last WTF episode except this time, the Environment Variables are being referenced in PowerFx, rather than cloud flow expressions.
Breaking down deep links for model-driven app forms or views in Power Apps mobile
The base query parameters are similar to what I shared in the last episode with minor differences. All of these base query parameters can be created as Environment Variables in a solution.
1. The first query parameter is targeted-app.
To load any model-driven app, the query parameter value is ms-apps as outlined in the Microsoft Learn documentation. Create an environment variable with ms-apps as the current value.
2. The second query parameter is org-url.
This is the Dataverse environment URL without the https, colon and forward slashes (://)
Create an environment variable with the Dataverse environment URL as the current value.
3. The third query parameter is the appid.
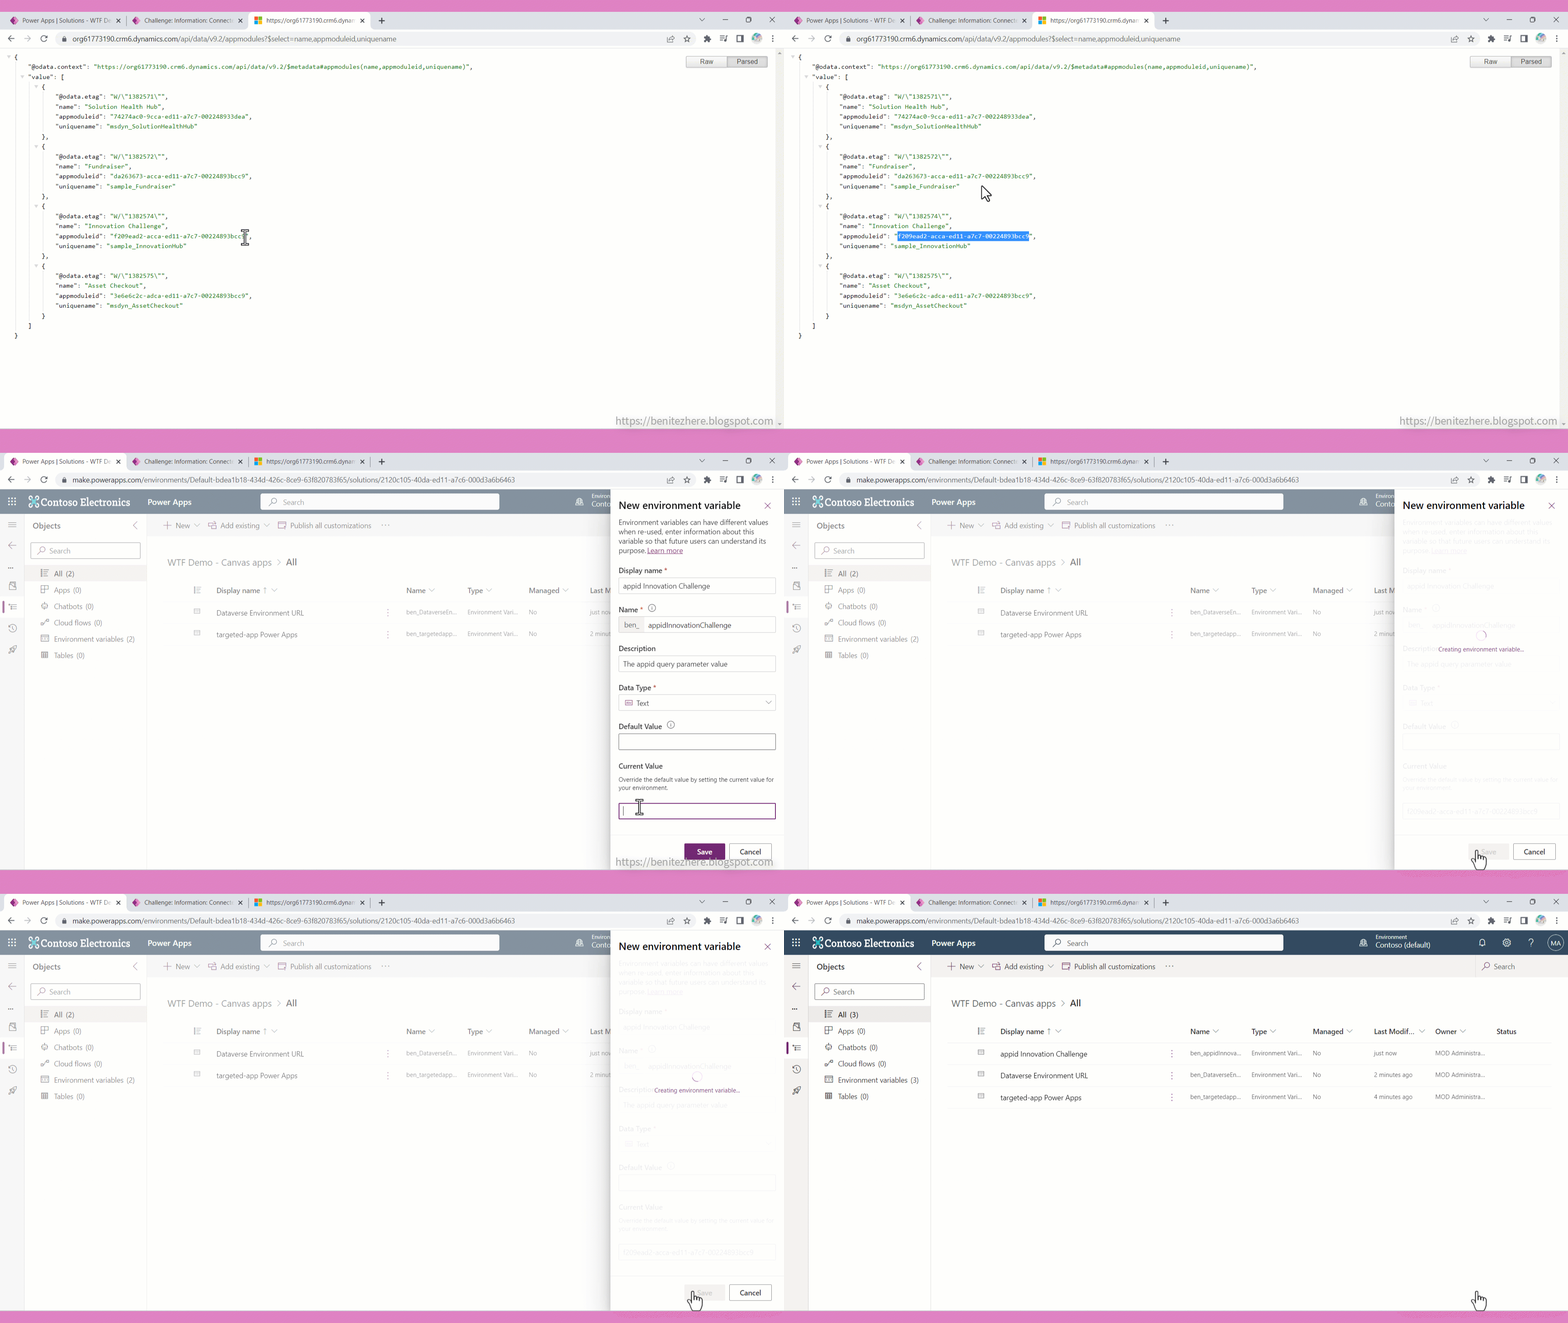
In a solution create an environment variable for the app-id query parameter value.
You can find the appids of your model-driven apps by using the GET request I showed you in the previous WTF episode and copy the appmoduleid value and paste it into the environment variable.
The fourth query parameter is the tenant id of the environment where your model-driven app lives in.
In a solution create an environment variable for the tenant id. The tenant id can be found by navigating to make.powerapps.com, click on settings on the top right and select session details. Copy the tenant id and paste the copied tenant id into the environment variable.
Putting it all together with the form or view query parameters - it’s the same as what I covered in the last WTF episode. For a form it’s the following where the pagetype is entityrecord and the query parameters of the Challenges table logical name and ID of the challenge are included.
For a view it’s the following where the pagetype is entitylist and the query parameters of the Challenges table logical name, view id and viewtype are included.
Building deep links in Power Apps studio
Next, let’s understand how to build the deep links for the Power Apps mobile app in Power Apps studio. First, make sure you have the Dataverse tables of Environment Variable Definition and Environment Variables Values added as data sources.
To keep it simple for this episode, I’m using two screens and the design is very basic. The first screen is a gallery that displays all active challenges from Dataverse.
The second screen displays some data from the Challenge selected in the gallery.
There are two buttons in this screen which is the same as the two hyperlink I showed you in the last WTF episode.
The first button, Edit Challenges, will open the form for the selected Challenge.
The second button, View Active Challenges, will open the view for the Active Challenges system view in the model-driven app.
Several expressions and functions used in PowerFx
In the OnSelect property of the button, by default it will be false. I’ll use PowerFx to build the URL to open the form and view in the Power Apps mobile app for the model-driven app.
There's several expressions and functions I'm going to apply in PowerFx.
String interpolation
What I’m going to do is concatenate the Environment Variables and string values to build the deep link. I’ll use string interpolation that came into support in April 2022 instead of using the concatenate function or ampersand character in PowerFx.
As per the Microsoft Learn documentation, "Prefix the text string with a dollar sign $ and enclose the formula to be embedded with curly braces { }."
This is what will be applied in PowerFx to create the address for the Launch function.
➡️ If you want to learn how to use string interpolation, check out this awesome blog post by Matthew Devaney, another Microsoft MVP in our community who covers it in detail.
Launch function
To open model-driven apps in Power Apps mobile, use the Launch function for the deep link. There’s three parts to the function,
address which is mandatory
parameters and target is optional
I’ve found that parameters is not needed in the function as the query parameters for model-driven app forms and views are part of the address.
I also found that target is also not needed in the function as it’ll open the model-driven app in the Power Apps mobile app without providing a target. So address is the only one I’m using in PowerFx to build the URL.
LookUp function
To reference Environment Variables in PowerFx, the key thing to understand is to
Retrieve the Environment Current Value
Where the parent record equals the Environment Variable you're after
Underneath the hood in Dataverse, there's two tables in Dataverse.
Environment Variable Values - this is where the current value of an Environment Variable lives
Environment Variable Definitions - this is the "parent record"
For example, for the first parameter of targeted-app, the Environment Variable current value needs to be retrieved. To achieve this, retrieve the current value from the Environment Variable Value table that is associated to the Environment Variable Definition that equals the target-app parameter.
We can use logic in PowerFx to retrieve the current value where the Environment Variable Definition equals the target app Environment Variable.
You can watch this part of my video where I explain this in detail for your understanding.
What the PowerFx formula looks like
Open model-driven app form
For the OnSelect property of the Edit Challenges button in the canvas app, the following is what the PowerFx formula will look like for opening a model-driven app form in Power Apps mobile.
The Launch function is first referenced, followed by string interpolation, which starts with the dollar sign character and double quote, followed by the functions and formulas being delineated by curly braces. To complete the string interpolation, use a double quote. Then, to complete the Launch function, use a closing bracket.
This is similar to what I covered in the last WTF episode, and in this episode the Environment Variables are being referenced in PowerFx, rather than cloud flow expressions.
The minor difference in PowerFx when referencing the ID (Dataverse GUID) of the Challenge row is to use an expression that retrieves the ID from the selected Challenge in the gallery (from the first screen in the app).
Open model-driven app view
For the OnSelect property of the View Active Challenges button in the canvas app, the following is what the PowerFx formula will look like for opening a model-driven app system view in Power Apps mobile from a button in canvas apps.
It’s mostly the same with the only difference of changing the pagetype to entitylist and referencing the viewid environment variable along with providing the viewType definition of 1039 for system view. As a reminder, I did cover this in my last WTF episode so check out that episode if you haven’t already done so.
And action!🎬 Open the form or view in model-driven apps from canvas apps in Power Apps mobile
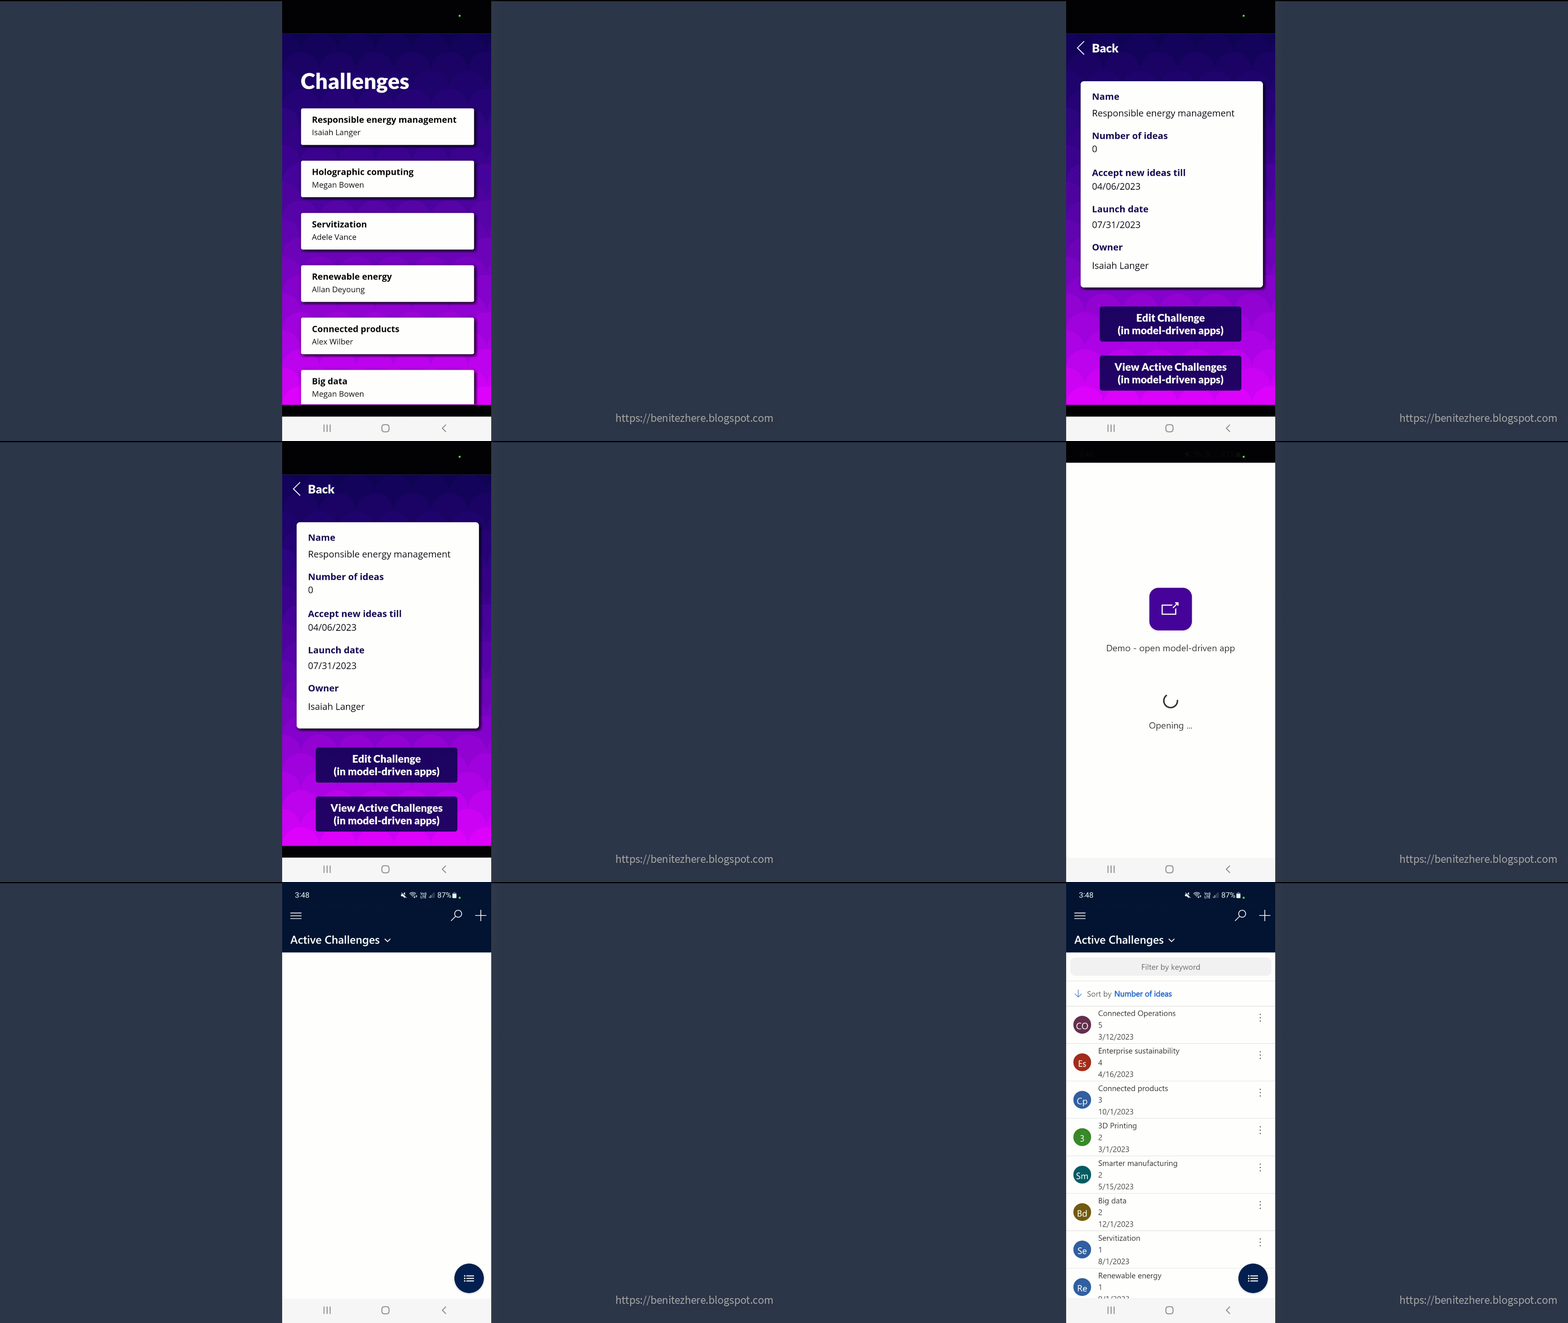
I'll open the canvas app on my mobile phone, and select a Challenge from a gallery.
After the Challenge loads, I'll tap on the Edit Challenges button in canvas apps and it'll open the Challenge in the model-driven app in Power Apps mobile. Awesome sauce!
I'll go back to the canvas app, select a Challenge from the gallery again, and tap on the View Active Challenges button. It'll once again open the Challenge in the model-driven app in Power Apps mobile. Pretty cool 😎
Summary
In canvas apps, you can use Environment Variables in PowerFx to build deep links to open forms or views in model-driven apps within Power Apps mobile. This allows users to switch from canvas apps to model-driven apps with one tap/a single tap 🤳🏻
Hope you learnt something new 😊 and stay tuned for the next episode where I'll cover how to do the same in Power Apps Cards - pending bug being fixed 🤞🏼
Earlier this year I did a webinar with XRM Vision, a Microsoft partner based in Montreal, Canada. I showed how a Revenu Québec form can be automated using the Documentation Automation Toolkit. In the webinar I showed the Document Automation Toolkit in action including
the prerequisites
how to install
configure the Document Automation Toolkit
build an AI Builder Form Processing model
end-to-end demo of automating the Revenu Québec form
Towards the end of the webinar I mentioned that currently only 27 of the fields from the Revenu Québec form are included in the automation. Even though I built my AI Builder Form Processing model with 34 fields, only 27 fields were displayed in the Document Automation Application Canvas app. This is because only a maximum of 27 field have been defined in the Documentation Automation Toolkit. I said I'd be sharing soon how to extend the Document Automation Toolkit to include all fields. Well that time has come and this is what you'll learn in this #WTF episode 😊
When an email is received and the attachment is the Revenu Québec Self-Employe Net Income form,
I want the data to be automatically extracted,
So that I don't have to enter it manually into our system
AND
I also need the ability to review the data extracted,
So that I can correct the data where relevant
Document Automation Toolkit components that need to be updated
To include the additional 7 fields (34 - 27 = 7), three components need to be updated in the Document Automation Toolkit solution.
1. Dataverse table
The Document Automation Data table needs to be updated so that it can reference the additional 7 fields. There are two sets of fields that need to be created. The first set of fields are for the Data values, the other set of fields are for the confidence score (displayed as a percentage) when the AI Builder Form Processing model extract the information based on the mapped fields defined in the model.
2. Cloud flow
The Document Automation Processor cloud flow needs to be updated so that the new fields in the Document Automation Data table are updated. This is so that
The value extracted from the 7 fields are stored in Dataverse
The values are displayed on the Canvas app
3. Canvas app
The Document Automation Application Canvas app needs to be updated so that two screens in the app display the 7 fields.
The first screen is used by end users who will be configuring the Document Automation Toolkit including the app. In this screen the end user can see the mapped Revenu Québec fields and its values defined by in the AI Builder Form Processing model.
The second screen is used by end users who will be manually reviewing the data extracted by the AI Builder Form Processing model with the form uploaded.
Steps for extending the Document Automation Toolkit
Step 1 - Create a new solution and add the components
A new solution needs to be created so that the components can be configured. This is because the Document Automation Toolkit is a managed solution and if you make change directly in this managed solution, it will create an unmanaged layer.
In the new solution add the components from the Document Automation Toolkit solution. In my #WTF episode I added the following components.
Canvas app
Document Automation Application
Dataverse tables
Document Automation Configuration
Document Automation Data
Document Automation Processing
Document Table Data
Document Automation Table Taxonomy
Document Automation Taxonomy
Power Automate cloud flows
Document Automation Email Importer
Document Automation Processor
Document Automation Validator
Now when I think about it, I only needed to add the three components I outlined in the previous section rather than all of the components in the original Document Automation Toolkit solution 😂
Step 2 - Add columns to the Document Automation Data table
Depending on the number of fields in your form, the difference needs to be created in this table.
In my scenario I had a total of 34 fields I was automating. The difference between the 27 fields and the total of 34 fields is 7 fields. I needed to created 7 fields for the Data and 7 fields for the Accuracy Percentage.
I created columns Data28 to Data34. This is the value of the data extracted from the form as defined by the field mapping in the AI Builder Form Processing model.
I created columns Metadata28 to Metadata34. This is the confidence score from the AI Builder Form Processing model of the value extracted from the form.
Step 3 - Update the Document Automation Processor cloud flow
One of the core actions in this cloud flow stores the extracted data in the Document Automation Data table. With the columns added in Step 2, the respective fields in the action also need to be updated. Browse to the Document Automation Processor cloud flow and click Edit. Scroll down to the "Create document processing data" action and again, scroll down until you see the new columns added in Step 2.
In my scenario it's Data28 - Data34. Click on Data27 and copy its expression. Click on Data 28 and paste the expression into this field. Update the expression to reference Data28 column.
variables('DataDictionary')?['Data28']
Repeat for the remaining DataXX columns you created in Step 2.
Next, apply the same steps to the Medtadata columns created in Step 2. Click on Metadata27 and copy its expression. Click on Metadata28 and paste the expression into this field. Update the expression to reference Metadata 28 column.
variables('DataDictionary')?['Data28_confidence']
Repeat for the remaining MetadataXX columns you created in Step 2.
Step 4 - Update the Document Automation Application Canvas app
There are several controls that need to be updated in the Document Automation Application Canvas app.
Fields mapping screen
1. Expand the Fields mapping screen.
2. Select the Hidden Mapping Refresh Button.
3. Select the OnSelect property as the formula needs to be updated.
4.Expand the formula bar and scroll down to the Patch function to update the JSON.
5. Copy an existing row such as Data26.
6. Enter a new line, followed by pasting the content.
7. Update the Name, Index and remaining functions to reference 28.
Repeat for the remaining DataXX columns you created in Step 2.
This will display the DataXX columns created in Step 2 in the screen for the end users who will be configuring the Document Automation Toolkit.
Document Detail Screen
1. Expand the Document Detail Screen.
2. Click the Document Header Form. If you scroll down, you'll see that there are DataCards for the 27 columns. New DataCards need to be added to the Document Header Form control to display the DataXX columns and MetadataXX columns created in Step 2.
3. Click on Edit fields.
4. Click on Add field.
5. Search for Data28.
6. Select Data28.
7. Click Add.
A DataCard control will now be added to the Document Header Form. Scroll down to see it.
8. Unlock the DataCard for Data28
9. Select all the controls within the DataCard and delete them. Yes, delete them - don't worry! Trust me!
10. Select one of the existing DataCards such as Data26_DataCard1.
11. Copy all of the three controls.
12. Select Data28_DataCard1 control and paste (hit CTL + P on your keyboard). The three controls will now appear.
13. Update the name of the first control to reference 28 - DataCardConfidence28
14. Update the name of the second control to reference 28 - DataCardValue28
15. Update the name of the third control to reference 28 - DataCardKey28
16. Select one of the existing DataCards such as Data26_DataCard1.
17. Select the DisplayName property.
18. Copy the formula.
19. Select Data28_DataCard1 control.
20. Select the DisplayName property.
21. Paste the formula.
22. Update the reference to 28.
23. Select the DataCardConfidence28 control.
24. Select the Text property. 25. Update the formula to reference Metadata28.
25. Rearrange the placement of the controls in the DataCard to to be in alignment to the other DataCards. Repeat for the remaining DataXX columns created in Step 2.
26. Save the Canvas app.
27. Publish the Canvas app.
That's it - that's how you extend the Document Automation Toolkit! Awesome sauce 😊
Document Automation Toolkit in action
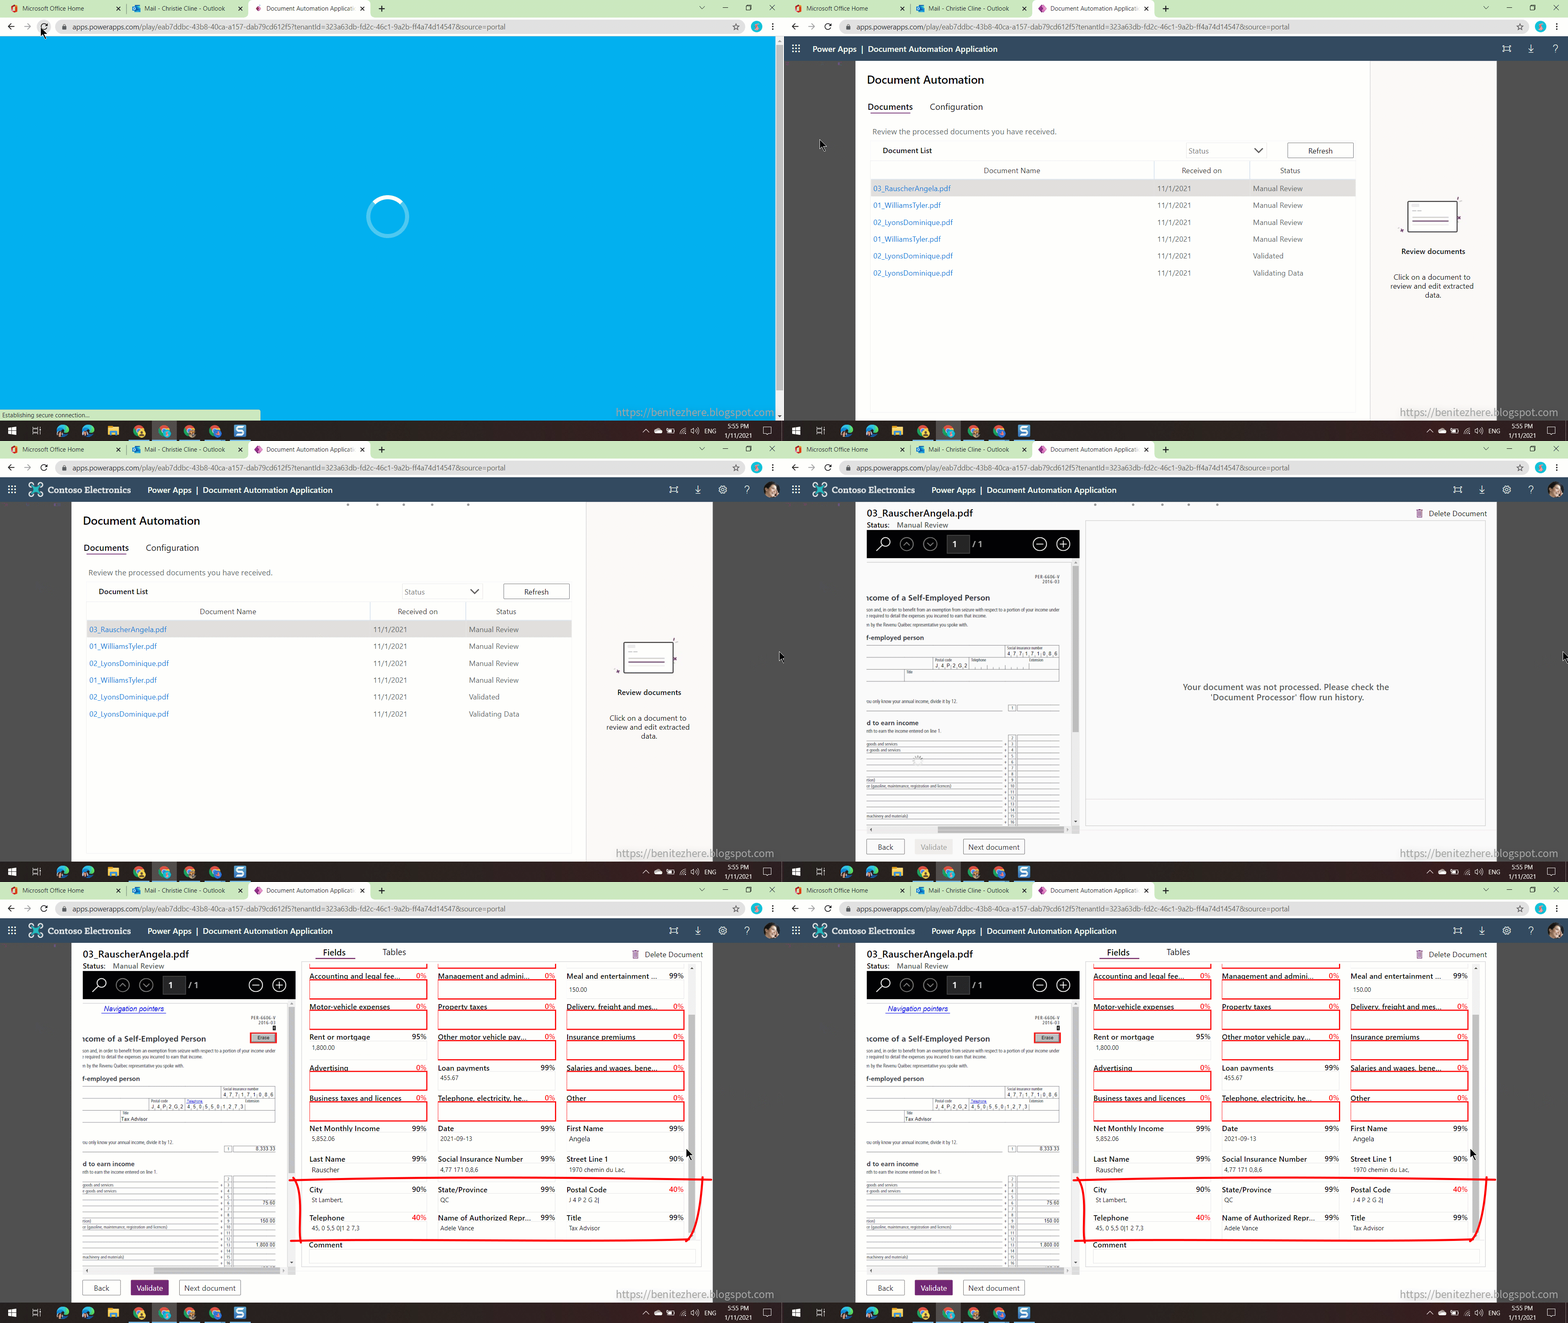
Trigger the automation by sending an email to the Inbox email address configured in the cloud flow.
As manual reviewer, load the Document Automation Application Canvas app and you'll now see the additional fields 🙂
Summary
If you need to display all the fields that you've defined and mapped in your AI Builder Automation Form Processing model in the app that comes with Document Automation Toolkit solution, follow the steps above. By adding the columns beyond the 27 default fields, updating the cloud flow and the Canvas app extends the Document Automation Toolkit to suit your requirements.