I'm no longer a Microsoft MVP after being one for the last 6 years.
I have joined the Microsoft Cloud Advocates team as a Senior Developer Advocate in April Dunnam's Power Platform advocacy team. I'm the newest addition to the team after Scott Durow joined in October and will be working alongside Gomolemo Mohapi, Shavonna Jackson and Daniel Laskewitz.
In our Power Platform team we engage with the technical communities focused on Power Platform to
Help educate and raise awareness of developing solutions with Power Platform through the form of different types of content - think videos, blogs, samples, learn live sessions during Microsoft events, present virtually or in-person at conferences and events, and much more.
Relay feedback and concerns the technical community has to the engineering teams to help close gaps.
We have a number of avenues you can follow to learn about the Power Platform or keep up to date:
I am excited to represent this side of the world. I do want to shine the spot light on South East Asia, Australia, New Zealand and the Pacific Islands. I am interested in connecting with the Power Platform community (if it exists) in the Pacific Islands so if you are based there or know someone, let's connect 🙂
Microsoft Cloud Advocates is a global team so I'll be based in New Zealand working remotely.
Goodbye to being a Microsoft MVP
Reflecting back on my Microsoft MVP journey
2010 was when I started with Dynamics CRM 4.0. I was fresh out of university and started out in the Sales team for a Microsoft partner here in New Zealand. I learnt everything I knew from former colleagues Sophie Khun-Hammond, Maryse Botros and Brent Wimmers. The internet was also another good source of learning - who can forget the original http://msdn.microsoft.com/en-us/library/ for the documentation on Dynamics CRM 😁 and some of the people I followed during this period of the early years in my career were,
I had no idea I'd be meeting three of the people mentioned above years later at my first and only ever Microsoft MVP Summit back in 2019, and Aileen during my #EWorldTour when I stopped by in Singapore.
— Elaiza Benitez #LetsAutomate (@benitezhere) June 21, 2019
The "push" of encouragement
Along the way I learnt more of Dynamics CRM by trying, failing and succeeding. A lot of online content back then were blog posts and the videos posted on YouTube were of recorded webinars. There weren't any shorter intimate videos that zoned in on the "how-to" do something or troubleshoot. I wondered if I should start recording myself and uploading to YouTube. I used to be a tutor at university teaching 3rd year undergraduate students so why not try YouTube? At the same I was scared.
One day I commented on a LinkedIn post of Ben Hosking's, where he posted a video of him attempting to record a video and having fun being on camera, but also announced he was going to start posting videos. My comment was some where along the lines of how I've always wanted to do videos but don't have the courage to do it. Ben messaged me privately on LinkedIn and encouraged me to go for it. After mulling over it, in May 2014 I posted my first video on YouTube. (I just watched a couple mins of it and I have evolved since that first video!)
I followed his advice of having a blog site and a corresponding blog post to compliment the video. I then learnt that my blog post should be a mirror image of video in written format to cater for audiences who learn by reading. Over time my content improved.
I filmed after hours in the office of the Microsoft partner I used to work for and edit my videos and write the blog post after work and on weekends. This continued for a number of years. As Jukka pointed out in his recent blog post, I did it because I wanted to share my knowledge and was not expecting anything in return. I was passionate about what I did and my aim was to help at least one person. I was (and still am) not focused on the number of views or subscribers, I only want to help others.
I didn't promote my content in the early years. I was silent in posting videos because I was afraid people would judge my content in a negative manner. Plus as a much younger person stepping into a pool of respected experts, my level of confidence was low. I didn't join Twitter (now known as X) until 3 years later in 2017.
One person who noticed my stuff was Natraj Yegnaraman and he would tweet my blog posts. I still remember when someone thought that my blog post Natraj tweeted was his but Natraj corrected the person in saying it wasn't his post, and attributed it back to me. Thank you Natraj for noticing a "nobody" back then.
The day I was awarded as a Microsoft MVP
I never thought about being a Microsoft MVP and it was not something I aimed for. The one time I did think about it was when Aileen Gusni was awarded in 2015. Being an Asian female myself, it was amazing to see someone who looked like me be awarded. In the back of my mind I thought if she is one, maybe I too can be an MVP one day.
Fast forward to 2017, Andre Margono, friend and community member nominated me to the Microsoft MVP Award program. I don't know if it's still the case now, but back then you received an email that informed you of being nominated by someone. After about 9 months from when I was nominated, in May 2018 I was awarded - 4 years later from blogging and posting on YouTube.
I still remember it. I was in the office and my project team was scheduled to do a UAT deployment that morning. Everyone else had gone out for coffee except for Ketan Chowhan, my former colleague at the time.
I decided to check my emails while waiting for my colleague to confirm the UAT deployment was complete. I saw the infamous "Congratulations" email. I read it twice in silence and turned to Ketan, asked him if it was real. He took a look and said YES!!! And yeah celebrated that day with my Melbourne team in the office. I ended that memorable week by watching The Killers live in concert (which is still my favourite concert till this day).
Eventually I received my MVP Award kit and did an unboxing video ⤵️
The following year in 2019 I attended Microsoft MVP Summit which I'll never forget. Meeting like minded friends from around the world finally in-person was an amazing time, as well as meeting with the PMs.
Top: Myself, Mark Smith and Jerry Weinstock Bottom Left: Guido Preite, Natraj Yegnaraman, Antti Pajunen, myself
If you do want to learn about the Microsoft MVP Award program, Elizabeth Pappalardo who is currently the Community Program Manager for the South APAC region spoke about it at a virtual event.
Thank you, a new chapter awaits
And now I say farewell to the Microsoft MVP award program.
It's been one heck of a ride. I have mentioned the positives but behind the scenes there's a lot more that goes on. It hasn't always been smooth sailing and in all honesty - only those closest to you in your household recognize your true effort. My life from when I started my blog and YouTube journey back in 2014 is different to what it is now. I have my family to look after these days and have accumulated more responsibilities as I age - hooray for being an adult lol. (Btw - some people don't believe me when I say I'm near to reaching my 40s 😄)
In my career I "grew up" with a lot of well known figures from the CRM space, followed by Power Platform when it came into the picture in 2016. The width of the community grew and so did the go-to people for learning either tech. To mention a few who popped up as Power Platform matured,
Those mentioned above are now the Jukka Nirranen, the Clarissa Simpson, the Adam Vero, the Donna Edwards, the Jason Lattimer, the Roohi Shaikh, the Jerry Weinstock, the Daniel Cai, the Gus Gonzales for others now starting their journey with Dynamics 365 or Power Platform. I have a separate page on recommendations of others to follow so please take a look when you can.
To the NZ BizApps family: I hope that you will support the next female who is awarded in our country as I leave being the only female MVP in BizApps. I took a screenshot of the fam as a time stamp into history.
Business Process Flows have existed since Dynamics CRM 2013 and continues to be supported in Dataverse and model-driven apps.
Earlier this year in Novemeber, I presented two sessions at the Microsoft Power Platform Conference 2023 and one of them was Summarizing Business Process Flows to help you get started which I’ll cover in this WTF episode blog post.
I'll be covering the following:
What is a Business Process Flow?
What is a Business Process Flow?
Elements of a Business Process Flow
Create a Business Process Flow
Create a Business Rule in a Stage
Assign security role to a Business Process Flow
Create a cloud flow to run from a Step
Create a classic workflow to display an error message to users on exit of a Stage
Update the Business Process Flow with #6 and #7
Demo - the Business Process Flow in action
1. What is a Business Process Flow
It’s a visual user interface in model-driven apps to guide users in understanding the steps to complete for an organisation process, and ensures the same steps are followed by users each time. Business Process Flows are online based and are visible only in model-driven app forms.
2. Elements of a Business Process Flow
Let’s take a closer look at the different elements.
Each Business Process Flow will be associated with a primary table in Dataverse. In this example, this Business Process Flow is associated to the Idea table in Dataverse.
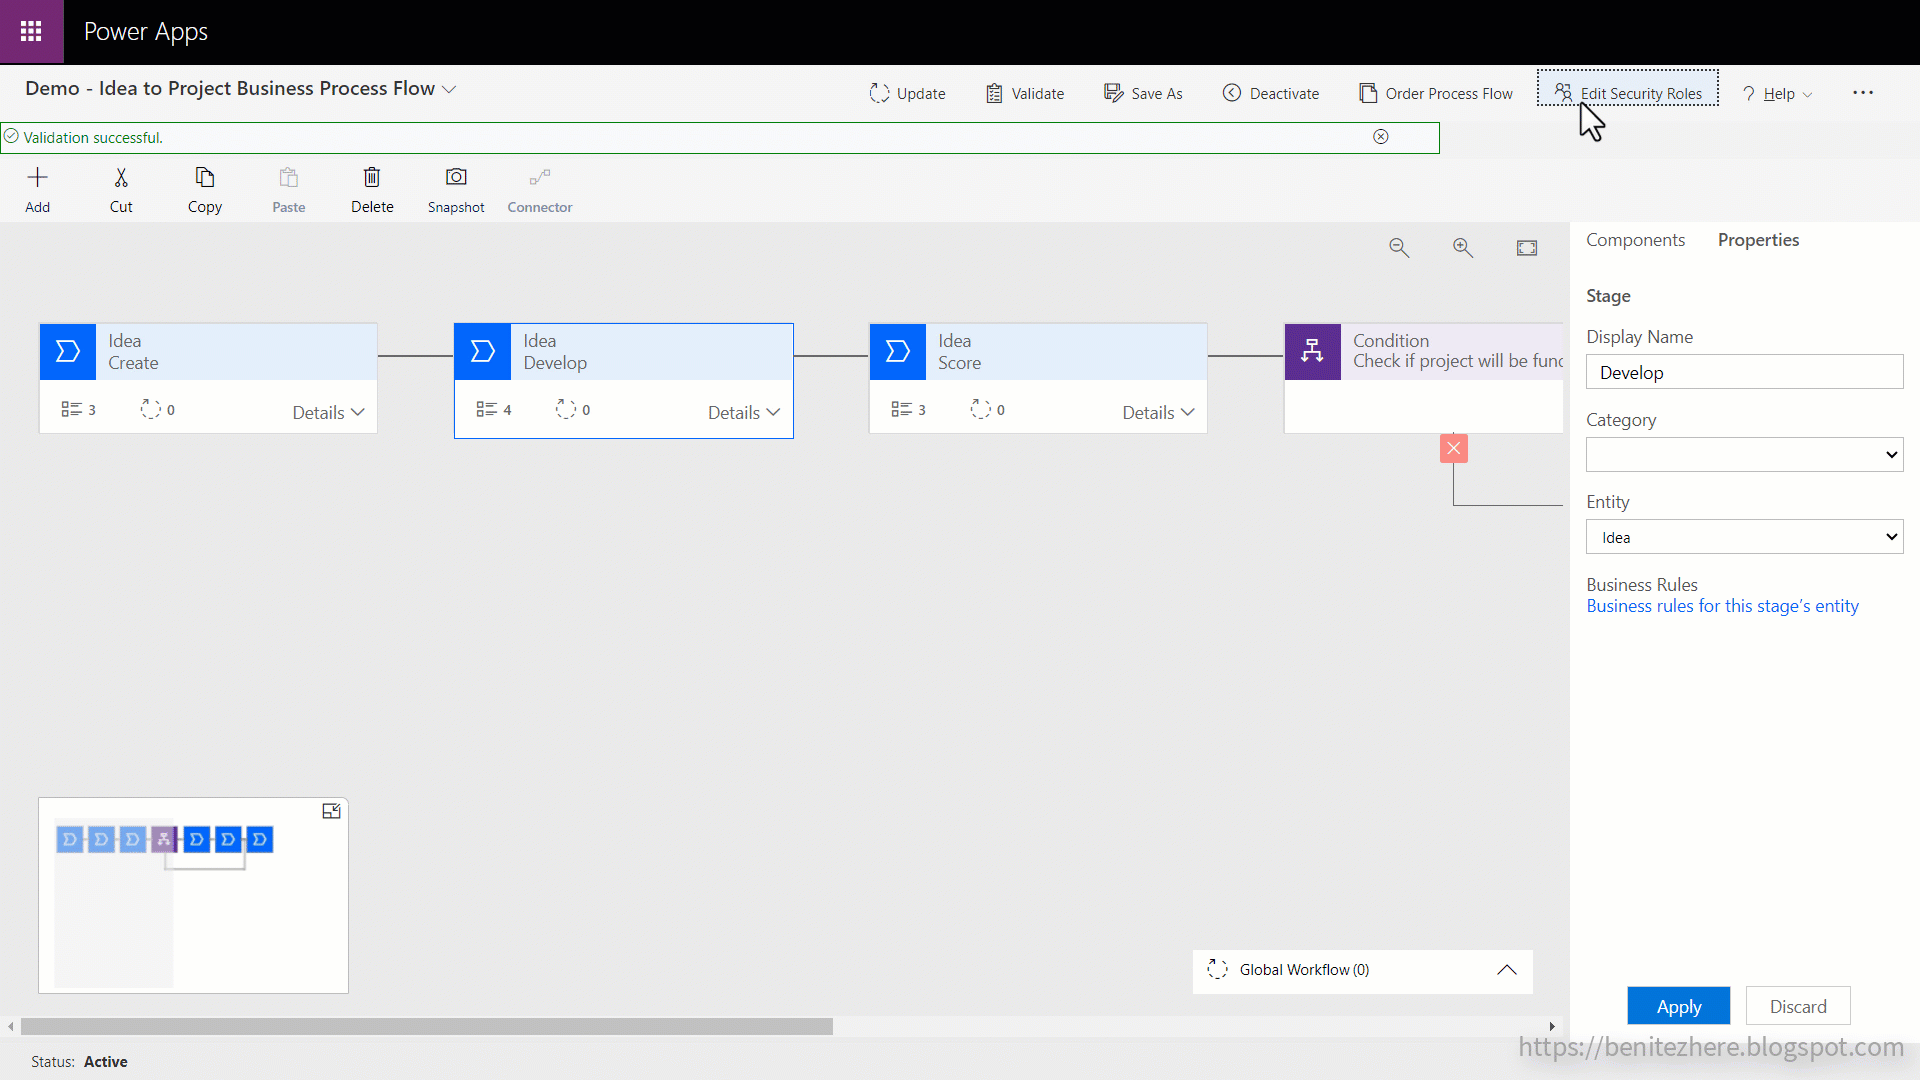
Next there’s Stages. Think of Stages as a phase or way to categorize the different parts of your process. The first stage will always be linked to the primary table by default.
Now for every Stage, there are steps. These steps are columns from the Dataverse table the Stage is associated to. These steps can be made mandatory and the behaviour of them can be changed by using business rules, such as making a step read-only based on logic.
3. Create a Business Process Flow
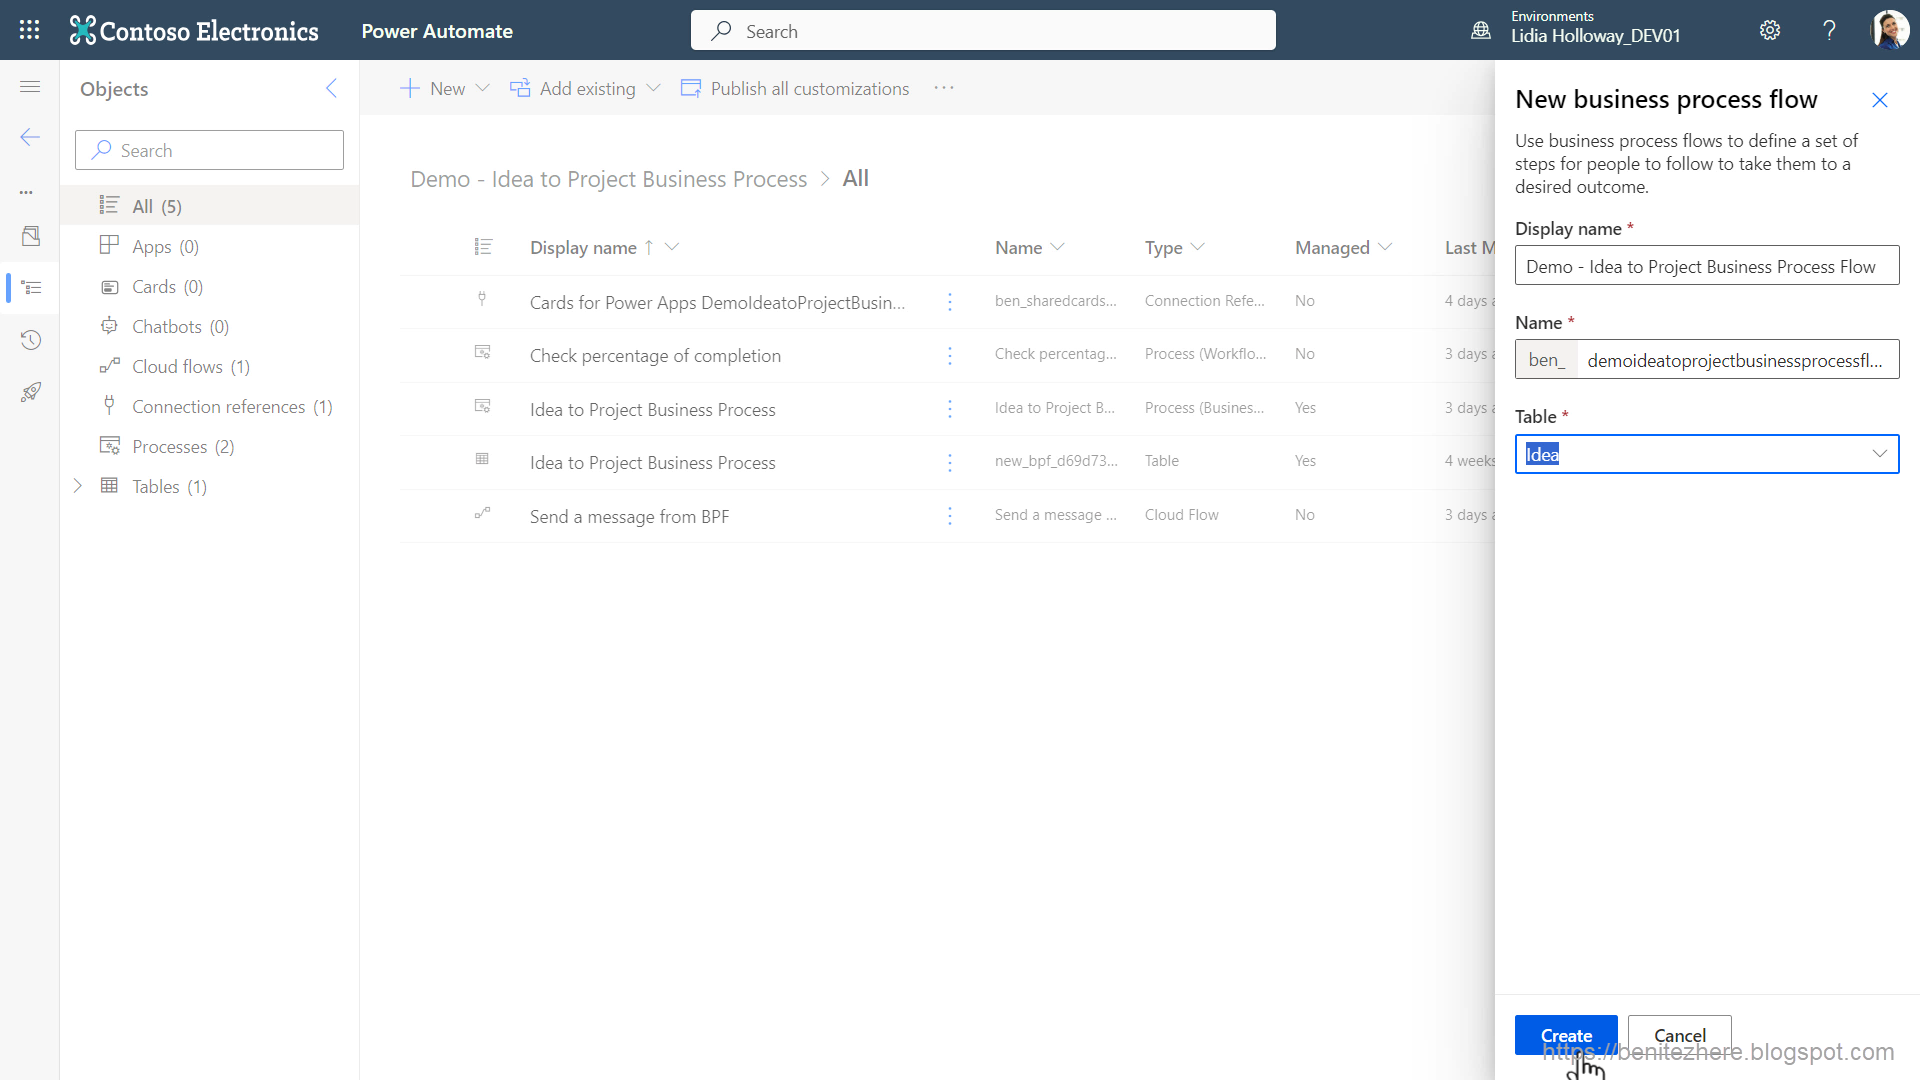
All business process flows are created within a solution. In a solution click New, head to Automation then Process, and select Business Process Flow.
Enter a name for the business process flow, select a Dataverse table as the primary table the business process flow is associated with, and then click Create.
You’ll see a prompt appear to let you know that once the business process flow is created, the solution will refresh and your newly created business process flow will be displayed. Click on the ellipsis of the newly created business process flow and select Edit.
The Business Process Flow designer will load next and you can enter a description for the business process flow by clicking on the expand icon next to the Name. Entering a description helps users and makers understand the purpose of the business process flow.
Defining Stages
Save the Business Process Flow and next define the first stage in the business process flow. Select the first stage and do the following:
Enter a name.
Optional - select a Category. The Category can be useful when you want to do reporting on the business process flow.
Click Apply.
The stage will now be defined and you're ready to add steps to the stage.
Defining Steps
Click on details in the first stage and select the first step. Do the following:
Enter a name.
Select a column from the Dataverse table that will represent the step.
Optional - make the step required or not required for the user.
Click Apply.
And that's how you define a step in a stage 😊
To add another step into the stage, click on Add and select Add Data Step under Composition. Then click on the + icon inside of the stage to add the new step. Repeat the same process in defining the step.
Add more Stages and Steps
To add another stage after you’ve defined your first stage, click Add and then click on the + icon next to the first stage, and a new stage will be added. Repeat the same process for defining the stage, followed by adding steps to the new stage.
Adding a secondary table in the Business Process Flow (aka multi-table)
You can also have a multi-table business process flow where you can add secondary Dataverse tables to stages. This will be a table different to the Primary table the Business Process Flow is associated with, but is related to the Primary table. This relationship from the secondary Dataverse table to the Primary table is a 1:N relationship.
For example for one of the stages, I’ll select the Team Project table for the entity of the stage. The column that represents the 1:N relationship is the Originating Idea column which displays in the relationship dropdown field.
If I select the Originating Idea column, I’m enabling the user to link the Team Project row to a parent row from the Ideas table. This is handy when I want to move back from a Team Project stage to an Idea stage, and then move back to the Team Project stage by reselecting the Idea previously created.
If I select the relationship field as None, it means each time a user moves from an Idea stage to a stage that’s associated to the secondary table of Project Team, they are required to create a new Project Team row each time.
For this WTF episode, I’ll select the Originating Idea column in the Relationship field to allow the user to go back to the previous Idea stage, and when they move on to the next stage that’s related to the Project Team, they can re-select the row they previously created or linked the Idea to.
Adding a Condition for logic
Other things you can do in the business process flow is add a condition. Conditions are If Else logic in a business process flow. To Add a Condition, click on Add and select Add Condition. To place the logical condition in the business process flow, click on the + icon after a business process flow stage. Then define the logic for the condition.
For this episode I’ll configure the If part of the condition to check whether the project is funded. I configured the logic as the following:
Enter a name
Select the column to use for the conditional logic which in this use case is Fund Project
The operator can remain as equals
The type can remain as value
For the value, I’ll select Yes
Click Apply
The If part of the condition is now defined.
To define the If Else part of the condition, we can link the condition to an existing stage. To do this,
Select the condition and click on connector
Click disconnect.
Then reselect the condition and select Connect. Notice how the other stages downstream in the Business Process Flow are highlighted in Yellow. This indicates that these stages can be selected for the If Else part of the condition.
Select the close stage and the If Else condition is now defined for the condition.
You can save and activate the business process flow at this point.
4. Create a Business Rule in a Stage
If you want to add business rules to the business process flow, you can do it directly from the designer. You select a stage, then click on the Business rules for this stage's entity hyperlink, and a new window will appear. Click on the new icon and the business rule designer will appear.
The example I used in this WTF episode is making the % (Percentage) Complete field show as business required when the Complete proposal field equals Yes. To achieve this, do the following:
Enter a name for the business rule
Enter a description for the business rule
Select the Condition in the business rule designer and enter a name for the Condition step.
The Entity will remain as the Idea Dataverse table
The Source will remain as the Entity
Select the Complete proposal field in the Field dropdown
For the Operator it’ll remain as equals.
The Type will remain as value
Select the Yes checkbox as the Value
Lastly click Apply.
Next I’ll add an action of Set Business Required and click on the + icon. I’ll then enter a display name and select the % (Percentage) Complete field in the dropdown. In the next dropdown I’ll change it to Business Required and click Apply.
Now do the opposite for the If Else condition. I’ll click add, then click on the + icon for the If Else condition and add the Set Business Required action. Enter a name, followed by a description, and select the % Complete field, and click Apply.
You can also configure the Scope of the Business Rule and there are 3 to choose from.
The first one is Entity which means it will run on server side where a user does not need to be on the model-driven form for it to take effect.
Next there’s All Forms where the business rule will run on all forms for the table and the user is required to be in a model-driven app form.
Lastly there’s a Specific Form, in my use case we see the Information Form, and if selected, it will only run on this form.
The following are several links to more information on business rule scope and business rules so check it out when you can.
Save and activate the Business Rule. Exit out of the Business Rule designer and you’ll see the Business Rule has been created. With the business process flow already activated, click the Update button and the business process flow will be updated with the business rule.
5. Assign security role to a Business Process Flow
You can also select which security roles can access this business process flow. Business process flows can be role-based meaning only users with the specified security roles can access the business process flow. The following are the steps to assign a security role:
Select Edit Security Roles
Then select the relevant security roles for the business process flow
Navigate to the Business Process Flows tab
Enable the Organization access level for all privileges or you can choose to not enable some of them but at minimum it will need Create, Read, Write, Append and Append To.
Click Save and Close to update the security role, exit from the security role window and exit from the other window that lists the security roles to get back to the business process flow.
6. Create a cloud flow to run from a Step
Nthat you know how to create a business process flow, let’s add some automation to it. You can execute a cloud flow from any stage in the business process flow. What I demonstrated in this WTF episode is how you can send a message from the Business Process Flow stage by entering a comment as the message and in Teams, a Power Apps Card will be sent to a channel. This is all achieved by using Power Automate cloud flows.
As of when this blog post and WTF episode was filmed, the the new flow designer does not support the Dataverse trigger of When a flow step is run from a business process flow. So I won’t be building in the new flow designer.
Create a cloud flow
Create a cloud flow in the same solution and the trigger to select is instant. Enter a name for the cloud flow and select the Dataverse trigger of When a flow step is run from a business process flow. Then click Create.
The Trigger
For the trigger, add an input. I’ll select text as the input to prompt the user to enter a comment.
Remaining steps of the cloud flow
For the next step, I’ll select the Dataverse action of Get a row by ID.
I’ll rename the action and for the table, I’ll select the Ideas table.
For the Row ID, we’ll reference a dynamic content value from the trigger, the BPF flow stage table row ID. This is the GUID of the Ideas table the cloud flow was triggered from through the stage in the business process flow.
To optimize the flow run, I’ll only display the columns I want which is the name of the Idea, the Idea score and the Risk score.
I’ll then add the Create card instance action from the Cards for Power Apps connector. If you want to learn how to create Power Apps Cards, watch my previous episode.
I’ll select the Card that will be posted in a Microsoft Teams channel.
For the Message from BPF input value, I’ll select the dynamic content of Comment from the trigger.
Next I’ll populate the variables of the Power Apps Card by selecting the dynamic content of GUID from the previous action that retrieves the Ideas row, followed by the Idea Name, Idea Score and Risk Score dynamic content values.
Next I’ll select the Post card in a chat or channel from the Microsoft Teams connector.
I’ll Post as Power Apps
and Post in Channel.
Next I’ll select the Teams group followed by the Channel to post the Card to
Lastly, I’ll select the dynamic content of Card from the Power Apps Card action
The last action in my cloud flow is to update the Process Log table that contains the run details of the workflow that was triggered in the stage of the Business Process Flow.
Select the Flows Workflow Log Id from the trigger
Select the Status of Succeeded. This will now update the Status to Succeeded which will be visible in the business process flow stage once the cloud flow run completes.
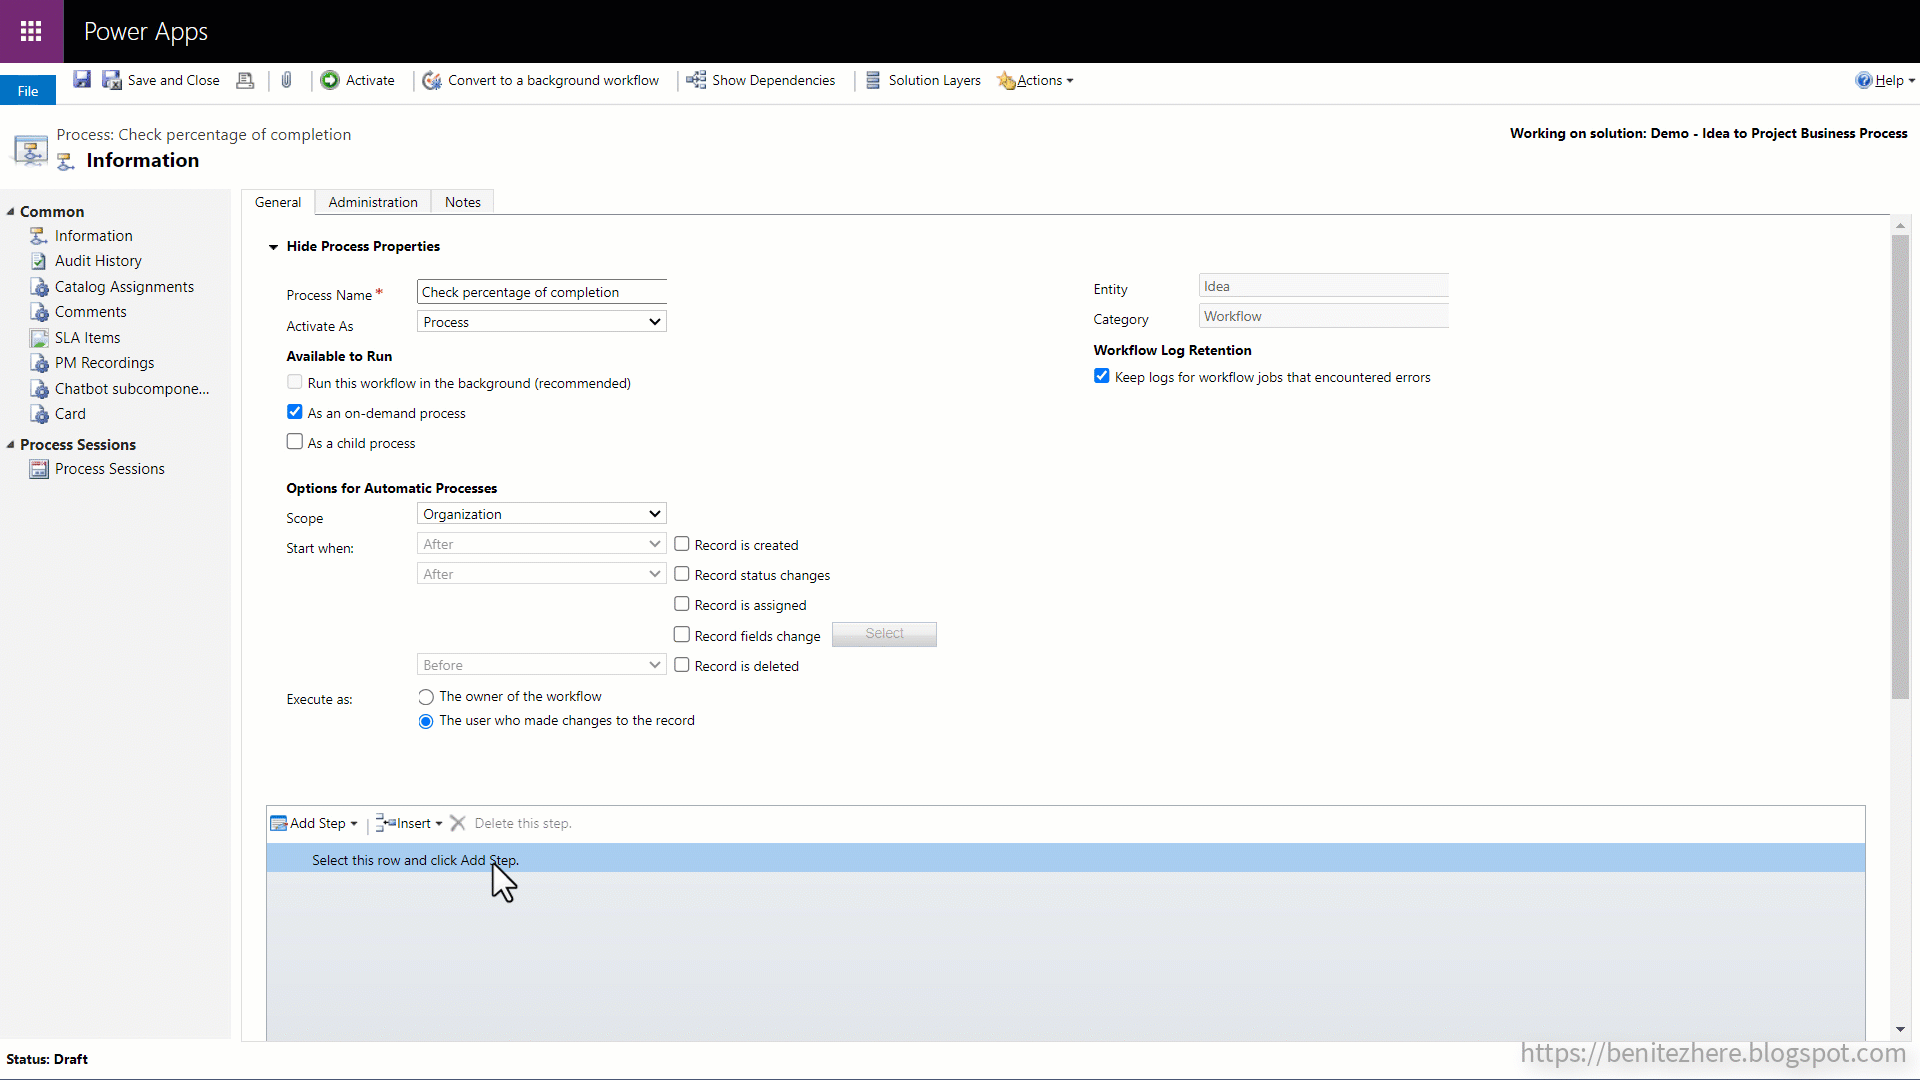
7. Create a classic workflow to display an error message to users on exit of a Stage
Next we’ll learn about using classic workflows to display an error message on exit of a business process flow stage. Classic workflows is the original built-in low code automation of Dynamics 365 and Dataverse as you don’t need to know functions, it’s simply click and select.
As an example, I’ll display an error message if the user tries to move on to the next business process flow stage when the % (Percentage) Complete is equal to or less than 79.
Create classic workflow in a solution
In the same solution, select workflow under automation.
Enter a name and select the Ideas Dataverse table. We’re going to create the classic workflow from scratch so leave it as blank and click create.
Define the workflow execution details
Before adding steps to the workflow, we first need to do the following:
Tick the "As an on-demand process checkbox," this is so that we can run the classic workflow from the business process flow stage.
Change the Scope from user to "Organisation" to allow any user to be able to trigger the classic workflow.
Uncheck the tickbox for "Record is created" as the classic workflow will be executed on demand.
Add steps to the workflow
We’ll add a condition by selecting the row in the designer, followed by clicking on Add Step and select Check Condition. You’ll be prompted to enter a description for the description. You can then define your condition by clicking on the hyperlink within the condition.
In the new screen that appears, you can define the logic for the condition. For the use case of displaying an error message if the user tries to move on to the next business process flow stage when the % Complete is equal to or less than 79, I did the following:
Selected the Dataverse table which is Idea,
Followed by selecting the column % Complete.
I then selected the operator of Is Less Than or Equal To and entered a value of 79.
I’m going to add another condition where we check if the column is not populated, as we don’t want the user to progress if they have left this step in the business process flow stage blank.
Both of these two logics need to be handled as OR, where we check if either condition is met. Select both rows and the group OR action. Then click Save and Close.
To display an error message to the user, we can use the Cancel workflow step. Select the row in the designer under the condition and click on Add Step, and select Stop workflow. Enter a description and then change the status from Succeeded to Cancelled, and click on Set Properties. In the Value field, enter the message to display to the user.
Next we’ll add an If Else condition to not display an error message if the percentage complete column value is greater than or equal to 80, the user can proceed to the next stage in the business process flow. In the designer, select the entire row of the condition, then click on Add Step and select the Conditional Branch workflow step. Click on the condition hyperlink and select the Idea table, followed by the percentage complete column and this time for the operator select Is Greater Than or Equal To. Enter the value of 80 and click Save and Close.
We’ll repeat the previous process of adding a Stop workflow step, enter a description and leave the Status as Succeeded as we’re not displaying an error message. Finally click the Save button, and Activate the classic workflow. The classic workflow will now be activated and will also appear inside the solution when you exit from the classic workflow.
8. Update the Business Process Flow with the cloud flow and classic workflow
With the cloud flow and classic workflow built, they can now be added to the business process flow stage.
Add the cloud flow
In the business process flow, select Add Flow Step to associate the cloud flow to it.
Then select the + icon in the stage of where the flow step is to be added to.
Enter a name and you also have the option to make the flow step required if needed. Select the cloud flow in the lookup field and then click Apply.
The cloud flow is now added to the stage in the business process flow as a flow step.
Add the classic workflow
To add the classic workflow, it’s the same where you
Select the stage, click Add and select Add Workflow.
In the Trigger dropdown field, select Stage Exit
Then select the classic workflow in the lookup field. The Display name will automatically be populated with the name of the classic workflow.
Click Apply and the Workflow step is added to the Business Process Flow stage.
Business Process Flows on the surface can appear to be basic as a guided visual end user interface, however by adding logic either through the built-in condition step and/or business rule, plus sprinkles of automation using cloud flows and/or classic workflows, it can be an interactive experience for users too. My recommendation is to take a look at what processes you have in your organisation that have common steps and try see if you can use business process flows in model-driven apps to digitize it.
You can be an expert too with BPFs 😎
Some PCF controls that may be of interest to you 👀
If you want additional capabilities for Business Process Flows in model-driven apps, check out the following PCF controls in the PCF Gallery:
Fast forward to today, there’s now Power Apps Cards in preview. Power Apps Cards is the next step up from Adaptive Cards and you can use them with Power Automate cloud flows. In this WTF episode I’ll share how to open model-driven app forms and views from Power Apps Cards.
If you want to learn more about Power Apps Cards, I recommend watching a couple of videos.
I’m going to use the same use case in the last WTF episode. Whenever a new Challenge is created in Dataverse, post a Card into a Microsoft Teams channel with two hyperlinks to open the model-driven app form and view.
What I'll cover
Create a Power Apps Card
How to reference environment variables using PowerFx in Cards
Using the Card in Power Automate cloud flow
Create a new Power Apps Card
The starting point is similar to when you build a Canvas App, Cards can be created from make.powerapps.com.
Now initially, you may think that you can create a card inside a solution by clicking on +New, select More, select Other and then select Card.
However when you do this, you end up with the below, which isn’t correct.
Keep in mind that this is the current experience when filming this WTF episode, it could change in the future. **EDIT 20/11/2023 - Cards can now be created in a solution as of Nov 2, 2023. Read more here.**
What you need to do is click on More in the left-hand side menu pane, and you’ll see Cards. You can then pin it and it will display permanently in the menu.
When you select Cards form the menu, you will first see your cards, and the next tab will display both yours and your team’s cards.
Click on New Card or Create a Card, followed by entering a Name and Description for your Card.
After you click on create, the Power Apps Card designer will appear. It will look familiar because it’s similar to the Power Apps studio user interface. You have,
The tree view to see your screens and elements.
There’s the drag and drop UI elements, such as adding inputs and changing the layout. There are some UI elements that aren’t available compared to the ones available in Power Apps studio so keep that in mind.
You also have the same ability of adding data sources.
There’s variables, which I’ll cover shortly.
1. Add data source
The first thing to do is add your data source. As of when this WTF episode was filmed, Dataverse is the only connection available, but the product team will be enabling other connections in future updates.
Since we’re applying the same technique from the last WTF episode of using environment variables to build URLs for model-driven apps, we'll need to reference the relevant tables using the Dataverse connector. Add the following Dataverse tables,
Environment Variable Definition - This is the table that contains the Environment Variables that have been created in a solution.
Environment Variables Value - This is the table that contains the current value of an Environment Variable.
2. Create variables
The second thing to do is create variables for the cloud flow. These variables will become input values in the Power Apps Cards action in the cloud flow.
Several variables are required to be created. First, there's variables that will be used on the interface of the card, I’ll refer to these as visible variables. Secondly, the other variable will be one that won’t be used in the interface of the card, but in the background. I’ll refer to this as an invisible variable.
For the visible variables, they will be the values from the table columns of the newly created Challenge in Dataverse. I’ll display the following from Dataverse,
Name of the Challenge
Description of the Challenge
Owner of the Challenge
I’ll create a variable for the Name of the challenge by selecting Variables in the menu and click on + New variable.
This is the variable for the Name of the challenge,
I'll explain what some of the fields are.
Type
For the Type dropdown field I’ll keep it as Text.
Default Value
The Default Value field implies what you want the value to be when the Power Apps Card is created. It’s optional and for my use case, I want to leave it blank since it will be populated by the cloud flow.
Value settings - Persistence
Next, there’s two options on whether the value of the variable is either reset each time the card is opened or is left as-is. For my use case I will be using the Permanent option.
Value settings - Customization
Now the next couple of checkboxes were confusing initially. I reached out to Matt Maclaurin and Anthony Uitz in the Power Apps product team.
For the When sending this card, this value can be cutsomized checkbox, this will turn the variable into an input for the card.
For the Customization is required checkbox, the value of the variable is required, in other words mandatory, to be set by the cloud flow, power virtual agent bot or from the Cards play page. The play page is when you are copying and pasting the link to send through a Microsoft Teams message. Since the variables will be populated through the cloud flow, I’ll tick these two checkboxes.
Additional variable information
When you expand the additional variable information, Title and Description appears. These will be visible in cloud flows and in bots for Power Virtual Agents.
Repeat the above to create the rest of the visible variables, Description and Owner, and for the invisible variable, the GUID of the challenge.
3. Add controls to the Card
After the data source has been added and the variables have been created, it's time to create the Card.
By default, there will be a couple of controls already added to the screen of the card.
For the first control,
I updated the name of the Text Label where I've followed Matt Devaney's Power Apps coding standards for canvas apps when naming controls. Highly recommend you check out this free resource when building your apps or cards.
I also updated the text to be the title of the card. For a bit of fun, I inserted the lightbulb 💡 emoji.
I then updated the style by making the text larger.
I'll next update the second control,
I updated the name of the text label
I updated the text as the Name of the Challenge
I also updated the style by making it bolder
Next, I added a few more controls.
Under the Name text label, I added another text label with a name of txt_varChallengeName
For the text property, this is set to the varChallengeName variable. This will be populated through the cloud flow.
The spacing of the text label was updated to none.
This will be the structure I apply to mimic key-value pairs like in Adaptive Cards where I have one text label acting as the key, and the other acting as the value.
I’ll repeat the steps for the two other visible variables of Description and Owner. I’ll have a text label that acts as the key, and another text label that will be the value which will reference the input variables created earlier in this episode.
The last two controls are the buttons that a user can click/tap on to open the challenge form in the model-driven app, or view all Active Challenges in the model-driven app. This will be the same functionality as you saw in my previous WTF episode where a user will click on the hyperlink, and it will open either the form or the view in the model-driven app.
Add the button control and name the button, followed by entering a title for the button.
As a reminder the following are the query parameters when opening a form in model-driven apps.
You need the Dataverse or Dynamics 365 environment URL.
The appid or appname query parameter.
The value of the appid or appname query parameter.
The pagetype query parameter where the parameter value is entityrecord.
The etn query parameter which is the logical name of the table.
And the ID of the challenge.
For opening a system view in model-driven apps, it’s the same except the pagetype query parameter is entitylist, the viewid is the id of the view, and the viewType is 1039 which is the definition for system views.
The URL is going to be built within the property of the button using PowerFx. The formula will be very similar to what I showed in the last episode where I shared how to build deep links to open model-driven apps in Power Apps mobile. Environment Variables will be referenced again using PowerFx. I’ll be using the same environment variables in a solution that you saw from the last WTF episode.
If you’re familiar with canvas apps, the launch function can be used to direct a user to a browser and load the URL which I showed you in the last episode. However, in Power Apps Cards, if you try entering the Launch function in the On Select property of the button control, you’ll come across this error message because it’s currently not supported in Power Apps cards.
So, what can we use since the launch function is not currently supported? Well, we can switch the Type over to Open Url, and then use PowerFx to build the URLs.
Shout out again to Anthony Uitz for answering my question when I was scratching my head over why I couldn’t use the launch function and he guided me towards this. One thing to be aware of is that the URL string must start with https, colon, and forward slashes (https://) otherwise it won’t work.
To build the URLs, I’ll be concatenating strings again as seen from the last two episodes. I’ll use string interpolation rather than the concatenate function or the ampersand operation. I’ll refer you again to Matt Devaney’s blog post, where he explains how to use the string interpolation method in detail.
The following is the PowerFx expression for the View Challenge button.
Tip: Currently the PowerFx bar in Power Apps Cards doesn't have formatting or the ability to drag the bar to expand it, like in Power Apps studio. What I like to do is build my expression in Power Apps studio, format it, and then copy it over.
Note: You'll also see yellow squiggly lines which is a delegation warning that you can safely ignore. Delegation in PowerFx cards doesn’t have the same support as delegation in canvas apps but because the expression is only performing a string comparison on a single field, it’s fine.
The following is the PowerFx expression for the View Active Challenges button.
Now, the cool thing about Power Apps Cards is that you can preview your card in real-time with the data which you can’t do in Adaptive Cards. This is through the Play button. A new browser tab will open, and you’ll first be prompted to enter the values for the required input variables. You can copy and paste the values from a row/record in your model-driven app.
The Card will then load, and you can see the data.
This Send button will generate a link that you can copy and paste into a Microsoft Teams message. Since this card will be populated by a Power Automate cloud flow, we won’t be using this feature. Let’s next learn how to pass values from cloud flow to the input variables in the card.
Building the cloud flow
In my cloud flow I have my trigger which is when a new Challenge is created in Dataverse, followed by an action that will retrieve the user details of the Owner associated to the Challenge.
To call the Power Apps Card, add a new step and search for Cards for Power Apps and select the connector. You’ll see two actions and the one to select is Create card instance. In the dropdown field, select the card that you want to create.
You’ll then see the input variables as input values for the action. This is the title and the description of the input variables from the Card.
I’ll use dynamic content from the trigger to as the input values for the Challenge Name, Description, and Challenge ID.
For the Owner, I’ll use dynamic content from the previous action to reference the full name from the User table.
Next, add a new step and search for the action, Post card in a chat or channel. In the Post as dropdown field, select Power Apps. Then select where you want to post the card to. I’m posting to a Channel, and I’ll select the Team and the channel. Lastly, select the Card input value as dynamic content. And that’s it, save the cloud flow and it’s ready to be triggered.
Card in action
I create a new Challenge in Dataverse in the Innovation Challenges model-driven app, this will trigger the cloud flow. The cloud flow will then create a Power Apps Card and using the dynamic content from the trigger and previous action, it will populate the input variables of the card. The Power Apps Card will then be posted to a channel in Microsoft Teams.
Summary
Power Apps Cards allows you to create reusable cards that can be saved in the Power Apps maker portal which makes it easier to maintain compared to Adaptive Cards. You can also create variables in cards, and use them as visible or invisible variables which can be populated by a cloud flow or a bot in Power Virtual Agents.
Power Apps Cards is one method that you can use to create Dataverse notifications for users by making use of
variables to display data from Dataverse through a cloud flow
embed hyperlinks in the buttons using PowerFx that reference Environment variables in a solution
All of this is achieved without code with Power Platform 😊
Hope you learnt something new and thanks for stopping by 👋🏻