Showing posts with label Power Platform. Show all posts

Thursday, 18 November 2021

How to extend the Document Automation Toolkit solution

Earlier this year I did a webinar with XRM Vision, a Microsoft partner based in Montreal, Canada. I showed how a Revenu Québec form can be automated using the Documentation Automation Toolkit. In the webinar I showed the Document Automation Toolkit in action including 

  • the prerequisites
  • how to install
  • configure the Document Automation Toolkit
  • build an AI Builder Form Processing model
  • end-to-end demo of automating the Revenu Québec form
You can watch the recording of this webinar here.

Towards the end of the webinar I mentioned that currently only 27 of the fields from the Revenu Québec form are included in the automation. Even though I built my AI Builder Form Processing model with 34 fields, only 27 fields were displayed in the Document Automation Application Canvas app. This is because only a maximum of 27 field have been defined in the Documentation Automation Toolkit. I said I'd be sharing soon how to extend the Document Automation Toolkit to include all fields. Well that time has come and this is what you'll learn in this #WTF episode 😊

Recap on the use case

I was automating the Revenu Québec Self-Employed Net Income form and the use story I came up with was the following,

As a Tax Advisor,

When an email is received and the attachment is the Revenu Québec Self-Employe Net Income form,

I want the data to be automatically extracted,

So that I don't have to enter it manually into our system

AND

I also need the ability to review the data extracted,

So that I can correct the data where relevant


Document Automation Toolkit components that need to be updated

To include the additional 7 fields (34 - 27 = 7), three components need to be updated in the Document Automation Toolkit solution.

1. Dataverse table

The Document Automation Data table needs to be updated so that it can reference the additional 7 fields. There are two sets of fields that need to be created. The first set of fields are for the Data values, the other set of fields are for the confidence score (displayed as a percentage) when the AI Builder Form Processing model extract the information based on the mapped fields defined in the model.

2. Cloud flow

The Document Automation Processor cloud flow needs to be updated so that the new fields in the Document Automation Data table are updated. This is so that
  1. The value extracted from the 7 fields are stored in Dataverse
  2. The values are displayed on the Canvas app

3. Canvas app

The Document Automation Application Canvas app needs to be updated so that two screens in the app display the 7 fields. 

The first screen is used by end users who will be configuring the Document Automation Toolkit including the app. In this screen the end user can see the mapped Revenu Québec fields and its values defined by in the AI Builder Form Processing model.


The second screen is used by end users who will be manually reviewing the data extracted by the AI Builder Form Processing model with the form uploaded.


Steps for extending the Document Automation Toolkit

Step 1 - Create a new solution and add the components

A new solution needs to be created so that the components can be configured. This is because the Document Automation Toolkit is a managed solution and if you make change directly in this managed solution, it will create an unmanaged layer.

In the new solution add the components from the Document Automation Toolkit solution. In my #WTF episode I added the following components.

Canvas app
Document Automation Application

Dataverse tables
Document Automation Configuration
Document Automation Data
Document Automation Processing
Document Table Data
Document Automation Table Taxonomy
Document Automation Taxonomy

Power Automate cloud flows
Document Automation Email Importer
Document Automation Processor
Document Automation Validator


Now when I think about it, I only needed to add the three components I outlined in the previous section rather than all of the components in the original Document Automation Toolkit solution 😂

Step 2 - Add columns to the Document Automation Data table

Depending on the number of fields in your form, the difference needs to be created in this table.
In my scenario I had a total of 34 fields I was automating. The difference between the 27 fields and the total of 34 fields is 7 fields. I needed to created 7 fields for the Data and 7 fields for the Accuracy Percentage.

I created columns Data28 to Data34. This is the value of the data extracted from the form as defined by the field mapping in the AI Builder Form Processing model.


I created columns Metadata28 to Metadata34. This is the confidence score from the AI Builder Form Processing model of the value extracted from the form.


Step 3 - Update the Document Automation Processor cloud flow

One of the core actions in this cloud flow stores the extracted data in the Document Automation Data table. With the columns added in Step 2, the respective fields in the action also need to be updated. Browse to the Document Automation Processor cloud flow and click Edit. Scroll down to the "Create document processing data" action and again, scroll down until you see the new columns added in Step 2.

In my scenario it's Data28 - Data34. Click on Data27 and copy its expression. Click on Data 28 and paste the expression into this field. Update the expression to reference Data28 column.

variables('DataDictionary')?['Data28']


Repeat for the remaining DataXX columns you created in Step 2.

Next, apply the same steps to the Medtadata columns created in Step 2. Click on Metadata27 and copy its expression. Click on Metadata28 and paste the expression into this field. Update the expression to reference Metadata 28 column.

variables('DataDictionary')?['Data28_confidence']


Repeat for the remaining MetadataXX columns you created in Step 2.

Step 4 - Update the Document Automation Application Canvas app

There are several controls that need to be updated in the Document Automation Application Canvas app.

Fields mapping screen

1. Expand the Fields mapping screen.

2. Select the Hidden Mapping Refresh Button. 

3. Select the OnSelect property as the formula needs to be updated.

4.Expand the formula bar and scroll down to the Patch function to update the JSON. 

5. Copy an existing row such as Data26.


6. Enter a new line, followed by pasting the content.

7. Update the Name, Index and remaining functions to reference 28.

            {
                Name: "Data28", Index: 28, 'Document Automation Configuration': CurrentConfiguration, 
                'Mapped Column': If(NbLabels >= 28, Last(FirstN(ModelKeysCollection, 28)).label)
            },

Repeat for the remaining DataXX columns you created in Step 2.


This will display the DataXX columns created in Step 2 in the screen for the end users who will be configuring the Document Automation Toolkit.


Document Detail Screen

1. Expand the Document Detail Screen.


2. Click the Document Header Form. If you scroll down, you'll see that there are DataCards for the 27 columns. New DataCards need to be added to the Document Header Form control to display the DataXX columns and MetadataXX columns created in Step 2.


3. Click on Edit fields. 

4. Click on Add field.

5. Search for Data28.

6. Select Data28.

7. Click Add.


A DataCard control will now be added to the Document Header Form. Scroll down to see it. 

8. Unlock the DataCard for Data28


9. Select all the controls within the DataCard and delete them. Yes, delete them - don't worry! Trust me!


10. Select one of the existing DataCards such as Data26_DataCard1.

11. Copy all of the three controls.


12. Select Data28_DataCard1 control and paste (hit CTL + P on your keyboard). The three controls will now appear. 


13. Update the name of the first control to reference 28 - DataCardConfidence28
14. Update the name of the second control to reference 28 - DataCardValue28 
15. Update the name of the third control to reference 28 - DataCardKey28


16. Select one of the existing DataCards such as Data26_DataCard1.
17. Select the DisplayName property.
18. Copy the formula.


19. Select Data28_DataCard1 control.
20. Select the DisplayName property.
21. Paste the formula.


22. Update the reference to 28.


23. Select the DataCardConfidence28 control.
24. Select the Text property.
25. Update the formula to reference Metadata28.


25. Rearrange the placement of the controls in the DataCard to to be in alignment to the other DataCards. Repeat for the remaining DataXX columns created in Step 2.

26. Save the Canvas app.
27. Publish the Canvas app.


That's it - that's how you extend the Document Automation Toolkit! Awesome sauce 😊

Document Automation Toolkit in action

Trigger the automation by sending an email to the Inbox email address configured in the cloud flow. 


As manual reviewer, load the Document Automation Application Canvas app and you'll now see the additional fields 🙂 

Summary

If you need to display all the fields that you've defined and mapped in your AI Builder Automation Form Processing model in the app that comes with Document Automation Toolkit solution, follow the steps above. By adding the columns beyond the 27 default fields, updating the cloud flow and the Canvas app extends the Document Automation Toolkit to suit your requirements.

Until next time #LetsAutomate

Friday, 12 February 2021

How to display line breaks in Teams Meeting from Microsoft Dataverse or Dynamics 365

In my previous WTF episode I outlined how you can create and send a Teams Meeting invite from Microsoft Dataverse and Dynamics 365. What I mentioned towards the end was that in the next WTF episode I'd share how to display line breaks in the Teams Meeting as it was rendering the value from the Description column as a single line of text.

Let's Automate

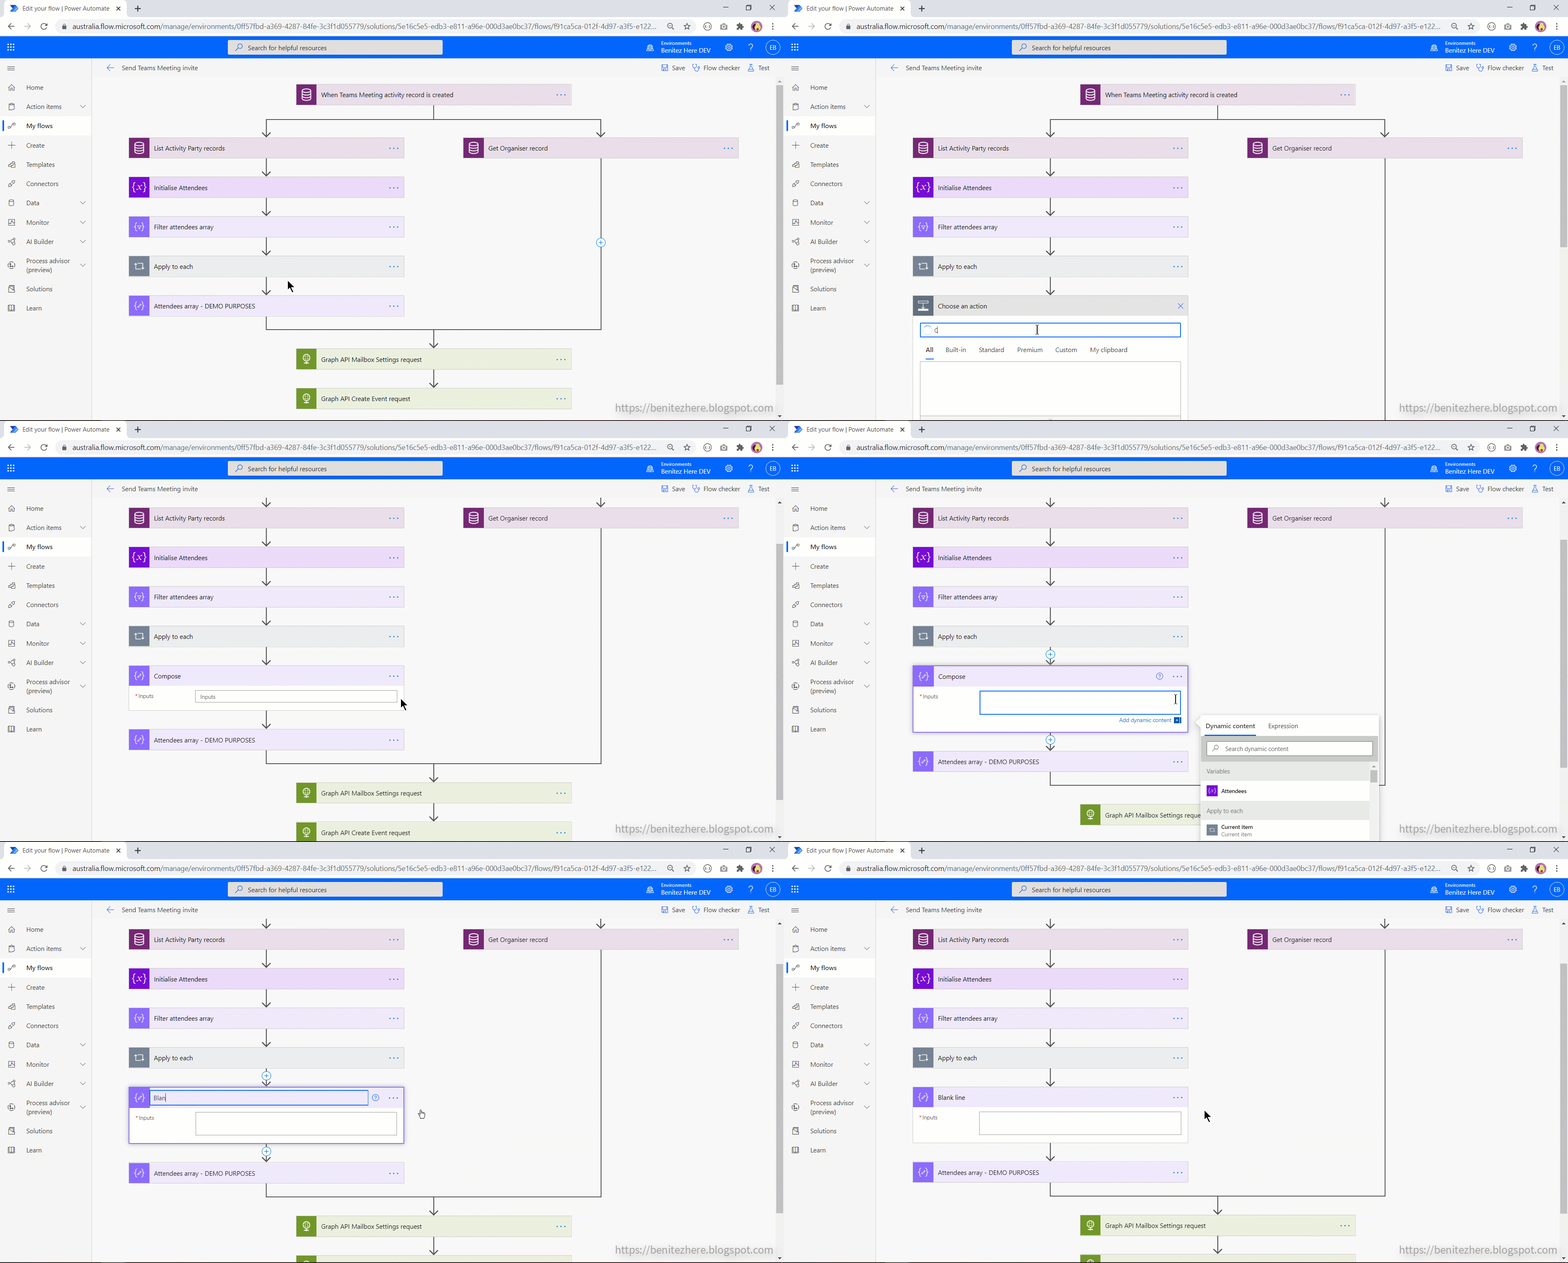
This is what my cloud flow looks in Power Automate. 


This should look similar to the previous WTF episode where the difference here is 

  1. The addition of a Compose action
  2. A change of expression in the final HTTP action
Since I already covered the cloud flow in detail in my previous WTF episode, I will only cover the above two in this WTF episode.

The Compose action

This action is for the purpose of referencing a new line in the expression used for the "Content" property in the Body of the HTTP action that calls the Create Event Graph API request.

As seen in my vlog I simply hit enter on my keyboard in the Compose action. Nothing else is required.

Expression for the Content property

In the final HTTP action the expression is updated to the following
if(equals(triggerOutputs()?['body/description'], null, null), '', replace(triggerOutputs()?['body/description'], outputs('Blank_line'), '<br>'))


In the scenario where the Description column is null and you don't have logic to be able to deal with null values, the cloud flow will fail. Therefore the expression incorporates two functions to handle when the Description column in the Teams Meeting Activity record in Microsoft Dataverse or Dynamics 365 is null. This is good practice when using expressions for columns where there is a possibility that the column value can be null. For more best practices on what you should be doing with cloud flows check out the white paper, A Guide to Building Enterprise-ready Flows that was authored by Jerry Weinstock and other prominent experts including input from the product team.

What are the two functions used?

The two functions are

If

The If function provides a conditional check where the true or false value defined is used in the output.
In this use case, the cloud flow will check if the Description field is null and if it equals true, the cloud flow will return null as the output. Otherwise if the Description field is not null, the cloud flow will return the false value.

Replace

The Replace function is used for the false value where its purpose is to find all the blank lines and replace it with the HTML <br> tag so that it will render as line breaks in the Teams Meeting created and sent via the Create Event Graph API request from the HTTP action.

Cloud flow in action

Create a new Teams Meeting Activity in Microsoft Dataverse or Dynamics 365 and let the magic flow ✨

When there is a description provided, the Teams Meeting will render the line breaks.


When there is no description provided, the Teams Meeting will display the content as blank. The cloud flow will not fail.

Summary

By using a Compose action and referencing this in an expression will display the value from the Multiline Text column with line breaks in the Teams Meeting that is created and sent from Microsoft Dataverse or Dynamics 365.

Stay tuned as in the next WTF episode I'll show you how to easily apply HTML next when creating and sending a Teams Meeting from Microsoft Dataverse or Dynamics 365.

Friday, 13 March 2020

How to send an email to multiple recipients using an Email Template with Power Automate

In my last WTF episode I shared how to send an email using an Email Template defined in Dynamics 365 or CDS. The constraint of that method is that it is valid for the use case of sending to a single recipient. When multiple recipients are required in the email, the SendTemplate unbound action is not suitable because of how you need to explicitly add the the recipient by clicking on "+ Add new item" within the action.

In today's WTF episode I share a different method in my flow in Power Automate for the use case of sending an email to multiple recipients dynamically using an email template.

Replicating sending an email with multiple recipients using an Email Template in Power Automate

The thing is, today in classic workflows it's not possible to achieve this out-of-the-box. You can elect to send to multiple recipients by selecting values from lookup fields when configuring the send email step and applying the "Use Template" option. However this is an explicit reference as it requires someone to reference those lookup fields within the send email step.


Another option is to add records directly through the To field in the send email step but again, this is an explicit reference.


You're not dynamically adding recipients to the send email step, and you definitely cannot do this without a custom workflow activity in the scenario where you want to send an email to contacts based on associated records from a 1:N relationship. It is common to come across a business process where an email is required to be sent based on Contacts that live in related records. Refer to the use case.

Use Case

I'm referring to a use that is relates to the insurance industry.

"As an insurance advisor,

I want to send Trustees an email reminder that their policy is due to expire,

so that their policy can be renewed."

Using a flow in Power Automate, this is achievable 😊💙

Process

The process will be that a Case is created and an insurance advisor will update a field to trigger the Power Automate. This can be automated where a scheduled Power Automate runs daily but for the purpose of this WTF episode I am triggering it manually. Once triggered an email is sent to all Trustees associated to the Trust using an Email Template.

Sounds like a piece of cake right? 😅

The data model in Dynamics 365 or CDS

I am using the out-of-the-box entity of Connections which is used to link a record to another record in Dynamics 365 or CDS. You can associate a connection role which represents the relationship of a record to another. What I have done is used Connections to link a Contact to an Account where the role associated to the Contact is "Trustee" and role associated to the Account is "Trust."


This is because Trustees can exist as contacts but are associated to their primary account already. To prevent duplicate contact records, connections is a good way to link a Trustee to a Trust which may also be an existing account record.

I have chosen to send the email to the Trustees where they are Bcc'd so that I can show you that my flow in Power Automate is flexible to cater for any activity party types that Dynamics 365 or CDS supports.

What my flow in Power Automate looks like

It has more actions than the previous flow you saw in my last WTF episode however don't forget that we can't do this out-of-the-box in a classic workflow today. My flow in Power Automate enables emails to be sent to multiple recipients that are dynamically referenced. You can have 30 Trustees or 5 Trustees, my flow in Power Automate will handle the recipients dynamically.


The last three actions in my flow is a result of AK's investigation and the core part of it is from my method that I figured out on how to form the email activity parties array and the recipient + sender objects dynamically. Combining our findings resulted in my pretty cool flow. Thanks AK.

This flow was created within a solution and I am using the CDS current environment connector.

1.0 Trigger - when a Case field is updated

I created a custom Two Option field called Send Trust policy renewal in the Case entity and placed it on the Case entity form so that I can update it to trigger my Power Automate. I set the filtering attribute to this field.


I have also configured the trigger condition where the field must equal Yes.

1.1 Get Account record

Using the CDS Get record action, retrieve the account record based on the Customer lookup value of the Case.

1.2 Retrieve connection records

Using the CDS List records action a FetchXml query can be applied which is defined using Advanced Find in Dynamics 365 or CDS. My FetchXml query will display all connections that have a connection role of Trustee and is associated to a specific account. The following is a screenshot of what my query looks like in Advanced Find.


The following is a screenshot of what my FetchXml looks like when downloaded.


Copy and paste this into the FetchXml query of the CDS List records action and replace the explicit references of account name and the account ID with the dynamic content values from the Get Account record. This is ensure that my Power Automate will work for any Trust and its associated Trustees that are represented by connections.

1.3 Temporary - Body of list

This is a Compose action where I am referencing the output of the CDS List records action. Currently as of writing this blog post there is a known issue where a status reason of 200 will display without an output of the JSON response. I am using the Compose action to verify that the correct connections records are returned since I don't have visibility in the CDS List records action while this issue is occurring. This is an optional action.

1.10 odata.type workaround + 1.11 Email target + 1.12 Perform an unbound action

I'm going to jump to two actions later in my flow because to understand the core part of my flow, I need to explain AK's method.

AK pointed out that there is another unbound action called SendEmailFromTarget. The part that tripped us up was the Target payload. It's documented how to define this through the SDK but as JSON, well that's another challenge which AK figured out. AK figured out the JSON payload for the Email Target from another fellow Microsoft MVP's blog post, Andrew Butenko. You can read Andrew Butenko's blog post here

AK figured out that he needed to serialize the @odata.type in order for it to be applicable in the Initialize Variable action that forms the Email Target object in the JSON payload. The Email Target object is an array of the email activity parties and the odata.type of email.

In my action 1.10 odata.type workaround, I'm using AK's method where Initialize Variable is used to form the @odata property.


This is then referenced in the Initialize Variable to form the Email Target object.

Problem solving time

While AK was investigating, I too was doing the exact same thing and found a different forum post from our community. When I was reviewing the screenshot in the bottom of the forum post I studied the email_activity_party array in the Target object.

  • I knew that the each of the rows in the array represented an email activity party. 
  • I knew that I also had to dynamically loop through the connections to identify the contact that would be used as the Bcc recipients.

Essentially when you study the JSON payload in the screenshot there's three elements (errr not sure if this is the right word but I'll go with it):

  1. The array which is the email activity parties.
  2. The object that represents the sender including the activity party type value.
  3. The object that represents the recipient including the activity party type value.

Since it is an array, I figured there can be more than one recipient which would be represented by multiple rows in the array where the type of recipient is defined by the ActivityParty.ParticipationTypeMask attribute.

The technique that I've applied is to use the following actions

  1. Initialize Variables
  2. Append to array variable
  3. Set Variable
I'll explain the core of my Power Automate in the next few sections.

1.4 Email activity parties

To form the array the Initialize Variable action is used where Type is equal to array.

1.5 Recipients

To form the row in each array the Initialize Variable action is used where Type is equal to Object.

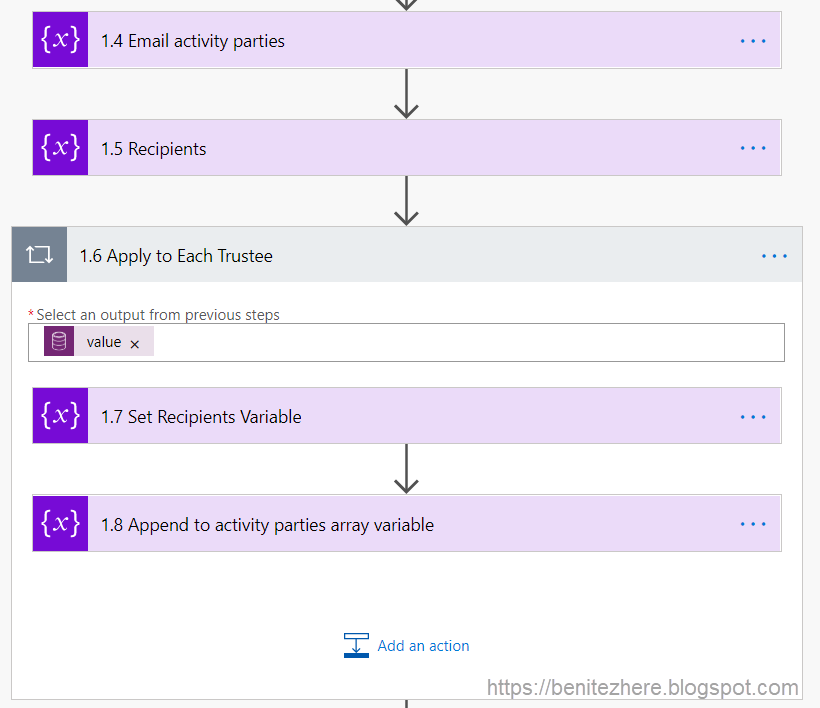
1.6 Apply to each Trustee

Since connections are retrieved from my FetchXml query in the CDS List records action, I needed to loop through each record to reference the contact ID which would be used in the email activity parties array.


1.7 Set Recipients Variable

To form the row for the contact to be used in the email activity parties array, the Set Variable action is used where I'm referencing my recipients variable from my action 1.5 Recipients. I am also forming the object that will represent the row in the array by the following,
  1. Reference the contact using the contact ID from the CDS List records action. This is defined by the Connected To field in the Connection entity.
  2. Reference the activity party type. Since the activity party type is Bcc, the value of 4 is used.

My expression to reference the contact ID in No.1 is
item()?['_record2id_value']

1.8 Append to activity parties array variable

The final action within the Apply to each control is to append the recipients variable defined in 1.7 Set Recipients Variable to the array variable in 1.4 Email activity parties. The Append to array variable action is used.


This action is important because it will dynamically form the row in the email activity parties array. Essentially when all connections have been looped through, all of the recipients will be appended to the activity parties array.

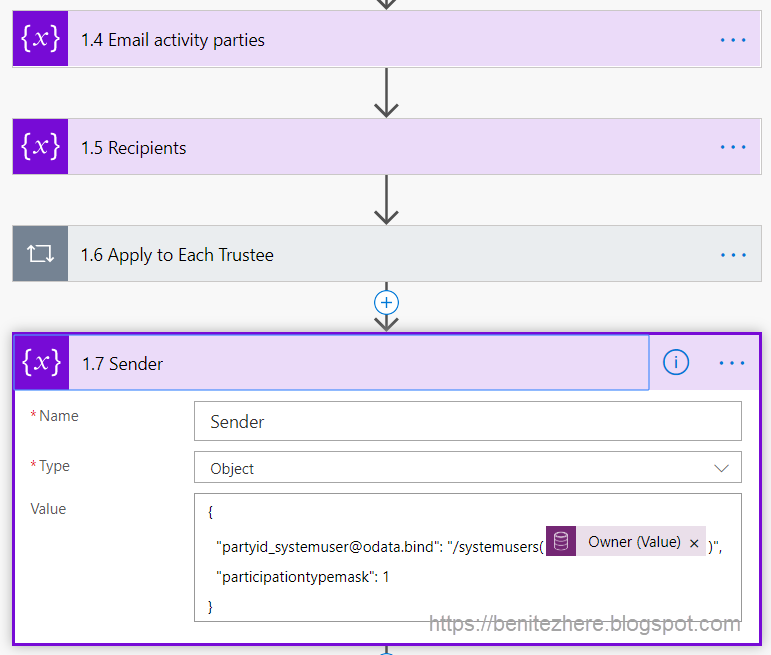
1.7 Sender

**note this should be named as 1.9 but I only noticed my mistake in the naming convention for the later half of my flow in Power Automate after filming. To keep it consistent with the vlog I'll keep it as-is in case you're creating your own flow by watching my vlog and reading this blog post at the same time**

Now that the recipients have been taken care of, the sender needs some TLC. It's essentially the same technique as 1.5 Recipients where an Initialize Variable action is used to form the Sender object but this time we define the JSON payload for the object since we do not need to loop through records. There is always going to be one sender whereas the number of recipients can be dynamic.

1.8 Append Sender to array variable

Using an Append to array variable action, the sender variable is appended to the array variable in 1.4 Email activity parties.

1.9 Email activity parties array

This action is optional, you do not need this at all. I have this Compose action that's referencing the array variable output for two reasons,
  1. To check that my array that was from the appended variables of recipients and senders was correct.
  2. To show you in the vlog what the array variable looks like to validate that it is in fact correctly structured and defined.

1.10 odata.type workaround

As mentioned earlier this was a hack AK originally came up with to serialize the @odata.type.

**💡 BUT WAIT 💡**

Since filming another Microsoft community person, Ryan Maclean, tweeted an issue about his unbound action and I commented to share AK's method which then also led to Andrew Butenko chipping in to solve it.

Then came the question of why from Matt, why does flow behave like this?

Whenever the flow life gives me lemons 🍋🍋🍋 I turn to the Flow Ninja, John Liu 🐱‍👤. John is a supreme flow being (no joke) cause he's super intelligent when it comes to Logic Apps or flow in Power Automate. John shared this microsoft.com article with me (scroll down) which I then shared in Ryan's thread. He takes it one step further by sharing a hack. Ryan also came up with a hack too.
  1. John Liu's Hack
  2. Ryan Maclean's Hack
Go follow these two on Twitter if you haven't already done so! Do it.

So you can now skip action 1.10 odata.type workaround by following John or Ryan's hack.

1.11 Email target

Now that we have the email activity parties array from the appended variables of recipients and senders, it can now be referenced in the overall JSON payload. I am using an Initialize Variable to honour AK's method but you could probably define this directly in the final action.


This is based on AK's investigation and my investigation where I studied the JSON payload from the Dynamics 365 Community Forum post I provided earlier.

1.12 Perform an unbound action

The final action is to use the CDS perform an unbound action where the SendEmailFromTemplate action is used.

The information required by this action are
  1. The action which is SendEmailFromTemplate
  2. The ID of the email template. This can be found in the URL of your email template record (refer to vlog)
  3. Regarding which is the Case record
  4. Target which is the JSON payload defined in my 1.11 Email target action

Woo hoo, we are ready to automate! #LetsAutomate

Power Automate in action

Good to go, update the Send Trust policy renewal field in my Case record and away it goes!

Summary

What previously couldn't be achieved using out-of-the-box classic workflows can be achieved with flow in Power Automate - sending emails to multiple recipients (dynamically) using an Email Template. This excites me because it takes Dynamics 365 and CDS to the next level as use cases can be met using flows in Power Automate.

Thanks for checking out this WTF episode and catch you in my next one.

Toodles.