Wednesday 28 November 2018

How to display a date field value correctly in an email in Flow

23:12 Posted by Benitez Here , , , , , , No comments

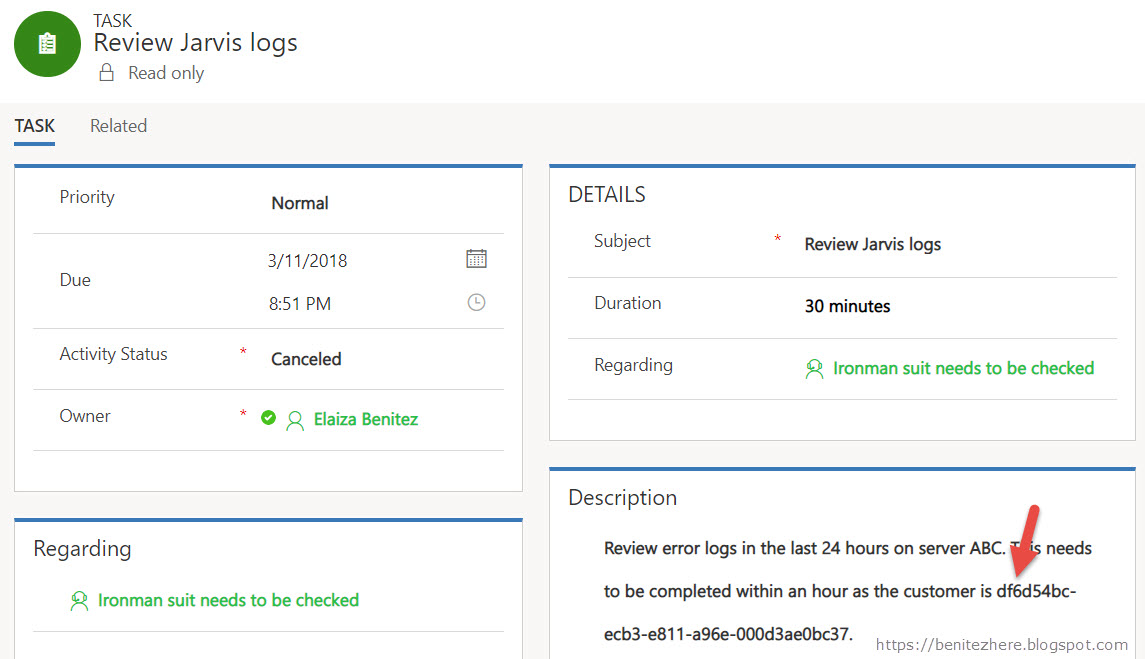
In my previous blog post and vlog I covered how to reference related entity data. The last use case was to send an email to the contact associated to the Case where the Created On value is included in the email message content. Currently today we're used to configuring this through the Form Assistant by selecting the Created On field of the Case.


If you do this in Flow using the Get Record action and Send email from Shared Outlook Mailbox, it'll look like the following.


Yes, a true WTF moment. Welcome to another WTF blog post.

Why does it display in this manner?

I stumbled across this when I was in the process of converting my Dynamics 365 workflows into Flow for the Dynamics 365 Saturday NZ conference earlier this year. I knew I needed to use the Get Record action and when I did it was showing up as seen in my screenshot above.

That's when I came across Stephen's blog post in the Flow community site. If you don't know about the Flow community site, you should definitely check it out. There's lots of useful nuggets in there.

Anyways Stephen's blog post explains that Flow treats Date and Time in UTC and talks about using a particular action. The other thing to take note of is that Dynamics 365 also stores Date and Time as UTC. When we see the date and time in the user interface it will be shown in the timezone of the user if it's defined as User Local. For further information on the other Date and Time definitions, refer to this docs.microsoft.com article.

Using the convert time zone action in Flow

This action is pretty simple to understand.

  1. Base time - this is where you need to reference the Dynamics 365/CDS field. In my scenario it's the Created On field of the Case
  2. Format string - this is where you can define the format of the date and time. You can either choose from a list or make your own
  3. Source time zone - this is where you set the value to UTC
  4. Destination time zone - this where you set the value to the local time zone
Once you have this Flow action set up, you're good to go. In your email message you can now reference the convert time zone action. 


When the recipient of the email views the email message they will now see the the date displaying correctly in a more end user friendly manner.

Is there any value in this "extra" configuration step?

OK you might be outraged that you need to go one step further in Flow to get the date and time displaying correctly in an email message compared to the minimal configuration required in Dynamics 365 workflows

However the advantage I see is that you now have the power to format the date the way you want it to. Those who are familiar with Dynamics 365 will know that
  • if you want to have different formatting in Email Templates or in an Email activity created from a Dynamics 365 workflow, you have to turn to some type of custom method
  • you can change the formatting of date and time in Settings so that it shows as desired but this applies globally in Dynamics 365, it's a system wide setting
Here are a few posts that demonstrate people asking about how to change the format of date and time outputs
If you turn to the developer guide on docs.microsoft.com, you'll see a bunch of information on how to to convert date and time fields through code.

By using the convert time zone action in Flow you have the power to choose what format you want as the output in your email message without any code.

Summary

Use the convert time zone action in Flow to display a date and time field value in an email message. If you don't, it will display as UTC in the email message.

If this has helped you, tweet to let me know. Thank you.

This Flow is available in the TDG PowerApps Bank.

Happy Flowing!

#WTF #FlowFever #TDG

Thursday 15 November 2018

How to reference related entity data in Flow

21:24 Posted by Benitez Here , , , , No comments
What we're currently used to in Dynamics 365 workflows is using the Form Assistant to reference data to a N:1 entity. This is usually when we want to grab field data from a lookup field on the entity form.

In Flow we don't have a Form Assistant to guide us but there is the Get Record action in Flow. It's somewhat different but it's easy to understand. Welcome to another WTF blog post where I explain the Get Record action and what happens if you don't use it.

Use case 1 - reference Company Name

In my first example seen in my vlog, I reference the Company Name from the selected Account in the Customer lookup field of the Case record.


If you don't use the Get Record action and reference the Customer Dynamic Content either in your Dynamics 365 or CDS connector, it'll look like this in your model-driven app.


You'll see the GUID rather than the Company Name. As explained in WTF Episode 1, Flow uses the ODATA APIs of Dynamics 365. It sees the referenced Customer as a GUID.

When you use the Get Record action, you'll be able to reference the Company Name.
The breakdown is as follows:
  • Entity - represents the related entity you want to reference
  • Identifier - represents how you are identifying the record. In this use case we are performing it through the Customer lookup field in the Case entity which is my CDS trigger of my Flow

Once you have inserted your Get Record action you can then correctly reference the Company Name through the Get Record action. When your Flow executes, this time it will correctly display the expected Company Name value.

Use case 2 - Reference email address

This is a common use case when we want to send an email using Dynamics 365 workflows. As seen in my vlog, I'm sending an email to the Contact through the lookup field in the Case. What we are used to when configuring in Dynamics 365 workflow is selecting the Contact in the Form Assistant.


If we do this in Flow, this is what happens.


An error is thrown because Flow again sees it as a GUID instead of an email address.

By using the Get Record action you will be able to reference the email address of the Contact based on the Contact value in the lookup field in the Case record.

Summary

The Get Record action is basically the Form Assistant that you're used to when you want to reference related entity data in Flow. This will allow you to reference fields from N:1 entities.

The next roadblock you might experience is when you reference data and time values in your email message step in Flow, it'll look like this:


In the next WTF blog post I will show you how to get around this.

Stay tuned citizen!

Wednesday 7 November 2018

Embedding Power BI report and dashboards in Dynamics 365 for Portals

All you die hard fans of displaying beautiful data through the art of Power BI can now rejoice as it's never been more easier to embed Power BI visualizations into Dynamics 365 for Portals. This is another new October 2018 release feature. Get excited cause it's super easy to configure.

What you need

  1. Dynamics 365
  2. Dynamics 365 for Portals
  3. Power BI

How to enable Power BI Integration

Enable Power BI integration through Portal Details. Head over to the Dynamics 365 Admin Centre and in the Application tab, select your Portals instance to open up Portal Details.

In here you'll see a new option called "Set Up Power BI Integration." 


Click on this and Power BI integration will be enabled. Super easy.

Understanding what can be surfaced

You have three options to choose from
  1. Power BI Report
  2. Power BI Dashboard
  3. Power BI Dashboard tile
In my vlog I demonstrated the first two. 

Method to use for embedding Power BI visualizations

You'll need to use Liquid tags with a couple of parameters which can be done through a web page or a web template. These parameters are 
  • Authentication type
  • Path

Authentication type

If using a secure Power BI report or dashboard where only Azure Active Directory authenticated users can view the Power BI, you need to use the tag of "AAD" Make sure the report or dashboard is shared to the required users.

If you want to use a Power BI report or dashboard that will be visible to anyone, you'll need to publish it to the web and use the tag of "anonymous." If you don't know how to do this, check out this article.

For more details on liquid tags for Power BI, refer to this https://docs.microsoft.com article.

Path

This is the URL of your report or dashboard.

Combining the two parameters

As referenced in the docs.microsoft.com article, your tag would be something like the following
{% powerbi authentication_type:"AAD" path:"https://app.powerbi.com/groups/00000000-0000-0000-0000-000000000000/reports/00000000-0000-0000-0000-000000000001/ReportSectionc01" %}

OK, ready to apply tag

You can either insert your Power BI liquid tag in a web page or web template. In my vlog I used a web page that I had created.

Insert the tag in the Copy field of the Localized Content record and you're good to go. Super easy.

Power BI visualization in action

Once the web page is saved, browse to your Portals instance and view the web page. Ta da! Awesome sauce.


What I do like about using a Power BI report is that users can interact with the report still. As mentioned in my vlog I was expecting it to be static and not interactive. Bonus in my opinion that you can interact the report as how you normally would.

Summary

The configuration steps are pretty simple and it doesn't take that long to hit the ground running with embedding Power BI visualizations in Dynamics 365 for Portals. I thought this was pretty cool when I had play with it last month.

I am not a Power BI guru but the person I recommend you check out and follow is none other than MVP CRM Chart Guy,
Cool, have fun configuring!

Thursday 1 November 2018

SharePoint Document Management for Dynamics 365 for Portals

I'm excited to share with you that SharePoint Document Management is back for Dynamics 365 for Portals. Over two years ago, Donna Edwards, requested that this feature was to be brought back. Short history lesson - back in Adxstudio Portals you could configure SharePoint Document Management. When it was acquired by Microsoft and was included as part of Dynamics 365 Customer Engagement enterprise subscription, the feature was no longer supported.

It has been the most requested feature and the product team have listened. As a MVP I was invited to review and provide feedback to the new October Release 2018 features for Dynamics 365 for Portals. I demonstrated the three new features in the October Melbourne User Group.
  1. SharePoint Document Management
  2. Embedding PowerBI 
  3. New modern Portal editor


In this blog post I will go through the configuration steps required to enable SharePoint Document Management.

Entity I am using

I used the Case entity for enabling SharePoint Document management. This was shown in my vlog and will be used for screenshots in this blog post.

Step 1

Enable the document management for the Case entity in the entity configuration record either by opening up solutions from within Dynamics 365 or PowerApps (through https://web.powerapps.com).


Step 2

Enable entity in Document Management Settings. There will be a wizard you follow.


Step 3

Enable SharePoint Integration through Portal Details. Head over to the Dynamics 365 Admin Centre and in the Application tab, select your Portals instance to open up Portal Details.

In here you'll see a new option called "Set Up SharePoint Integration." 


Click on this and you'll see an Enable SharePoint Integration option.


You'll be prompted to select your user account to enable required permissions.


Accept the required permissions presented.


Step 4

Configure the entity form to display a sub-grid of Document Locations in the Case entity configuration record either by opening up solutions from within Dynamics 365 or PowerApps (through https://web.powerapps.com).

  1. Make sure you configure the correct entity form that your Dynamics 365 for Portals references.
  2. Make sure you select Active Document Locations as the view as by default My Active Document Locations will be selected.

Step 5

The final step is to create a Child Entity Permission record. The Dynamics 365 for Portals entity form will need to have the "Enable entity permissions" checkbox enabled so that the Portals user can upload files though the sub-grid

There will be a Parent Entity Permission that will drive access to the Case entity. In my scenario, it is an entity permission that allows contacts to create, view, edit and delete Cases if they are the customer in the Customer field of the Case. Against this entity permission, I create a child entity permission.


SharePoint Document Management in action

After the above steps, you're now able to see it in action. 

Sign into your Portals instance and create a new case. After the case is created, you'll now be able to upload files. Remember, Dynamics 365 for Portals respects Dynamics 365 functionality so you cannot interact with a sub-grid until the records is created and saved.

By the sub-grid you'll see two buttons, 
  1. Add files which will allow you to upload files
  2. New folder which will allow you to create a new folder to upload files into
Awesome sauce, you're all set to upload files now 🙂


Once uploaded you can also browse to the SharePoint document location from the Case record.


As demonstrated in my vlog, files portals users delete if they have the permission to do so, will also be deleted in Dynamics 365 and in SharePoint online.

Summary

The most requested feature for Dynamics 365 for Portals returns and is all configurable. I am not a SharePoint configuration expert in the context of Dynamics 365 so if you have questions, it's better suited for the Dynamics Community forum. Please also refer to https://docs.microsoft.com for more information on managing SharePoint documents.

Stay tuned for my next blog post on Dynamics 365 for Portals October Release 2018.

Shout out to the Dynamics 365 for Portals product team for inviting me to play with these features in advance 😁 #thankyou