Wednesday 26 September 2018

AND OR statements in Flow

21:16 Posted by Benitez Here , , , , , No comments
When using a Check Condition step in Dynamics 365 workflows, you have the ability to to the following
  • AND
  • OR
  • Group a combination of AND OR

In this #WTF post I will cover how to do this in Flow as the configuration is different. Remember, Flow uses the odata APIs of Dynamics 365 which results in different configuration. However our Dynamics 365 knowledge still applies 😁

Two types of modes

When using a condition step in Flow there's two modes that you can apply. 
  1. Edit in Basic mode
  2. Edit in Advanced mode

Basic mode

This is the familiar "click and select" concept where you choose your condition and the field value.

Advanced mode

This is where you can make additional adjustments that is not available through basic mode. This is what we will use for AND OR statements. Why? In basic mode you cannot set more than one condition in a Flow condition step.

Breaking down Advanced mode

OK, this is where I give you my explanation. Disclaimer: I am not a developer and the terms I use is what makes sense to me. It is not the official explanation but this is how I have understood it which has helped my learning and adoption of Flow.

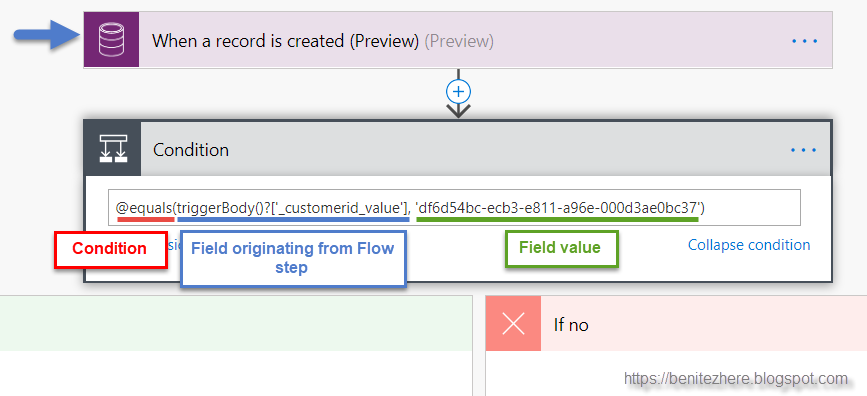
In a Flow condition step, it is calling a function to pass single or multiple parameters using some logic.

When we review the funky looking string in Advanced mode, this is how I see it:


Hopefully this makes sense to you.

How to do AND

You must use Advanced mode to be able to extend the function to have more than one criteria.

In my Flow condition, I was checking that the Customer equals Stark Industries and Product equals AI Support.

Again, here's my explanation of what the function is in Advanced mode.

How to do OR

Similar to AND but this time using OR instead.

How to group OR and AND statements

This one I figured out on my own. What I was able to work out is there's different parts to the function.

In Dynamics 365 workflows we are used to configuring it like the below,


We use "Group And" and "Group Or" clauses.

In Flow we apply the same logic in the following manner,

  1. In blue is the AND OR conditions
  2. In red is the two grouped OR conditions where the Product field value equals AI Support or Iron Man Armor.
  3. In green is the condition where customer equals Stark Industries

Bonus tips

Use GUID when referencing a lookup in a condition

In Dynamics 365 we are used to seeing the Name of the lookup value when referencing a related record in a condition.

In Flow we need to reference the GUID of a lookup value since it uses the odata APIs of Dynamics 365. In Unified Interface, it's easy to get the GUID in the URL.

Lookup record exists in target instance

If you export and import a Dynamics 365 workflow from a source instance into a target instance that references a related record through a lookup in a condition step, the workflow will not execute as expected if the record does not exist in the target instance.

Same principle applies in Flow so make sure the record does exist in the target instance. Otherwise when the Flow is imported into the target instance and the GUID does not exist, you're going to run into a problem.

Use Notepad++

Notepad++ is your best friend when it comes to making sure that you are not missing any close brackets which is what I demonstrated in my vlog. Notepad++ will highlight your brackets in red and it makes it easy to see where you are missing a close bracket.

Summary

To perform multiple conditions to use AND OR statements, and Group, you need to edit in Advanced mode to enter the correct function. It might appear as hard at first however you will get the hang of it. As mentioned earlier I am not a developer, but I was able to understand the concept of edit in Advanced mode when configuring the Flow condition step.

More #WTF coming. Stay tuned 😎
#FlowFever

Thursday 20 September 2018

How to configure Dynamics 365 workflow scope in Flow

07:20 Posted by Benitez Here , , , ,

#WTF 

In case you haven't watched my announcement video on my new WTF vlog series (What the Flow), here it is.


The purpose of my WTF vlog series is to help you extend your existing knowledge of configuring Dynamics 365 workflows and how to replicate this in Flow. Flow uses the odata APIs of Dynamics 365 and as a result of this, how you configure in Flow is somewhat different to Dynamics 365 workflows.

You may freak out. You may pull your hair out. You may think Flow is stupid.

Yes - I have mentally experienced this but once I overcame it I loved Flow. There's so much capability that Flow unlocks that we didn't have in Dynamics 365 workflows. I know, it is hard sometimes to let go of what you are already familiar with however you're not going to know unless you try.

Have I motivated you in learning Flow? Let's begin 😁💙

Episode 1 -  Scope in Flow

This is my first episode of my WTF vlog series. In this episode I talk about the difference between a Dynamics 365 connector and a Common Data Service [CDS] connector in the context of defining scope for Flow.

"Scope" is already a configuration we are familiar with in Dynamics 365 workflows. I thought it would be a good idea to kick-off my WTF vlog series with this since it is a configuration you normally set prior to configuring the Dynamics 365 workflow steps.

In case you are new to Dynamics 365

When configuring Dynamics 365 workflows one of the configurations is to set the scope of a workflow as this will determine which users will trigger the workflow. For more information on scope for Dynamics 365 workflows please check this out.

How do I replicate scope in Flow?

There are two types of connectors in Flow that is applicable to Dynamics 365:
  • Dynamics 365 connector
  • CDS connector

What's the difference?

In a Dynamics 365 connector, you cannot set the scope. The Flow will always be triggered organisation-wide.

Screenshot from Flow Dynamics 365 connector:

In a CDS connector, you can set the scope like how you currently can in a Dynamics 365 Flow.

Screenshot from Dynamics 365 workflow:


Screenshot from Flow CDS connector:


However as Andrew Ly pointed out in his blog, there are Flow premium connectors. Notice how some CDS connectors have a Premium label. 

I'm not a licensing expert but here are details of Flow plans. If you have questions on licensing I suggest you ask them in the Microsoft Flow community.

Steps

This will be familiar to you if you already know how to configure Dynamics 365 workflows in Flow. Set the desired scope in the CDS connector such as "Organization." 


That's it. You've learnt your first "how-to" in Flow. Congratulations!

Flow respects Dynamics 365 principles

Setting the scope in the CDS connector will replicate the existing functionality of Dynamics 365 workflows in scope. This means that the OWNER of the Flow defines which users will trigger the Flow.

What I demonstrated in the vlog is the following use case scenarios.


In terms of the security structure I have: 
  • The users Elaiza and CE Admin are in the same Business Unit
  • The user Aaron is in another Business Unit
In the use case where I set the CDS scope to Business Unit: 
  • when Aaron created the Case in Dynamics 365 the Flow would not trigger 
  • when CE Admin created the Case in Dynamics 365, the Flow triggered since CE Admin is in the same Business Unit as Elaiza, who is the owner of the Flow
The same Dynamics 365 workflow principles apply to Flow in regards to the defined scope.

Summary

Although the vlog was longer than this blog post, the vlog demonstrates that what you already know about configuring scope for a Dynamics 365 workflow and how it defines which users can trigger the workflow also apply to Flow.

In the next episodes I will begin to cover the configuration steps in Flow. I will start with how to do AND OR statements in a condition step. This is something you are already familiar with in Dynamics 365 workflows today but in Flow it's different which you'll learn in my next episode.

Stay tuned for more #wtf

#FlowFever