Business Process Flows have existed since Dynamics CRM 2013 and continues to be supported in Dataverse and model-driven apps.
Earlier this year in Novemeber, I presented two sessions at the Microsoft Power Platform Conference 2023 and one of them was Summarizing Business Process Flows to help you get started which I’ll cover in this WTF episode blog post.
I'll be covering the following:
What is a Business Process Flow?
- What is a Business Process Flow?
- Elements of a Business Process Flow
- Create a Business Process Flow
- Create a Business Rule in a Stage
- Assign security role to a Business Process Flow
- Create a cloud flow to run from a Step
- Create a classic workflow to display an error message to users on exit of a Stage
- Update the Business Process Flow with #6 and #7
- Demo - the Business Process Flow in action
1. What is a Business Process Flow
It’s a visual user interface in model-driven apps to guide users in understanding the steps to complete for an organisation process, and ensures the same steps are followed by users each time. Business Process Flows are online based and are visible only in model-driven app forms.
2. Elements of a Business Process Flow
Let’s take a closer look at the different elements.
- Each Business Process Flow will be associated with a primary table in Dataverse. In this example, this Business Process Flow is associated to the Idea table in Dataverse.
- Next there’s Stages. Think of Stages as a phase or way to categorize the different parts of your process. The first stage will always be linked to the primary table by default.
- Now for every Stage, there are steps. These steps are columns from the Dataverse table the Stage is associated to. These steps can be made mandatory and the behaviour of them can be changed by using business rules, such as making a step read-only based on logic.

3. Create a Business Process Flow
All business process flows are created within a solution. In a solution click New, head to Automation then Process, and select Business Process Flow.

Enter a name for the business process flow, select a Dataverse table as the primary table the business process flow is associated with, and then click Create.
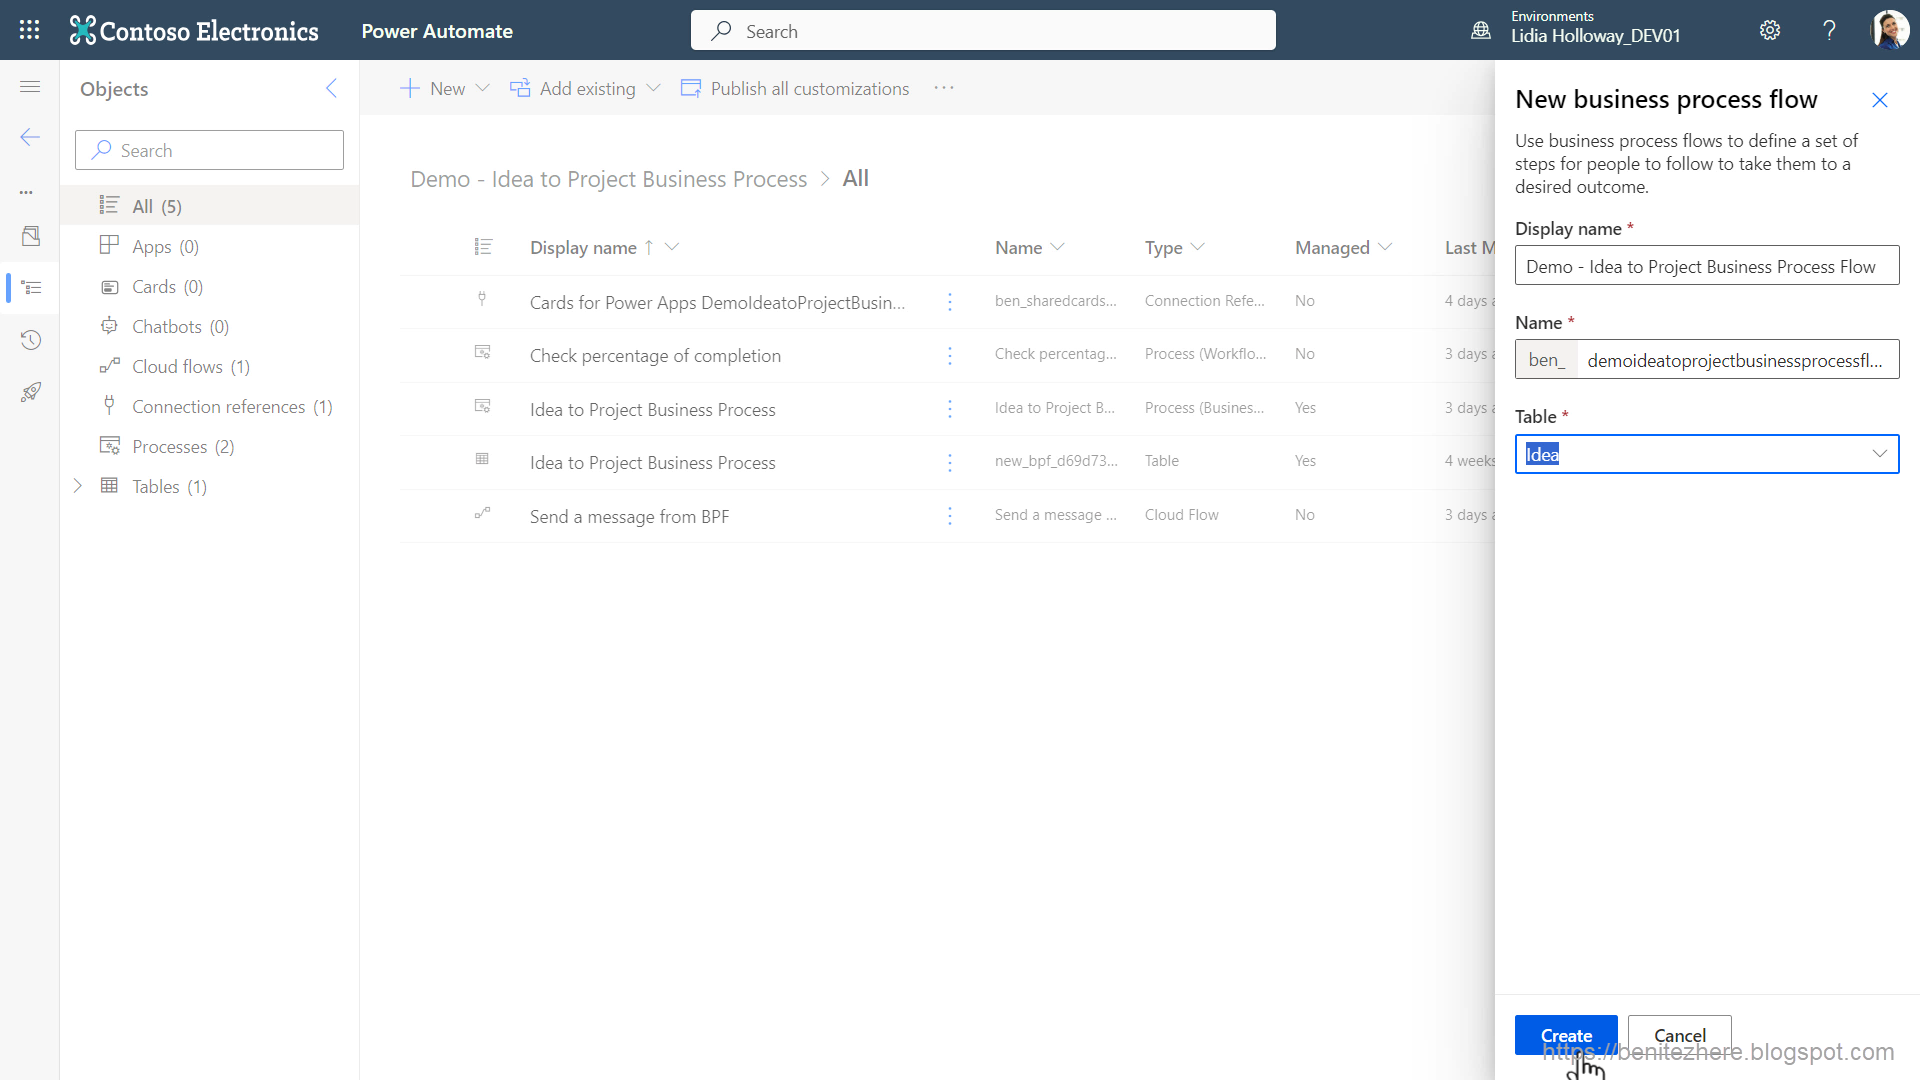
You’ll see a prompt appear to let you know that once the business process flow is created, the solution will refresh and your newly created business process flow will be displayed. Click on the ellipsis of the newly created business process flow and select Edit.

The Business Process Flow designer will load next and you can enter a description for the business process flow by clicking on the expand icon next to the Name. Entering a description helps users and makers understand the purpose of the business process flow.

Defining Stages
Save the Business Process Flow and next define the first stage in the business process flow. Select the first stage and do the following:


- Enter a name.
- Optional - select a Category. The Category can be useful when you want to do reporting on the business process flow.
- Click Apply.

The stage will now be defined and you're ready to add steps to the stage.
Defining Steps
Click on details in the first stage and select the first step. Do the following:
- Enter a name.
- Select a column from the Dataverse table that will represent the step.
- Optional - make the step required or not required for the user.
- Click Apply.

And that's how you define a step in a stage 😊
To add another step into the stage, click on Add and select Add Data Step under Composition. Then click on the + icon inside of the stage to add the new step. Repeat the same process in defining the step.
Add more Stages and Steps
To add another stage after you’ve defined your first stage, click Add and then click on the + icon next to the first stage, and a new stage will be added. Repeat the same process for defining the stage, followed by adding steps to the new stage.

Adding a secondary table in the Business Process Flow (aka multi-table)
You can also have a multi-table business process flow where you can add secondary Dataverse tables to stages. This will be a table different to the Primary table the Business Process Flow is associated with, but is related to the Primary table. This relationship from the secondary Dataverse table to the Primary table is a 1:N relationship.
For example for one of the stages, I’ll select the Team Project table for the entity of the stage. The column that represents the 1:N relationship is the Originating Idea column which displays in the relationship dropdown field.

If I select the Originating Idea column, I’m enabling the user to link the Team Project row to a parent row from the Ideas table. This is handy when I want to move back from a Team Project stage to an Idea stage, and then move back to the Team Project stage by reselecting the Idea previously created.

If I select the relationship field as None, it means each time a user moves from an Idea stage to a stage that’s associated to the secondary table of Project Team, they are required to create a new Project Team row each time.

For this WTF episode, I’ll select the Originating Idea column in the Relationship field to allow the user to go back to the previous Idea stage, and when they move on to the next stage that’s related to the Project Team, they can re-select the row they previously created or linked the Idea to.
Adding a Condition for logic
Other things you can do in the business process flow is add a condition. Conditions are If Else logic in a business process flow. To Add a Condition, click on Add and select Add Condition. To place the logical condition in the business process flow, click on the + icon after a business process flow stage. Then define the logic for the condition.

For this episode I’ll configure the If part of the condition to check whether the project is funded. I configured the logic as the following:
- Enter a name
- Select the column to use for the conditional logic which in this use case is Fund Project
- The operator can remain as equals
- The type can remain as value
- For the value, I’ll select Yes
- Click Apply

To define the If Else part of the condition, we can link the condition to an existing stage. To do this,
- Select the condition and click on connector
- Click disconnect.
- Then reselect the condition and select Connect. Notice how the other stages downstream in the Business Process Flow are highlighted in Yellow. This indicates that these stages can be selected for the If Else part of the condition.
- Select the close stage and the If Else condition is now defined for the condition.
You can save and activate the business process flow at this point.

4. Create a Business Rule in a Stage
If you want to add business rules to the business process flow, you can do it directly from the designer. You select a stage, then click on the Business rules for this stage's entity hyperlink, and a new window will appear. Click on the new icon and the business rule designer will appear.

The example I used in this WTF episode is making the % (Percentage) Complete field show as business required when the Complete proposal field equals Yes. To achieve this, do the following:
- Enter a name for the business rule
- Enter a description for the business rule
- Select the Condition in the business rule designer and enter a name for the Condition step.
- The Entity will remain as the Idea Dataverse table
- The Source will remain as the Entity
- Select the Complete proposal field in the Field dropdown
- For the Operator it’ll remain as equals.
- The Type will remain as value
- Select the Yes checkbox as the Value
- Lastly click Apply.


Next I’ll add an action of Set Business Required and click on the + icon. I’ll then enter a display name and select the % (Percentage) Complete field in the dropdown. In the next dropdown I’ll change it to Business Required and click Apply.

Now do the opposite for the If Else condition. I’ll click add, then click on the + icon for the If Else condition and add the Set Business Required action. Enter a name, followed by a description, and select the % Complete field, and click Apply.

You can also configure the Scope of the Business Rule and there are 3 to choose from.
- The first one is Entity which means it will run on server side where a user does not need to be on the model-driven form for it to take effect.
- Next there’s All Forms where the business rule will run on all forms for the table and the user is required to be in a model-driven app form.
- Lastly there’s a Specific Form, in my use case we see the Information Form, and if selected, it will only run on this form.
- MB-200: Microsoft Dynamics 365 Customer Engagement Core – Business Rules
- Server Side Execution of Business Rules
- Limitations of business rules in Dynamics 365
- Create business rules and recommendations to apply logic to a form
- Clarifying how Business Rules work with Editable Grids
Save and activate the Business Rule. Exit out of the Business Rule designer and you’ll see the Business Rule has been created. With the business process flow already activated, click the Update button and the business process flow will be updated with the business rule.

5. Assign security role to a Business Process Flow
You can also select which security roles can access this business process flow. Business process flows can be role-based meaning only users with the specified security roles can access the business process flow. The following are the steps to assign a security role:
- Select Edit Security Roles
- Then select the relevant security roles for the business process flow
- Navigate to the Business Process Flows tab
- Enable the Organization access level for all privileges or you can choose to not enable some of them but at minimum it will need Create, Read, Write, Append and Append To.
- Click Save and Close to update the security role, exit from the security role window and exit from the other window that lists the security roles to get back to the business process flow.
6. Create a cloud flow to run from a Step
Nthat you know how to create a business process flow, let’s add some automation to it. You can execute a cloud flow from any stage in the business process flow. What I demonstrated in this WTF episode is how you can send a message from the Business Process Flow stage by entering a comment as the message and in Teams, a Power Apps Card will be sent to a channel. This is all achieved by using Power Automate cloud flows.
As of when this blog post and WTF episode was filmed, the the new flow designer does not support the Dataverse trigger of When a flow step is run from a business process flow. So I won’t be building in the new flow designer.

Create a cloud flow
Create a cloud flow in the same solution and the trigger to select is instant. Enter a name for the cloud flow and select the Dataverse trigger of When a flow step is run from a business process flow. Then click Create.

The Trigger
For the trigger, add an input. I’ll select text as the input to prompt the user to enter a comment.

Remaining steps of the cloud flow
For the next step, I’ll select the Dataverse action of Get a row by ID.
- I’ll rename the action and for the table, I’ll select the Ideas table.
- For the Row ID, we’ll reference a dynamic content value from the trigger, the BPF flow stage table row ID. This is the GUID of the Ideas table the cloud flow was triggered from through the stage in the business process flow.
- To optimize the flow run, I’ll only display the columns I want which is the name of the Idea, the Idea score and the Risk score.

I’ll then add the Create card instance action from the Cards for Power Apps connector. If you want to learn how to create Power Apps Cards, watch my previous episode.
- I’ll select the Card that will be posted in a Microsoft Teams channel.
- For the Message from BPF input value, I’ll select the dynamic content of Comment from the trigger.
- Next I’ll populate the variables of the Power Apps Card by selecting the dynamic content of GUID from the previous action that retrieves the Ideas row, followed by the Idea Name, Idea Score and Risk Score dynamic content values.

Next I’ll select the Post card in a chat or channel from the Microsoft Teams connector.
- I’ll Post as Power Apps
- and Post in Channel.
- Next I’ll select the Teams group followed by the Channel to post the Card to
- Lastly, I’ll select the dynamic content of Card from the Power Apps Card action

The last action in my cloud flow is to update the Process Log table that contains the run details of the workflow that was triggered in the stage of the Business Process Flow.
- Select the Flows Workflow Log Id from the trigger
- Select the Status of Succeeded. This will now update the Status to Succeeded which will be visible in the business process flow stage once the cloud flow run completes.

7. Create a classic workflow to display an error message to users on exit of a Stage
Next we’ll learn about using classic workflows to display an error message on exit of a business process flow stage. Classic workflows is the original built-in low code automation of Dynamics 365 and Dataverse as you don’t need to know functions, it’s simply click and select.
As an example, I’ll display an error message if the user tries to move on to the next business process flow stage when the % (Percentage) Complete is equal to or less than 79.
Create classic workflow in a solution
In the same solution, select workflow under automation.

Enter a name and select the Ideas Dataverse table. We’re going to create the classic workflow from scratch so leave it as blank and click create.

Define the workflow execution details
Before adding steps to the workflow, we first need to do the following:
- Tick the "As an on-demand process checkbox," this is so that we can run the classic workflow from the business process flow stage.
- Change the Scope from user to "Organisation" to allow any user to be able to trigger the classic workflow.
- Uncheck the tickbox for "Record is created" as the classic workflow will be executed on demand.

Add steps to the workflow
We’ll add a condition by selecting the row in the designer, followed by clicking on Add Step and select Check Condition. You’ll be prompted to enter a description for the description. You can then define your condition by clicking on the hyperlink within the condition.
In the new screen that appears, you can define the logic for the condition. For the use case of displaying an error message if the user tries to move on to the next business process flow stage when the % Complete is equal to or less than 79, I did the following:
- Selected the Dataverse table which is Idea,
- Followed by selecting the column % Complete.
- I then selected the operator of Is Less Than or Equal To and entered a value of 79.

I’m going to add another condition where we check if the column is not populated, as we don’t want the user to progress if they have left this step in the business process flow stage blank.

Both of these two logics need to be handled as OR, where we check if either condition is met. Select both rows and the group OR action. Then click Save and Close.

To display an error message to the user, we can use the Cancel workflow step. Select the row in the designer under the condition and click on Add Step, and select Stop workflow. Enter a description and then change the status from Succeeded to Cancelled, and click on Set Properties. In the Value field, enter the message to display to the user.

Next we’ll add an If Else condition to not display an error message if the percentage complete column value is greater than or equal to 80, the user can proceed to the next stage in the business process flow. In the designer, select the entire row of the condition, then click on Add Step and select the Conditional Branch workflow step. Click on the condition hyperlink and select the Idea table, followed by the percentage complete column and this time for the operator select Is Greater Than or Equal To. Enter the value of 80 and click Save and Close.

We’ll repeat the previous process of adding a Stop workflow step, enter a description and leave the Status as Succeeded as we’re not displaying an error message. Finally click the Save button, and Activate the classic workflow. The classic workflow will now be activated and will also appear inside the solution when you exit from the classic workflow.

8. Update the Business Process Flow with the cloud flow and classic workflow
With the cloud flow and classic workflow built, they can now be added to the business process flow stage.
Add the cloud flow
- In the business process flow, select Add Flow Step to associate the cloud flow to it.
- Then select the + icon in the stage of where the flow step is to be added to.
- Enter a name and you also have the option to make the flow step required if needed. Select the cloud flow in the lookup field and then click Apply.
- The cloud flow is now added to the stage in the business process flow as a flow step.

Add the classic workflow
To add the classic workflow, it’s the same where you
- Select the stage, click Add and select Add Workflow.
- In the Trigger dropdown field, select Stage Exit
- Then select the classic workflow in the lookup field. The Display name will automatically be populated with the name of the classic workflow.
- Click Apply and the Workflow step is added to the Business Process Flow stage.

9. Demo - see it all in action
I've put a jump link to the part in my WTF episode YouTube video that shows how it all works end-to-end.
Summary
Business Process Flows on the surface can appear to be basic as a guided visual end user interface, however by adding logic either through the built-in condition step and/or business rule, plus sprinkles of automation using cloud flows and/or classic workflows, it can be an interactive experience for users too. My recommendation is to take a look at what processes you have in your organisation that have common steps and try see if you can use business process flows in model-driven apps to digitize it.
You can be an expert too with BPFs 😎
Some PCF controls that may be of interest to you 👀
If you want additional capabilities for Business Process Flows in model-driven apps, check out the following PCF controls in the PCF Gallery:
- Business Process Flow Viewer by Allan De Castro
- Business Process Cards for System Views by Natraj Yegnaraman