Showing posts with label Dynamics Portals. Show all posts

Thursday, 9 May 2019

Automatically update the stage of a Business Process Flow with Flow

I have worked on Dynamics 365 for Portals projects and one of the things I get asked is how to reflect the lifecycle of an application back in the model-driven app. This is for the purpose of users who need to interact with the application to progress it for the ultimate goal of the application being approved. Naturally Business Process Flows come to mind because it's a visual aid to help users understand what is to be completed in each stage.

I wanted to see if it is possible to automatically update a Business Process Flow using Flow based on interactions by multiple types of end users. These would be end users of the portal and end users of the model-driven app. I put Flow to the test and it worked 😄 In this WTF episode I cover how to automatically update a Business Process Flow stage with the power of Flow.

Quick lesson on behind the scenes of Business Process Flows

For the folks in the community who have been around the Dynamics 365 circuit for a while, the method of retrieving and updating BPF fields within the record is deprecated.


For example Stage ID and Traversed Path will display as deprecated in the Application entity customization settings. Note: for some reason in https://web.powerapps.com the Stage ID was not displaying so my screenshot is from the classic solution editor.


The current supported method is to reference fields in the BPF entity that would have been created when your BPF was created. In my scenario I created a custom Application BPF and a custom BPF entity was also created. There are fields within this entity that will be used in my WTF Flow which are
  • Active Stage ID - this will contain the stage ID value of the Business Process Flow stage the application is currently in
  • Application - this is the lookup to the application record
  • Business Process Flow Instance ID - this is the ID of the record that will be used in a Flow action
  • Status
  • Status Reason
  • Traversed Path - this will contain the active stage IDs the Business Process Flow has gone through in its lifecycle

Use case

I am extending my Grant Application Management solution to replicate the real world of an organisation. I have previous vlogs and blogs that cover it.
  1. Grant application management part 1: Universal Resource Scheduling
  2. Grant application management part 2: the external reviewer and applicant experience
  3. Dynamics 365 Saturday Scotland 2019 - Grant Application Management
In a nutshell
  • a grant application is submitted through the portal
  • an external reviewer is assigned to the application where they are required to approve or reject it through the portal
  • an internal reviewer also approves or rejects it within the model-driven app
  • until there are two approvals, the application will not be updated to Approved
To keep it simple and for demo purposes I have three stages in my custom Application Business Process Flow.
  1. In Progress
  2. Review
  3. Approved

Here is the interactions of the end users that will trigger the Flow
  1. When an application is submitted by an Applicant through the portal, the Business Process Flow stage of the application record should automatically move from the In Progress stage to the Review stage. This is so that anyone within the organisation can see that the Application is now in the Review stage.
  2. When both the External Reviewer and Internal Reviewer has approved the Application, the Business Process Flow stage of the application record should automatically move from the Review to Approved stage.
This is a Business Process Flow that uses a single entity.

Let's Flow

1 - The trigger

The trigger will be when the status reason of the Application has been updated.

2 - Retrieving the Application Business Process Flow record

Since the supported method is to reference the fields in the Business Process Flow record, the List Records action is used to retrieve the Application BPF record associated to the Application.

The filter query is for the purpose of only returning the Application BPF record associated to the Application. If a filter query is not used then ALL Application BPF records will be returned.

3 - Parse JSON

To reference the properties returned in the JSON response from the List Record returned, the Parse JSON action will be used. In my expression I am use the first function which I covered briefly in my previous WTF episode.

4 - Compose action for the Review stage ID

To move the Business Process Flow from one stage to another, the stage ID needs to be captured in the traversed path field. I am using two compose actions to store the value of the stage IDs.

To identify the stage ID values of the Business Process Flow there is a Dynamics 365 API request which can be found in the docs.microsoft.com article.


In the API request you reference the Dynamics 365 organisation URL along with the ID of the business process flow record. The simplest way to grabbing the ID is to do it from the Business Process Flow record.


Once you execute it in a browser it will look something like this:

Copy and paste into Notepad++ and use the JSON viewer plugin so that the response can be easier to read for the Business Process Flow stage IDs.


The Review stage ID can now be referenced in the Compose action.


I decided to use two Compose actions because I don't know how to store the Dynamics 365 API request in a Flow action. If you know how to do this, feel free to blog and tweet to me so that I can check it out.

5 - Compose action for the Approved stage ID

This Compose action references the Approved stage ID.

6 - Initialize Variable action for the Switch action

If you have not used the Switch action before I recommend checking out the Flow blog and Pieter Vienstra's blog to learn about the Switch action. He has a couple of great blog posts on the Switch action.
The reason why I am using a Switch action is that there are multiple outcomes for the Application Business Process Flow based on the Application Status Reason. Using the Condition action would work too but it means that there will be a few branches and if you have a Business Process Flow with more than 3 stages, the Flow could look like a mess.

Using a Switch is just as effective and provides the desired output based on the Application Status Reason. A single field is defined in the Switch that will drive what should happen next in the Flow.

The Initialize Variable allows me to reference the Application Status Reason in my switch. I set the type to Integer as the Status Reason is an Option Set where each value in the Option Set is an integer.

7 - Switch it up

In the Switch action we reference the variable. Based on the value of the Status Reason a switch will be performed. The two cases can are defined as
  • If the Status Reason has been updated to Submitted the Business Process Flow record needs to be updated from In Progress to Review.
  • If the Status Reason has been updated to Approved the Business Process Flow record needs to be updated from Review to Approved.

7.1 - Moving to the Review stage

When the Status Reason equals Submitted, the CDS Update a record action will be used to automatically move the stage from In Progress to Review.

Entity

The entity referenced will be the Application BPF. Reminder that this is the entity that was automatically created when the custom business process flow was created.

Record Identifier

The Record Identifier will be the business process flow instance id from the Parse JSON action. This property uniquely identifies the business process flow record associated to the Application.

Traversed Path

The Traversed Path is a field as mentioned earlier that represents the lifecycle of the business process flow as it contains the stage IDs the Business Process Flow as gone through. The Traversed Path field value needs to be updated to include the stage ID of the current active stage it will be moved to. This is the Review stage.

To include the stage ID in the Traversed Path field the concat function is used in an expression. This allows the Review stage to be appended to the existing Traversed Path field value which can be derived from the Traversed Path property in the Parse JSON action.

The expression will be the following

concat(body('1.3_Parse_JSON')?['traversedpath'], ',',outputs('1.4_Review_Process_Stage_ID'))

Active Stage

This field value will be the earlier Compose action that references the Review stage ID.

Application

The final field to ensure you populate is the lookup that associates the Business Process Flow record to the Application. This is done through the Application ID from the trigger. 


7.2 - Moving to the Approved stage

When the Status Reason equals Approved, the CDS Update a record action will be used to automatically move the stage from Review to In Progress.

Same definitions except for a couple

The same field definitions apply however there's two more that is required in the CDS Update a record action since the Approved stage is the final stage in the Business Process Flow. This is so that the final state of the Business Process Flow is correctly reflected to the end user in the model-driven app. For further information refer to the docs.microsoft.com article.
  • Status Reason - this will be set to Finished
  • Status - this will be set to Inactive

Flow in action

Time to run the Flow. When the Application has been submitted through the Portal, the Business Process Flow of the application record will automatically move from In Progress to Review.


When the Application has two approvals - one from the External Reviewer and the other from the Internal Reviewer, the Business Process Flow of the application record will automatically move from Review to Approved where the state will show as finished.

Summary

Based on different end user interactions whether it is through Dynamics 365 for Portals or within the model-driven app, the business process flow of a record can be automatically updated to progress from one stage to the other using the power of Flow.

Don't forget to subscribe to my YouTube channel.

Toodles.

Wednesday, 7 November 2018

Embedding Power BI report and dashboards in Dynamics 365 for Portals

All you die hard fans of displaying beautiful data through the art of Power BI can now rejoice as it's never been more easier to embed Power BI visualizations into Dynamics 365 for Portals. This is another new October 2018 release feature. Get excited cause it's super easy to configure.

What you need

  1. Dynamics 365
  2. Dynamics 365 for Portals
  3. Power BI

How to enable Power BI Integration

Enable Power BI integration through Portal Details. Head over to the Dynamics 365 Admin Centre and in the Application tab, select your Portals instance to open up Portal Details.

In here you'll see a new option called "Set Up Power BI Integration." 


Click on this and Power BI integration will be enabled. Super easy.

Understanding what can be surfaced

You have three options to choose from
  1. Power BI Report
  2. Power BI Dashboard
  3. Power BI Dashboard tile
In my vlog I demonstrated the first two. 

Method to use for embedding Power BI visualizations

You'll need to use Liquid tags with a couple of parameters which can be done through a web page or a web template. These parameters are 
  • Authentication type
  • Path

Authentication type

If using a secure Power BI report or dashboard where only Azure Active Directory authenticated users can view the Power BI, you need to use the tag of "AAD" Make sure the report or dashboard is shared to the required users.

If you want to use a Power BI report or dashboard that will be visible to anyone, you'll need to publish it to the web and use the tag of "anonymous." If you don't know how to do this, check out this article.

For more details on liquid tags for Power BI, refer to this https://docs.microsoft.com article.

Path

This is the URL of your report or dashboard.

Combining the two parameters

As referenced in the docs.microsoft.com article, your tag would be something like the following
{% powerbi authentication_type:"AAD" path:"https://app.powerbi.com/groups/00000000-0000-0000-0000-000000000000/reports/00000000-0000-0000-0000-000000000001/ReportSectionc01" %}

OK, ready to apply tag

You can either insert your Power BI liquid tag in a web page or web template. In my vlog I used a web page that I had created.

Insert the tag in the Copy field of the Localized Content record and you're good to go. Super easy.

Power BI visualization in action

Once the web page is saved, browse to your Portals instance and view the web page. Ta da! Awesome sauce.


What I do like about using a Power BI report is that users can interact with the report still. As mentioned in my vlog I was expecting it to be static and not interactive. Bonus in my opinion that you can interact the report as how you normally would.

Summary

The configuration steps are pretty simple and it doesn't take that long to hit the ground running with embedding Power BI visualizations in Dynamics 365 for Portals. I thought this was pretty cool when I had play with it last month.

I am not a Power BI guru but the person I recommend you check out and follow is none other than MVP CRM Chart Guy,
Cool, have fun configuring!

Thursday, 1 November 2018

SharePoint Document Management for Dynamics 365 for Portals

I'm excited to share with you that SharePoint Document Management is back for Dynamics 365 for Portals. Over two years ago, Donna Edwards, requested that this feature was to be brought back. Short history lesson - back in Adxstudio Portals you could configure SharePoint Document Management. When it was acquired by Microsoft and was included as part of Dynamics 365 Customer Engagement enterprise subscription, the feature was no longer supported.

It has been the most requested feature and the product team have listened. As a MVP I was invited to review and provide feedback to the new October Release 2018 features for Dynamics 365 for Portals. I demonstrated the three new features in the October Melbourne User Group.
  1. SharePoint Document Management
  2. Embedding PowerBI 
  3. New modern Portal editor


In this blog post I will go through the configuration steps required to enable SharePoint Document Management.

Entity I am using

I used the Case entity for enabling SharePoint Document management. This was shown in my vlog and will be used for screenshots in this blog post.

Step 1

Enable the document management for the Case entity in the entity configuration record either by opening up solutions from within Dynamics 365 or PowerApps (through https://web.powerapps.com).


Step 2

Enable entity in Document Management Settings. There will be a wizard you follow.


Step 3

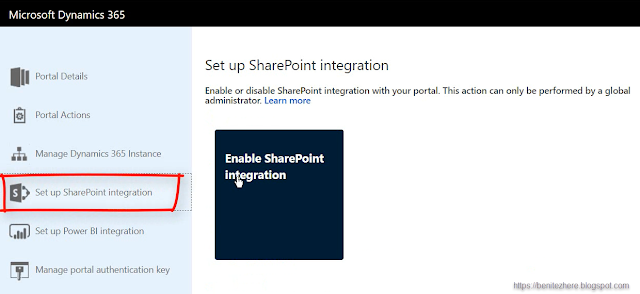
Enable SharePoint Integration through Portal Details. Head over to the Dynamics 365 Admin Centre and in the Application tab, select your Portals instance to open up Portal Details.

In here you'll see a new option called "Set Up SharePoint Integration." 


Click on this and you'll see an Enable SharePoint Integration option.


You'll be prompted to select your user account to enable required permissions.


Accept the required permissions presented.


Step 4

Configure the entity form to display a sub-grid of Document Locations in the Case entity configuration record either by opening up solutions from within Dynamics 365 or PowerApps (through https://web.powerapps.com).

  1. Make sure you configure the correct entity form that your Dynamics 365 for Portals references.
  2. Make sure you select Active Document Locations as the view as by default My Active Document Locations will be selected.

Step 5

The final step is to create a Child Entity Permission record. The Dynamics 365 for Portals entity form will need to have the "Enable entity permissions" checkbox enabled so that the Portals user can upload files though the sub-grid

There will be a Parent Entity Permission that will drive access to the Case entity. In my scenario, it is an entity permission that allows contacts to create, view, edit and delete Cases if they are the customer in the Customer field of the Case. Against this entity permission, I create a child entity permission.


SharePoint Document Management in action

After the above steps, you're now able to see it in action. 

Sign into your Portals instance and create a new case. After the case is created, you'll now be able to upload files. Remember, Dynamics 365 for Portals respects Dynamics 365 functionality so you cannot interact with a sub-grid until the records is created and saved.

By the sub-grid you'll see two buttons, 
  1. Add files which will allow you to upload files
  2. New folder which will allow you to create a new folder to upload files into
Awesome sauce, you're all set to upload files now 🙂


Once uploaded you can also browse to the SharePoint document location from the Case record.


As demonstrated in my vlog, files portals users delete if they have the permission to do so, will also be deleted in Dynamics 365 and in SharePoint online.

Summary

The most requested feature for Dynamics 365 for Portals returns and is all configurable. I am not a SharePoint configuration expert in the context of Dynamics 365 so if you have questions, it's better suited for the Dynamics Community forum. Please also refer to https://docs.microsoft.com for more information on managing SharePoint documents.

Stay tuned for my next blog post on Dynamics 365 for Portals October Release 2018.

Shout out to the Dynamics 365 for Portals product team for inviting me to play with these features in advance 😁 #thankyou

Sunday, 22 July 2018

Hiding the Contact preferences in the Profile web form of Dynamics 365 Portals

When you provision Dynamics 365 Portals, there's a lot of configuration that's already set up so that you can hit the ground running. One of the configuration that's available on the Profile web form is the Contact preferences displayed as check boxes.

Usually this is asked to be removed whenever I work with clients as they prefer to have an email only subscription method such as embedding a ClickDimensions Subscriptions page in Dynamics 365 Portals. There's no need to ask how to get in touch with Contact other than email.

When I first started on Adxstudio Portals I automatically assumed it would be in the Contact Profile entity form however it's not displayed in a section on the form. 


So how do you it? Well my grasshoppers, in this vlog and blog post I cover how to hide the Contact preferences using in the Profile web form configuration only. Checkout my vlog below.

Steps

What's behind the Contact preferences configuration is the following
  • Content Snippets 
  • Site Settings 
To hide the Contact preferences check boxes, simply update the Site Setting of  "Profile/ShowMarketingOptionsPanel" by updating the value from true to false.


Refresh the Profile web page in Dynamics 365 Portals and you're good to go. Hooray!

Summary

To hide the Contact preferences in the Profile web form of Dynamics 365 Portals, update the Site Setting Record and refresh the Profile web page. Ta-da! Simple and configuration only.

Till next time, toodles.

Monday, 2 July 2018

Terms and conditions for GDPR in Dynamics Portals

What is GDPR?

For a history of GDPR this article is a good starting point.

In 2016, the EU adopted the General Data Protection Regulation (GDPR), one of its greatest achievements in recent years. It replaces the 1995 Data Protection Directive which was adopted at a time when the internet was in its infancy.
The GDPR is now recognised as law across the EU. Member States have two years to ensure that it is fully implementable in their countries by May 2018.

GDPR is now in effect as of May 25, 2018.

What to do if using or considering Dynamics Portals as a platform with customers?

As a baby step towards GDPR in Dynamics Portals, there are new features that can be used to ensure customers as users of the portal to review terms and conditions.

Those that pay attention to the Microsoft Experience site will recognize this has most likely stemmed from this one.

These new features were made available in release 8.4 (as it says on the What's New docs.microsoft site) however if you dig into the release notes, you can't exactly pin which release it became available but I'm not complaining. I'm glad that there's functionality to provide terms and conditions 😃

Now keep in mind that there's still more ground work for your organisation to be GDPR compliant. It doesn't stop with enabling these features in Dynamics Portals. This is simply supporting the law.

Even though these features at first glance seem to appear to be applicable for brand new user of Dynamics Portals, the product team has designed it in a way where it can still be presented to existing users.

Check out my vlog for a brief overview.

Steps

Displaying your terms and conditions content

There is a Content Snippet record which will be blank by default. This Content Snippet record is Account/Signin/TermsAndConditionsCopy

Once you have your terms and conditions confirmed (and hopefully legally reviewed!) you can enter in the Content Snippet. There's HTML capability so you can include hyperlinks to additional web pages if needed to provide further information to the user.

Side note

There is four Content Snippets which can be updated in regards to what can be presented to the user upon reviewing and accepting the terms and conditions. The additional three Content Snippets is the following

Account/Signin/TermsAndConditionsAgreementText
This allows you to change the acceptance statement.

Account/Signin/TermsAndConditionsButtonText
This allows you to change the label displayed for the button that allows the user to continue to the site.

Account/Signin/Terms And Conditions Heading
If you want a different heading, this is your friend

Update a Site Setting

After entering your terms and conditions in the Content Snippet, you'll want to enable the functionality. As usual, my favourite gem in Dynamics Portals is Site Settings. The Site Setting to update is Authentication/Registration/TermsAgreementEnabled.

By default the value will be false. Update the value to true for the terms and conditions functionality to now display in your Dynamics Portals instance.

Hammer time - let's test

Refresh your Dynamics Portals and create a new account. After submitting your account registration details, voila! The terms and conditions will be displayed and you won't be able to continue unless accepted.

But wait! There's more

Enter Site Setting No. 2.

There is another Site Setting (surprised?) that can be updated. This Site Setting is Authentication/Registration/TermsPublicationDate. If you leave this blank then the user will continuously have to agree to the terms and conditions before signing in.

If you don't want the user to agree to the terms and conditions every time they sign in, you can enter a GMT value in this Site Setting.

Remember earlier how I said the product team designed it in a way where it can be presented to existing users? Users who have not not accepted the terms and conditions by the date and time, will be presented with the terms and conditions before proceeding.

I researched online what exactly is the string required for GMT values and came across this handy guideline. Sweet!

The next step was turning to Google and checking what time would it be in Melbourne if it was 8am GMT. This converts to 6pm here in Melbourne, Australia. At the time I was doing my vlog, it was past 6pm so this was perfect.

The value I entered in this Site Setting was Sun, 01 Jul 2018 08:00:00.


When I then logged back into Dynamics Portals using the same user account from earlier, the terms and conditions was no longer displayed. 


What is stored back in the Contact record?

This one I didn't cover in my vlog. In the Contact record there is a field called "Portal Terms Agreement Date" which will capture the date and time the Contact accepted the terms and conditions.

Summary

Terms and conditions can be displayed to users in Dynamics Portals to support the GDPR law. This was made available in preparation for the GDPR. This can all be done using configuration only. Steps are quite simple too.

Check out the other features available from the release.

Till next time, toodles.

Monday, 18 June 2018

Preventing users from seeing the profile form after signing into Dynamics Portals

Like Dynamics 365, when you provision Dynamics Portals there's features that already exist so you can hit the ground running. One of these features which I often get asked about when working on a project with clients is "Can you change the sign experience where users don't see the profile form after they sign in?"

The current behaviour is after a user successfully signs into Dynamics Portals they are presented with the profile form. This is valid when the registration is "open" where any member of the public can create a log in account for themselves.

When creating an account with Dynamics Portals the only details asked are
  • Email
  • Username
  • Password
  • Confirm Password
Therefore it make sense for user to see the Profile form immediately after signing in to provide further details on their First Name and Last Name etc.

However in the scenario where registration for Dynamics Portals is invite only which is valid for some clients, then they shouldn't be directed to the profile form. Why? When sending an invitation to an individual to Dynamics Portals it's usually against a Contact where you already have details such as the First Name and Last Name in Dynamics 365.

To find out how to prevent users in seeing the profile form after singing into Dynamics Portals checkout my vlog.

Steps

The site setting to update in Dynamics 365 for Dynamics Portals is "Authentication/Registration/ProfileRedirectEnabled"


By default this is set to true. 

Update this to false. 

When you next sign into Dynamics Portals, the user experience is that they will be directed to the Home page. Ta da!

Summary

You can prevent users in seeing the profile form after signing into Dynamics Portals by simply updating a Site Setting. Zero code needed.

Till next time.

Toodles.

Thursday, 7 June 2018

Grant application management Part 2: the external reviewer and applicant experience

In Part 1 I demonstrated how Dynamics 365 Universal Resource Scheduling can be used to book external reviewers for a submitted granted application.

In Part 2 I'm demonstrating the review life cycle of a grant application where
  • the external reviewer receives an email that they need to review a grant application
  • the external reviewer can comment on the grant application to request for information
  • the applicant can respond to the comment
  • when the external reviewer is ready to make a decision, they update the status of the grant application
  • the grant application is not deemed as approved until both the external reviewer and internal reviewer have approved the grant application
The above was what I recognized as the business process to be implemented and along the way I faced challenges but overcame them.

I used the following technologies and methods
  • Actions, workflows, custom workflow activity using fellow MVP Aiden Kaskela's Workflow Elements solution
  • Dynamics Portals - in particular the Notes feature
Reminder that I'm using configuration and not using additional development for the grant application management business solution.

For an in-depth walk through, watch my vlog.

Sending an email to the external reviewer

Continuing from Part 1, after the Bookable Resource is created another workflow is triggered which will send an email with a hyperlink to the external reviewer.

Usually a hyperlink is provided where it directs them to the view that displays the list of records. Given that the external reviewers have other responsibilities in their lives, I wanted to make the end user experience smooth where the external reviewer clicks on a hyperlink and it will automatically redirect them to the application in Dynamics Portals. This is where I came across the first challenge.

Challenge 1 - How to allow the external reviewer open the application record directly in Dynamics Portals

When you open/view a record in Dynamics Portal, you will see the web page URL and the GUID of the Dynamics 365 record.

I knew how to create the hyperlink by using the url path of the web page that loads the entity form but my problem was how to retrieve the GUID.

Enter MVP Aiden Kaskela (round of applause) #whoishe
He created Workflow Elements solution which had a number of cool custom workflow activities that can be used. I recommend you do a test drive yourself as you might find that there's a use case for one or multiple custom workflow activities.

The custom workflow activity step that I used is "Workflow - Get Metadata."


Using they hyperlink wizard in the workflow step that sends the email, I inserted the web page url that displays the entity form.

The next step I did was using the form assistant, I inserted the slug for the Get Metadata and referenced "Record ID" which grabs the GUID for the Application.


The external reviewer experience is that when they click on the hyperlink when they receive the email is that they will automatically be directed to the application record in Dynamics Portals.

If they are not signed in, the outcome will be the following


This is because there is a web role required to access the web page and since they are not signed in they see this. The message displayed can be updated using a Content Snippet to prompt the external reviewer to sign in.

If they are signed in, the outcome will be the following


Pretty nice.

Decision

I did find a way for the external reviewer to see the Sign In web page if they weren't signed in by inserting the Sign In URL path in the hyperlink. This wasn't a great solution as if the external reviewer was signed in they'd be directed to the Sign In page.

I weighed the pros and cons, decided the option to direct them to the review application web page was better.

Unless someone can suggest something better? (Hey Colin if you're reading this feel free to let me know).

Allowing the external reviewer and applicant to communicate to each other

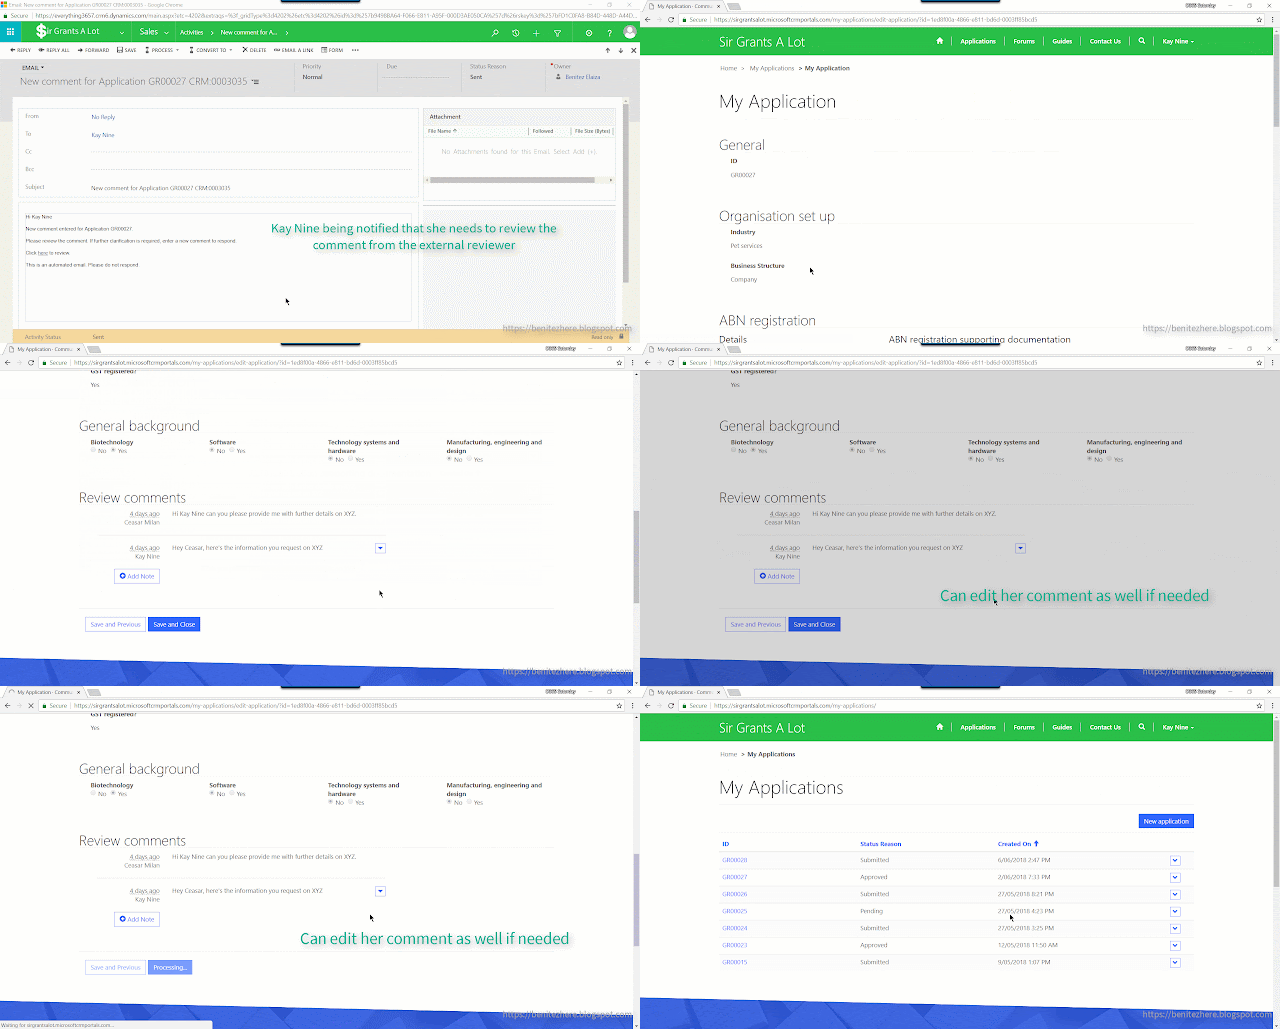
The external reviewer can comment on the grant application to request for information. In turn the applicant can respond back to the external reviewer.

I wanted to reduce the two parties emailing each other. Why? For these reasons
  • Prevent the email addresses to be shared in case either become disgruntled. They really should get in touch with Sir Grants A Lot to raise an issue.
  • Emails get lost and if someone else from Sir Grants A Lot needs to step in, it's easily visible in the Grant Application under Notes.
  • Driving more foot traffic to the portal is another way of getting more interaction of your content with your users. As humans we have the tendency to look at other information available so if Sir Grants A Lot had other meaningful content for their external reviewers or applicants, they'd find it on the portal. Less likely to get a hit rate if emails were sent.
My weapon of choice was enabling the Notes feature for Dynamics Portals. I could have used Timeline Control (upcoming vlog on this) but decided to stick with Notes as no other type of activity is going to be exchanged.

Once I enabled it and tested it out, it worked fine.

I then had to configure a workflow that will notify the external reviewer or the applicant when a new note was created so that either party can respond. Sounds simple right?

OK so when a Note is created from the portal, the only way to know the author of the note is to take a look at the Title field. In the Title field the Contact fullname and GUID of the Contact is stored in the Title.


I thought I could do this type of conditional step in a workflow:


However I couldn't as when you go to the regarding entity which is Application in my case, it will only display string/single line of text fields as this is the field type of the Title field in the Note entity. External reviewer and applicant is lookup fields therefore it's not displayed.

I came across this obstacle. However ain't no mountain high enough for this sista! #word #youfeelme

Challenge 2 - How to do a conditional workflow that will check who was the author of the Note

Now I don't want to take full credit for this as I happened to be talking about it with my technical consultant and suggested to use Actions. Sweet, gave it a go and it worked like a charm.

I used an output argument for a string field that will assign the value of the regarding application external reviewer or applicant field.


I then used this action in my conditional workflow that will now call the action to check if the Title contains the assigned value of external reviewer or applicant.


Yes. Almost there.

Challenge 3 - How to allow the external reviewer or applicant open the application record directly in Dynamics Portals

Next obstacle to overcome was providing the same experience from step one where the hyperlink provided directly takes the external reviewer and applicant to the application. A nice consistent experience. Or you could call it OCD.

I wasn't able to use Aiden's custom workflow activity step (cue the violins) as it will retrieve the GUID of the Note. 

What I did do was create a custom field in the application that would store the GUID on create of an application. I have another workflow that will perform this and it does use Aiden's "Workflow - Get Metadata" custom workflow activity step.


I then used this custom field in my hyperlink to insert the GUID. This is the end result:

Decision time

When the external reviewer is ready to make a decision they update the status of the grant application by clicking on two "buttons."

Behind the scenes these are two on demand workflows configured as actions against the Dynamics Portals Entity Form.

I have one on demand workflow that will update the external reviewer status to "Approved" and another that will update the external reviewer status to "Declined."

When an external reviewer is ready to approve or decline, they simply click on the button and the external reviewer status reason will be updated immediately.

Grand finale - two approvals equals Approved

The grant application is not deemed as approved until both the external reviewer and internal reviewer have approved the grant application.

This was fairly simple to achieve by having another workflow update the Status Reason if both the internal reviewer and external reviewer status reason equals Approved.

Summary

You can create a business solution for grants application management using Dynamics Portals and Dynamics 365 Universal Resource Scheduling. This was the challenge I set myself and it turned out great. Even though I had faced obstacles along the way, I overcame them by using different methods.

Some people don't like Dynamics Portals but I honestly really like it. Once you learn Dynamics Portals it's not difficult to create something cool. And then when you team up with another complimenting service like Universal Resource Scheduling, it makes the business solution even more cooler. I'm still learning Universal Resource Scheduling and am so keen to see what else can be done with it for custom entities.

What I would like to experiment further is create a model driven app for the internal reviewer experience.

Till next time.

Toodles.