The API that the Dynamics 365 product team released in 2019 references a
Document Template record which has a Word Template associated to it which acts
as the backbone of a PDF generated from Dynamics 365. For more information
about Convert to PDF refer to
this docs.microsoft.com
article.
**I'd like to make it clear that as of today, Convert to PDF is configured and supported in the Dynamics 365 Sales Hub app**
**I'd like to make it clear that as of today, Convert to PDF is configured and supported in the Dynamics 365 Sales Hub app**
In this WTF episode I will cover
- A brief overview of the Convert to PDF functionality
- How to create a Word Template from scratch
- How to update an existing Word Template
Use Case
Before we jump into the How To's, the use case for this series will be
As a customer,
As a customer,
I want to receive a Tax Receipt of my purchase in an email,
so that I have confirmation of my purchase.
The life cycle of the process will be
- A Dynamics 365 Invoice record is updated to paid.
- A flow in Power Automate is triggered that handles all the magic.
- The customer associated to the Invoice will receive an email with a PDF attached that represents their Tax Receipt.
Overview of the Convert to PDF functionality
The Convert to PDF functionality that exists today in Dynamics 365 Sales Hub
can be used against the following entities
- Account
- Contact
- Lead
- Opportunity
- Quote
- Order
- Invoice
This is what it will look like to an end user when viewing a record in the
Dynamics 365 Sales Hub app,

Regardless of what option the end user chooses, the end user is required to
select a Word Template that has been created for that particular entity. In
my case it is the Invoice entity. This is due the Dynamics 365 API request,
ExportPdfDocument, as it will generate a PDF based on a Word Template that
is associated to a Document Template record. More details regarding the
Dynamics 365 ExportPdfDocument API request in Part 2 😉

In order for the Convert to PDF functionality to appear in the Dynamics 365
Sales Hub app they need to be enabled for the desired entities. Head to App
Settings and you'll see the Convert to PDF configuration, click Manage.

Enable the entities you'd like and hit that Save button. Refresh your
browser and you should now see the Convert to PDF functionality in Dynamics
365 Sales Hub.

Cool on to the How To's.
How to create a Word Template from scratch
Any Word Template or Excel Template created and uploaded into Dynamics 365
will be associated to a Document Template record. This functionality has
existed for a few years now and
this is the official docs.microsoft.com
article.
In my vlog I misbehaved by not showing you how to navigate to Document
Templates from the Power Platform Admin Centre - my bad 😅 Old habits since I
started with Dynamics CRM 4.0. The following steps will reference the Power
Platform Admin Centre.
Head over to the Power Platform admin center and select Settings.
Head over to the Power Platform admin center and select Settings.

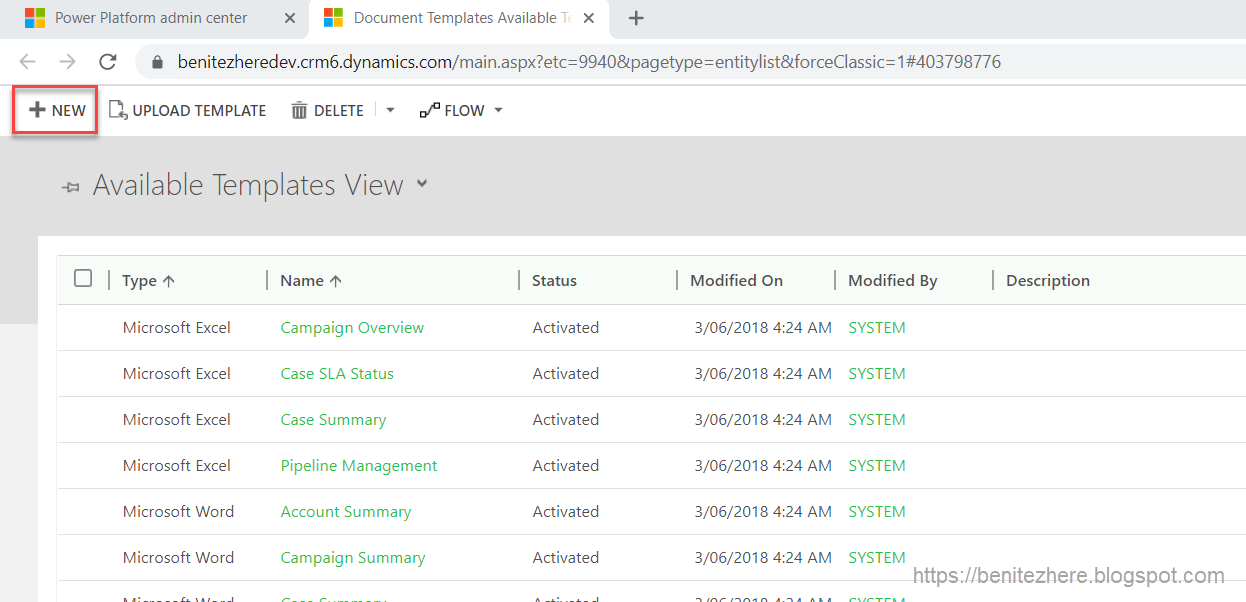
Expand the Templates settings and select Document Templates.

A new browser tab will appear where you click +NEW to create a new Document
Template.
Select Word Template and the entity of your choice. In my use case it is the
Invoice entity. Click Select entity

Next, the entity relationships are required to be selected in order for data
to be displayed in the generated Word document using the Word Template. Since
I'm going to be generating a Tax Receipt from a paid Invoice I'll be
referencing the Invoice Line Items and information about the customer so I
have selected the Invoice Product, Account and Contact entity
relationships. Once you're ready click the Download Template button.

Enable Editing on the Word Template and head over to File > Options and in
the Customize Ribbon tab enable the Developer command.

Head to the Developer tab and select the XML Mapping Pane from the ribbon.
This is where we can define the XML Mapping to the Invoice entity in Dynamics
365. Select the Custom XML Part drop down field and there should be a
reference to the Dynamics 365 entity that was defined when the Word Template
was downloaded from Dynamics 365.

Once the XML Mapping is pointing to Dynamics 365 reference the fields for the
Invoice entity will be displayed.

If you scroll down the entities based on the entity relationships defined for
the Word Template will also be visible which will allow you to select the
fields from those entities.

You can start creating your desired Word Template by selecting a field from
the entity relationships. For example to select the Invoice Number field from
the Invoice record,
- Scroll down to the Invoice Number field.
- Right click and select Insert Content Control.
- Select Plain Text.
This will display your select field where you have positioned it in the Word
document.

Continue to build the rest of your Word Template to your requirements. If
there will be a table in your Word Template, you'll want to display the rows
of that related data. In my use case this will the Invoice Line Items.
Previously we were selecting fields but since we're dealing with rows for a
table the content control is sightly different.
Create a table and in your first row select the content controls for the fields. Then highlight your first row, select the entity from the related entities and right click to select insert content control followed by "Repeating."
Create a table and in your first row select the content controls for the fields. Then highlight your first row, select the entity from the related entities and right click to select insert content control followed by "Repeating."

When the Word Template has been defined it can be uploaded into Dynamics 365.
Save your Word Template and head back to the Document Templates view to create
a new Document Template record.

Select your Word Template file to upload.

Click on Upload.

A new window will appear with the newly created Document Template record. By
default the file name will be the value in the Name field. This can be updated
to whatever value you like.

To check out your newly created Word Template, open an existing Invoice record
and select the Word Template to see it in action.

How to update an existing Word Template
If you were to open a Word Template record in Dynamics 365 you won't see
anything that indicates a way of updating the previously uploaded Word
Template.

The solution? XrmToolBox. Microsoft MVP Tanguy Touzard is the legend behind XrmToolBox and there are many people in the Microsoft community who have contributed their time by creating and adding tools to XrmToolBox. One of these souls is Microsoft MVP James Novak who created and shared his tool called "Document Template Manager" which allows you to download existing Word templates and edit them.
When you open XrmToolBox head over to the Tool Library and select Document
Template Manager to install.

Once it has been installed and select the Document Template Manager Tool which
will connect to the environment that you were last connected to.

If you are not connected to an environment already you can select an existing
environment or create a new environment in the "Connected To" settings of
XrmToolBox which will be at the bottom on the left.

To load all the templates available in the Dynamics 365 instance you are connected to click on the Load Templates button. To update one of the out-of-the-box Word Templates such as Invoice Summary, select the document and click on Download Templates.

Once the Word Template has been downloaded you can open the file and view the
existing template with the references to the content controls that have been
defined. If you want to add any additional content controls, head to the XML
Mapping Pane in the Developer tab of the ribbon. Select the Custom XML Part
drop down field and there should be a reference to the Dynamics 365 entity
that was defined fro the Word Template.

When you're ready to upload the Word Template document you can do this
directly from Jim's Document Template Manager tool as well. Select the Word
Template you want to overwrite with your updated template and select Single
Upload. A warning message will appear to inform you that the file uploaded
will overwrite the document template for that select Document Template record.

Once it has completed you can then navigate to your Invoice record and select
the updated Document Template record.

Summary
You can either create a Word Template from scratch or create a Word Template
based on an existing template by downloading it through
XrmToolBox using
Jim's
Document Template Manager
tool.
A Document Template record will be referenced in my flow in Power Automate that will generate a PDF of an Invoice automatically. Stay tuned for Part 2 where I will share how to create a custom Dynamics 365 custom connector to handle the API request to generate the PDF.
A Document Template record will be referenced in my flow in Power Automate that will generate a PDF of an Invoice automatically. Stay tuned for Part 2 where I will share how to create a custom Dynamics 365 custom connector to handle the API request to generate the PDF.
Your Vote Counts!
If you want Convert to PDF across custom entities then vote for
this Dynamics 365 Idea
to gain momentum. I would love to see this functionality across the Dynamics
365 platform so let's do our part by voting for it.
Where my Starship Troopers fans at?! 😁
0 comments:
Post a Comment