I recently presented at CRM Saturday Melbourne and CRM Saturday Sydney. CRM Saturday is a free CRM Technical and Strategy event organised by the Microsoft Dynamics Community MVP's for customers, CRM Professionals, Technical Consultants and Developers. It gives you the opportunity to learn, share knowledge and meet peers in our line of work. It's a fantastic event and definitely attend one if there is a CRM Saturday where you are. The last one for the year 2017 is in Milan.

I decided to present on tips that I've come across over the years with Dynamics CRM. I started my journey with Dynamics back in 2009 with CRM 4. It's changed over the years from CRM 4 to CRM 2011, to CRM 2013, to CRM 2015, to CRM 2016 and now Dynamics 365. New features have popped up along the way which all consultants needed to learn in order to assess whether they would be of value to the client/customer.
Even though these new features are amazing compared to the previous version of CRM, the fundamental principals of Dynamics CRM still exist. Creating a field, adding a new section onto a form, creating a workflow... these are still the basics that exist today. As years have passed, I've come across these tips (or even best practice) to apply for customization and configuration of Dynamics 365. Some you may be familiar with already, others not so much.




This is handy when you want fields to be automatically populated when creating a new record from an associated record. For example, creating a new Membership record from a Contact record where data from the Contact record is brought across.

With out-of-the-box entities, there is default forms with system fields already inserted into the form. Remove the system fields from the out-of-the-box forms such as the Contact main form that will not be in use by end users.


If you look at out-of-the-box entity forms in Microsoft Dynamics 365 (in my case, Contact) the naming convention is: <Tab Name>_TAB.

Follow this naming convention for consistency throughout your solution.

I found that the Section naming conventions are not consistent out-of-the-box. I think this is due to how CRM started out with Version 4 and the underlying schema has remained the same for sections.
To keep it consistent with Tab Naming Conventions, use the format of: <Section Name>_SECTION.

Before

After

I've done a lot of customization over the years and I found this to be a common recurrence with customers where they expect the same columns in a majority of entity views.


This is something painful I experienced two years ago when working on a government project. There was quite a few Business Rules that we were implemented on a form. I had odd behaviour happening that I didn't want, and the Business Rules that I wanted to work when required (such as when field xy is updated, do abc...) never did. It drove me crazy and then after doing some Googling, I discovered the Business Rules will execute based on the order it was activated #goodtoknow #whydidntanyonetellme #wastedhours
Thankfully, I get to share this one with you. To prevent conflicting Business Rules, use a numbering system in the Name and activate them in sequential order.
Before - no 0 appended before the single digit number


Thanks Greg for the photo
I decided to present on tips that I've come across over the years with Dynamics CRM. I started my journey with Dynamics back in 2009 with CRM 4. It's changed over the years from CRM 4 to CRM 2011, to CRM 2013, to CRM 2015, to CRM 2016 and now Dynamics 365. New features have popped up along the way which all consultants needed to learn in order to assess whether they would be of value to the client/customer.
Even though these new features are amazing compared to the previous version of CRM, the fundamental principals of Dynamics CRM still exist. Creating a field, adding a new section onto a form, creating a workflow... these are still the basics that exist today. As years have passed, I've come across these tips (or even best practice) to apply for customization and configuration of Dynamics 365. Some you may be familiar with already, others not so much.
What's the difference between the two terms?
The definition of customization vs configuration is always a debatable topic in the community. For me, I follow the explanation outlined in this article.

Customization
- Anything that can be done within CRM without resorting to the SDK or external code.
- Adding new fields to an existing entity, creating new entities, option sets, reports etc.
Examples include Fields, Entities, Relationships, Forms, Views etc.
Configuration
- Any changes made to existing options available within the default installation of CRM.
- Configuration applies to objects like: Business Units, Security Roles, Users, Teams, Auditing etc.
My tips
1. Reuse system fields where relevant
For out-of-the-box entities such as Contact, there is a list of fields that are created as part of the default installation of Dynamics 365. This is what we call a "system" field. Often there are times where a data type can be captured in a system field and the only change that needs to happen is to relabel the field display name. It's good to relabel a field if it can be used rather than creating a new field. Saves one extra field from being created.
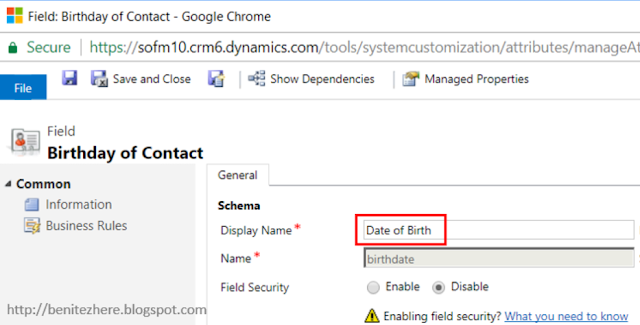
The most common one I tend to relabel is the Birthday field.

A lot of customers I have worked with usually want this to be relabeled to Date of Birth. To relabel a field, go to the entity in your solution and open the field attribute record. Change the Display Name to the desired label.

Bonus tip
It's important you do this within the Field Attribute record in the target CRM Solution and not within the Form Display Field Label customization. If you make the change within the Form, it will only change the label at the Form level.
Why should you care? End users expect to see the field label that's on the form in Advanced Find or Views as they're not familiar with the schematics of Dynamics 365. I've come across this many times in my career where the field label was changed within the Form and support tickets are raised because they can't find the field they see on the Form in Advanced Find or Views.
Make sure you always update the field label within the Field Attribute record.
2. Update system field to not be searchable
I'm a big fan of less is more, be clutter free in Dynamics 365. Not all system fields will be used by end users. Yes, you can remove system fields from the Contact form such as the Address 1: Shipping Method.

However it will still appear in Advanced Find when end users are wanting to view a list of records with specific criteria.
To minimize the list of fields that is displayed, simply hide any system fields that will not be in use by updating the searchable option from Yes to No in the field attribute record.

This ensures that fields used by end users are only displayed and that they don't have to trawl through a long list.
Before

After

A reminder that this will only prevent the field being displayed in Advanced Find. The field will still appear when adding columns to within Advanced Find and in Entity System Views within your solution.
Bonus tip
If you want to perform a bulk update of fields to not be searchable, you can use Attribute Bulk Updater in XrmToolBox. This will save you time as you can do it in one go rather than painfully open the Field Attribute record one by one. Raising my glass to the fellow CRM'er who designed this nifty tool.

3. Append “id” to custom lookup fields
When creating custom lookup field, append "id" to the end of the schema name. This is so that end users or even colleagues in Managed Services in consulting companies know that the field is a Lookup field which is an association to another entity. For developers, it's so handy for them as they immediately know that this field is a foreign key in the source entity. Ben Hosk outlined this as a useful tip too.

4. Removal of double prefix in relationships
This one is more of a "I like to keep it clean" tip. When creating a custom Lookup field, the schema relationship name will automatically render a double prefix as you're creating it within a Solution that has a prefix defined. I tend to remove the additional prefix cause I find it more tidier #neatfreak

5. Mapping from source record to target record to reduce data entry
If you don't already know about this customization feature, then you're about to learn :) One of the cool things you can do is grab data from a field in a source record to a target record. The condition here is that the field attribute type must be the same. In other words, if a field in the source record is a Single Line of Text field then the field in the target record must be Single Line of Text too.

This is handy when you want fields to be automatically populated when creating a new record from an associated record. For example, creating a new Membership record from a Contact record where data from the Contact record is brought across.
6. Apply Global Option Set where relevant
The difference between a Global Option Set and an Option Set is that the former can be reused across Dynamics CRM whereas an Option Set is restricted to the entity that it is created in. For example if you create an Option Set within the Contact entity, you can only use it within the Contact entity.
Global Option Sets are handy for customers where the same values in a list will be used across Dynamics 365. One that I always create is a Yes/No Global Option Set. This is useful for customers where a Two Option/Boolean field is not appropriate as they require the end user to select Yes or No where the default when creating a new record for the first time is required to be blank.
The screenshot example below is for Membership Organisations where typically Member Type is used across Dynamics 365.

7. Tidy fields and navigation pane on out-of-the-box forms
With out-of-the-box entities, there is default forms with system fields already inserted into the form. Remove the system fields from the out-of-the-box forms such as the Contact main form that will not be in use by end users.

Same goes to the navigation pane on the out-of-the-box forms by removing any related records that will not be in use by end users.

This is so that end users only focus on what they're meant to see and have access to. Keep the end user experience clean, remove the unnecessary noise.


Bonus Tip
If you want to save time in removing fields from entity forms, use the Bulk Form Attribute Manager in XRMToolbox. This will display all fields that are on forms and you can select which ones you want to remove.
8. Entity Form Tab naming convention
Tabs allow sections and fields to be grouped within an entity form. When you create a custom tab on an entity form by default the tab will be given a string as the Name value.
If you look at out-of-the-box entity forms in Microsoft Dynamics 365 (in my case, Contact) the naming convention is: <Tab Name>_TAB.

Follow this naming convention for consistency throughout your solution.

9. Section naming convention
After discovering the above about four years go, I decided to investigate the naming conventions for Sections. Sections allow fields and sub-girds to be inserted within an entity form.I found that the Section naming conventions are not consistent out-of-the-box. I think this is due to how CRM started out with Version 4 and the underlying schema has remained the same for sections.
To keep it consistent with Tab Naming Conventions, use the format of: <Section Name>_SECTION.

10. Update out-of-the-box system views Consistency of views using View Layout
The current theme you'll find in this post is about keeping the end user experience clean, consistent and clutter free. This tip is about ensuring Views are consistent, for example the columns in the Active Contact view can also be the same for the Contacts Inactive View.Before

After

I've done a lot of customization over the years and I found this to be a common recurrence with customers where they expect the same columns in a majority of entity views.
Bonus Tip
View Layout Replicator in XrmToolbox can be used for achieving consistency of views. You basically select a source view that contains the columns you want to be applied to other views. Once you select the source view, you can select the target view and simply publish the changes.
11. Sequential Business Rules
I presented this tip at the Melbourne Dynamics 365 User Group back in October 2015.
This is something painful I experienced two years ago when working on a government project. There was quite a few Business Rules that we were implemented on a form. I had odd behaviour happening that I didn't want, and the Business Rules that I wanted to work when required (such as when field xy is updated, do abc...) never did. It drove me crazy and then after doing some Googling, I discovered the Business Rules will execute based on the order it was activated #goodtoknow #whydidntanyonetellme #wastedhours
Thankfully, I get to share this one with you. To prevent conflicting Business Rules, use a numbering system in the Name and activate them in sequential order.
My bonus tip for this is to append 0 for single digit numbers to ensure business rules displaying sequentially.

After – 0 appended prior to the single digit number

I actually had someone from the audience come up to me afterwards saying they went through this exact same problem and thanked me for my tip which was nice. It's so simple yet effective.
This is also really great long term for CRM super users or Managed Services consultants.
- If you have enhancements in the future where additional Business Rules is required, deactivate all Business Rules and rename them in order. Then activate them in the required order.
- When trouble shooting as part of a support ticket/case/service request and the Business Rules is required to be deactivated for issue resolution, you'll know which order to activate it once fixed.
12. Improve Quick Find Search duration
By default when browsing through entity views or search results in Microsoft Dynamics 365, the number of records is limited to 50 records per page of the view.
When using the Quick Find Search, sometimes you use the wildcard function (*). For example, search for “*com” against the Active Accounts View. This will retrieve any account record that contains “com” in the fields that have been enabled for Quick Find Search.
You can increase the performance of the search by increasing the Records Per Page limit from 50 to 250.

To read more about this, checkout this post.
13. Using App Designer for a better end user experience
A new feature that was introduced in Dynamics 365 is the App Designer which allows you to create a new app which can be selected from Dynamics 365 and restricted to specific security roles.

I'll demonstrate this further in my next post so keep your eyes peeled. Subscribe to my blog if you haven't already done so.
Summary
All of the above is tips I've accumulated through out my journey with Dynamics 365. The fundamental principals still exist inspite of new features being introduced in each release. I hope you've learnt something from me today.
Below is a copy of my slides I used for CRM Saturday Sydney.
Note: the slides will automatically go to the next slide after 15 seconds.
Note: the slides will automatically go to the next slide after 15 seconds.
Enjoy. Toodles.