Friday, 17 December 2021

How to create in-app notifications for model-driven apps the low code way

In-app notifications, also known as "toast notifications" popped up (see what I did there... 😂) in August 2021 as announced on the Power Apps blog site. This was also blogged about by the following in our #MicrosoftCommunity

Chime Okure

Sara Lagerquist - Microsoft MVP

David Rivard

Phil Topness - Power CAT
So you're probably wondering, "OK E, what else can you share with us in relation to In-App Notifications for Model-Driven apps?" 

Thanks for wondering 🙂 - I'll cover a couple of things in this episode and in my #WTF episode vlog I demo it all.

What I'm covering in this #WTF episode

1. A handy tool

At the end of September fellow Microsoft MVP, Ivan Ficko, went live with an awesome tool in XrmToolBox.
By using Ivan's In-App Notification Builder it makes enabling and developing in-app notifications so much more easier.

Linn Zaw Win another fellow Microsoft MVP covered the tool in his blog post

2. Two methods

I'll share how to create two types of notifications in terms of user reach
  1. How to notify a single user
  2. How to notify users from a team - think of notifying multiple users at the same time

The Use Case

As a Claims Assessor

I need to be notified when a claim requires further investigation,

So that I can assign it to myself and review

The end users

Christie Cline - the claims advisor creating the claim in the model-driven app
Alex Weber and Adele Vance - the claims assessors who need to review the claim

The In-App Notification Builder tool in XrmToolBox

First you'll need to install the XrmToolBox and connect to your Dataverse or Dynamics 365 environment. The most up-to-date how-to video I can find is from the lovable Jonas Rapp, watch this video for details on how to set up XrmToolBox.

Once you've installed XrmToolBox, you'll need to add the In-App Notification Builder tool by navigating to the Configuration tab and selecting Tool Library.


Search for In-App Notification Builder, select it and then click Install.


After it as been added,  
  1. Click on Tools.
  2. Use the filter to search for In-App Notification Builder.
  3. It will then appear in the results.

Select the tool and a new tab will load with the In-App Notification Builder tool. The following should load for you.


The remainder of this section will cover the different features in the tool. The first one is App. This will display a list of all the model-driven apps your security role has access to. In my use case, I have a Claims model-driven app and this is the app I'll be using.


Next to it is the Notification Status button. If you see the red circle and white square, it means in-app notifications have not been enabled for the model-driven app. 


Personally, this is one of the great features of Ivan's in-app notification builder tool. Why? If you take a look at the official documentation it provides you with details on how to enable in-app notifications within the model-driven app. To some it may not make sense or would be too much for a person who is not familiar with updating the browser console. If you take a look at step 5 - to someone who has never updated the browser control, this step would not make sense at all.

This is where the Notification Status button comes in handy because with ONE click, it will enable in-app notifications immediately for the model-driven app. When you click on the button you'll be prompted to confirm and once confirmed it will be enabled.
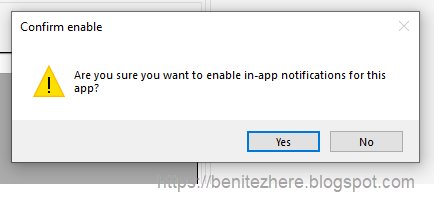

A green circle with a white triangle should now appear.


I'll come back to the Test and Get Code features soon. Let's focus on the features under Data and Preview. Basically anything you update on the left will update the preview of the in-app notification in real-time.


Pretty cool right?!

In the screenshot below is how the features on the left under Data and Actions map to the in-app notification under Preview on the right.


This is what we'll go through next.

The Title field represents the first line in the notification. Make it clear what the in-app notification is about for the user. 


Next we have the Body field. This will display under the Title in the in-app notification. Formatting can be applied to the text, hyperlinks can be added, and an image can also be added. Note, the image is in the form of a URL.


The next two features are Toast Type and Expires In which is explained in the docs.microsoft.com documentation. There are two Toast Type values in the drop down field.
  1. Toast means it will be a 'pop up' experience - think slices of bread in the toaster that pops up when ready to be eaten 😋
  2. Whereas Hidden means it will not 'pop up' but there will be an integer/number value by the bell icon in the model-driven app to indicate there are new notifications for the user.
The Expires In field values represent when the notification should be deleted if not dismissed as per the documentation.

The Icon feature allows you to change the icon that will appear on the in-app notification. There are default icons you can choose from. If you want to display a custom icon, this is supported. You would need to create a web resource in your solution associated to your environment. In this web resource is where you would upload the icon you would be using. 

In my use case I've created a web resource that has an icon which is used for my Claims app so I selected it as an example to show you that custom icons are supported.


The Actions feature allows you to create clickable hyperlinks that will direct the user to either a URL, Record in Dataverse or Dynamics 365, list view, a custom page or even a dashboard in Dataverse or Dynamics 365. In my use case I created two actions.

The first action directs the user to the claim record that was created. 
  • The Text field is what the end user sees as a hyperlink. 
  • The Open As field determines the end user experience of viewing what they are are being directed to.
    • Dialog - Opens in the center dialog.
    • Inline - Default. Opens in the current page.
    • newWindow - Opens in a new browser tab.
  • The Type field represents what the user is being directed to. In my use case I'm directing them to a record.
  • Entity field is displayed if the Type field equals Record. This is where you select the Dataverse or Dynamics 365 Table of the record.
  • Form field is displayed if the Type field equals Record. This is useful if you have several Entity Forms in a table.
  • The Id will be left as-is as this will be defined in Power Automate.
You'll notice that the URL field is disabled as this is defined by the values you've selected in the Entity, Form and ID fields.


I've applied the similar properties to the second action which directs the user to the member record associated to the claim. The only differences here are the Text, Open As, Entity and Form values.


Alright! That's pretty much it for creating your in-app notification. 

But wait - there's more! The other GREAT feature is that you can Test your in-app notification. It's so cool because if you did not use this tool, you'd have to execute your in-app notification each time in order to see it. With the tool, in three clicks you can test it immediately for any user. 

At the top you'll see a Test button, click it! Next select a user you want to test it with. This should be a user you know the credentials for as you'll need to log in as the selected user in order to see the test in-app notification.


Voila - you've now tested an in-app notification using Ivan's In-App Notification Builder tool! High five 🙌🏻

Note: If you click on the hyperlink in the model-driven app, nothing will happen as the ID of the record URL path has not been defined as this will be done in Power Automate. My test was for the visual of the in-app notification.

The Get Code feature is the final one to check out. The first two options are for pro-code developers and the last one is my bestie, Power Automate, which is what will be used to create the low-code in-app notification.


Click on the Power Automate option and a new dialog will appear. 


You copy and paste these values into a cloud flow in Power Automate. This is what I'll cover next as I'll explain the two methods that can be applied to in-app notifications.

1. How to notify a single user

In the Power Automate maker portal, create a new cloud flow. The following is what my cloud flow looks like overall.

The trigger

The connector is Dataverse and the trigger selected is When a new row is added. The Change type is Added (you could have this as added or modified). The Table I've selected is my custom Insurance Claim table. To ensure this notification is only created when an assessor is required for the claim, I've added this as a filter in the Filter rows field of my trigger.


The action - Add a new row

The action that comes next is Add a new row. This will create a new Notification record where we can apply what was created in XrmToolBox. The Notification table is selected, followed by copying as pasting the values from XrmToolBox in the In-App Notification Builder tool.


After copying and pasting, I've added some dynamic content.

  • In the Body I am referencing the Claim Number from the trigger.
  • In the url property of the View Claim action I'm referencing the Insurance Claim record from the trigger.
  • In the url property of the View Member action, I have several references.
    • I'm using an Environment Variable that contains the value of the organisation in the app URL path. Watch this part of the #WTF episode vlog to understand how to get this value.
    • I'm using another Environment Variable that contains the app ID value in the app URL path. Watch this part of the #WTF episode to understand how to get this value.
    • I'm referencing the Member record from the trigger that's associated to the Insurance Claim record
I am also setting the Owner field as the user who created the Claim. This is for demo purposes only. Ideally there would be some logic on how this field is populated.

Side tip

Environment Variables are used so that if you're deploying your solution that contains the cloud flow to a target environment, you simply update the value to the target environment value once the solution has successfully imported. This way your URLs will never break as the organisation and app id value is always unique for each environment. 

The cloud flow in action

I trigger my cloud flow by creating a new claim that requires an assessor as the claims advisor (Christie). The notification is then created and pops up in the Claims model-driven app.

2. How to notify users from a team

This is the second method that enables multiple users to be notified at the same time. The following is what my cloud flow looks like overall.
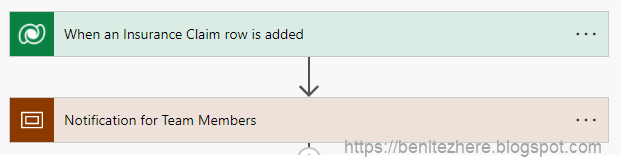
The trigger is exactly the same so I won't cover that part. In this method however we're using a couple of new actions.

List rows

I'm using the List rows action in the Dataverse connector to retrieve the users associated to a Team through the teammemberships table.


In Dataverse and Dynamics 365 there's the concept of Teams in the security model. A Team is associated to a Business Unit and users are associated to the Team. There are several Team Types available and for the purpose of this demo, I'm using Owner. I go briefly cover this in the #WTF episode vlog here.

Another Environment Variable is used that stores the value of the ID of the team record. This Environment Variable is referenced in the Filter rows field of the action so that only the Claim team is retrieved.

The end result is only users associated to the Claim team will be retrieved.

Apply to each

The next action is using an apply to each to loop through each of the users returned form the list rows action. This is so that a notification for each user can be created.

Add a new row

This is exactly the same as the steps I shared in the 1. How to notify a single user method. For the Owner field, this time the dynamic property of SystemUserId is referenced from the apply to each action.


There is ONE slight difference - a Bonus Tip 😇

Bonus Tip

A handy feature of in-app notifications is that you can @mention a user or a team. Well to be honest, I didn't know if a team could be mentioned but after testing it with Power Automate cloud flows, I can confirm it works!

If you review the docs.microsoft.com documentation, a sample is provided. This is what I followed and applied.


I simply created another Environment Variable that stores the Team ID value which can be used in the Body for the in-app notification. I cover this in my #WTF episode here.

The cloud flow in action

I trigger my cloud flow by creating a new claim that requires an assessor as the claims advisor (Christie). The notification is then created for the claim assessors, Alex and Adele, who are associated to the Claim team record. The notification pops up in the Claims model-driven app for both Alex and Adele.

Summary

By using Ivan's In-App Notification Builder tool in XrmToolBox and combining it with Power Automate cloud flows, you achieve creating low-code in-app notifications for model-driven apps 😁

Ivan's tool is so handy and remember:
  1. In one click you can enable in-app notifications for your model-driven app
  2. You can perform tests to any user to confirm what it will look like for them
Thanks all for tuning in!

Thursday, 18 November 2021

How to extend the Document Automation Toolkit solution

Earlier this year I did a webinar with XRM Vision, a Microsoft partner based in Montreal, Canada. I showed how a Revenu Québec form can be automated using the Documentation Automation Toolkit. In the webinar I showed the Document Automation Toolkit in action including 

  • the prerequisites
  • how to install
  • configure the Document Automation Toolkit
  • build an AI Builder Form Processing model
  • end-to-end demo of automating the Revenu Québec form
You can watch the recording of this webinar here.

Towards the end of the webinar I mentioned that currently only 27 of the fields from the Revenu Québec form are included in the automation. Even though I built my AI Builder Form Processing model with 34 fields, only 27 fields were displayed in the Document Automation Application Canvas app. This is because only a maximum of 27 field have been defined in the Documentation Automation Toolkit. I said I'd be sharing soon how to extend the Document Automation Toolkit to include all fields. Well that time has come and this is what you'll learn in this #WTF episode 😊

Recap on the use case

I was automating the Revenu Québec Self-Employed Net Income form and the use story I came up with was the following,

As a Tax Advisor,

When an email is received and the attachment is the Revenu Québec Self-Employe Net Income form,

I want the data to be automatically extracted,

So that I don't have to enter it manually into our system

AND

I also need the ability to review the data extracted,

So that I can correct the data where relevant


Document Automation Toolkit components that need to be updated

To include the additional 7 fields (34 - 27 = 7), three components need to be updated in the Document Automation Toolkit solution.

1. Dataverse table

The Document Automation Data table needs to be updated so that it can reference the additional 7 fields. There are two sets of fields that need to be created. The first set of fields are for the Data values, the other set of fields are for the confidence score (displayed as a percentage) when the AI Builder Form Processing model extract the information based on the mapped fields defined in the model.

2. Cloud flow

The Document Automation Processor cloud flow needs to be updated so that the new fields in the Document Automation Data table are updated. This is so that
  1. The value extracted from the 7 fields are stored in Dataverse
  2. The values are displayed on the Canvas app

3. Canvas app

The Document Automation Application Canvas app needs to be updated so that two screens in the app display the 7 fields. 

The first screen is used by end users who will be configuring the Document Automation Toolkit including the app. In this screen the end user can see the mapped Revenu Québec fields and its values defined by in the AI Builder Form Processing model.


The second screen is used by end users who will be manually reviewing the data extracted by the AI Builder Form Processing model with the form uploaded.


Steps for extending the Document Automation Toolkit

Step 1 - Create a new solution and add the components

A new solution needs to be created so that the components can be configured. This is because the Document Automation Toolkit is a managed solution and if you make change directly in this managed solution, it will create an unmanaged layer.

In the new solution add the components from the Document Automation Toolkit solution. In my #WTF episode I added the following components.

Canvas app
Document Automation Application

Dataverse tables
Document Automation Configuration
Document Automation Data
Document Automation Processing
Document Table Data
Document Automation Table Taxonomy
Document Automation Taxonomy

Power Automate cloud flows
Document Automation Email Importer
Document Automation Processor
Document Automation Validator


Now when I think about it, I only needed to add the three components I outlined in the previous section rather than all of the components in the original Document Automation Toolkit solution 😂

Step 2 - Add columns to the Document Automation Data table

Depending on the number of fields in your form, the difference needs to be created in this table.
In my scenario I had a total of 34 fields I was automating. The difference between the 27 fields and the total of 34 fields is 7 fields. I needed to created 7 fields for the Data and 7 fields for the Accuracy Percentage.

I created columns Data28 to Data34. This is the value of the data extracted from the form as defined by the field mapping in the AI Builder Form Processing model.


I created columns Metadata28 to Metadata34. This is the confidence score from the AI Builder Form Processing model of the value extracted from the form.


Step 3 - Update the Document Automation Processor cloud flow

One of the core actions in this cloud flow stores the extracted data in the Document Automation Data table. With the columns added in Step 2, the respective fields in the action also need to be updated. Browse to the Document Automation Processor cloud flow and click Edit. Scroll down to the "Create document processing data" action and again, scroll down until you see the new columns added in Step 2.

In my scenario it's Data28 - Data34. Click on Data27 and copy its expression. Click on Data 28 and paste the expression into this field. Update the expression to reference Data28 column.

variables('DataDictionary')?['Data28']


Repeat for the remaining DataXX columns you created in Step 2.

Next, apply the same steps to the Medtadata columns created in Step 2. Click on Metadata27 and copy its expression. Click on Metadata28 and paste the expression into this field. Update the expression to reference Metadata 28 column.

variables('DataDictionary')?['Data28_confidence']


Repeat for the remaining MetadataXX columns you created in Step 2.

Step 4 - Update the Document Automation Application Canvas app

There are several controls that need to be updated in the Document Automation Application Canvas app.

Fields mapping screen

1. Expand the Fields mapping screen.

2. Select the Hidden Mapping Refresh Button. 

3. Select the OnSelect property as the formula needs to be updated.

4.Expand the formula bar and scroll down to the Patch function to update the JSON. 

5. Copy an existing row such as Data26.


6. Enter a new line, followed by pasting the content.

7. Update the Name, Index and remaining functions to reference 28.

            {
                Name: "Data28", Index: 28, 'Document Automation Configuration': CurrentConfiguration, 
                'Mapped Column': If(NbLabels >= 28, Last(FirstN(ModelKeysCollection, 28)).label)
            },

Repeat for the remaining DataXX columns you created in Step 2.


This will display the DataXX columns created in Step 2 in the screen for the end users who will be configuring the Document Automation Toolkit.


Document Detail Screen

1. Expand the Document Detail Screen.


2. Click the Document Header Form. If you scroll down, you'll see that there are DataCards for the 27 columns. New DataCards need to be added to the Document Header Form control to display the DataXX columns and MetadataXX columns created in Step 2.


3. Click on Edit fields. 

4. Click on Add field.

5. Search for Data28.

6. Select Data28.

7. Click Add.


A DataCard control will now be added to the Document Header Form. Scroll down to see it. 

8. Unlock the DataCard for Data28


9. Select all the controls within the DataCard and delete them. Yes, delete them - don't worry! Trust me!


10. Select one of the existing DataCards such as Data26_DataCard1.

11. Copy all of the three controls.


12. Select Data28_DataCard1 control and paste (hit CTL + P on your keyboard). The three controls will now appear. 


13. Update the name of the first control to reference 28 - DataCardConfidence28
14. Update the name of the second control to reference 28 - DataCardValue28 
15. Update the name of the third control to reference 28 - DataCardKey28


16. Select one of the existing DataCards such as Data26_DataCard1.
17. Select the DisplayName property.
18. Copy the formula.


19. Select Data28_DataCard1 control.
20. Select the DisplayName property.
21. Paste the formula.


22. Update the reference to 28.


23. Select the DataCardConfidence28 control.
24. Select the Text property.
25. Update the formula to reference Metadata28.


25. Rearrange the placement of the controls in the DataCard to to be in alignment to the other DataCards. Repeat for the remaining DataXX columns created in Step 2.

26. Save the Canvas app.
27. Publish the Canvas app.


That's it - that's how you extend the Document Automation Toolkit! Awesome sauce 😊

Document Automation Toolkit in action

Trigger the automation by sending an email to the Inbox email address configured in the cloud flow. 


As manual reviewer, load the Document Automation Application Canvas app and you'll now see the additional fields 🙂 

Summary

If you need to display all the fields that you've defined and mapped in your AI Builder Automation Form Processing model in the app that comes with Document Automation Toolkit solution, follow the steps above. By adding the columns beyond the 27 default fields, updating the cloud flow and the Canvas app extends the Document Automation Toolkit to suit your requirements.

Until next time #LetsAutomate

Friday, 6 August 2021

How to retrieve a random YouTube video from a playlist with Power Automate

04:10 Posted by Benitez Here , , , , No comments

This is something fun that I had originally planned to do for the MVP Advent Calendar last year by the wonderful Megan V Walker but it didn't go ahead for good reasons. Months later I decided to do this as a WTF episode to share a way of how to motivate your peers/colleagues using the awesomeness of YouTube and Microsoft Teams with Power Automate.

The idea

Since most organisations have their workforce in a hybrid or 100% working from home placement, teams don't have much engagement with each other in-person anymore. There's also been a factor of being isolated indoors which reduced what we regarded as everyday activities such as going to evening classes for learning or to the gym or catching up with friends over a bite to eat.

I wanted to come up with a way of motivating teams to reignite their mind set. One thing that I thought of was sharing a random video from a YouTube playlist with a channel in Microsoft Teams. This can be sharing 
  • something that's related to a team's professional development such as videos from the official Microsoft Power Platform YouTube channel
  • or something that's not related to work such as at home exercises, cooking videos to try since people would be isolating indoors
A random YouTube video from a playlist can be shared using a schedule of choice. Examples are
  • Daily at 12pm
  • Every Friday at 4pm for weekend motivation
  • Once a month on Tuesdays
With Power Automate cloud flows you can motivate the team using an automated schedule with a random YouTube video from a playlist.

And that is how and why this episode came to life 😊 Keep reading if you're interested and want to try this out within your organisation.

The use case

I want to share a random video from a playlist on a weekly basis to help educate or motivate my team so that they can learn or feel motivated

Prerequisites

OK firstly, I want to make it clear that I am not a developer and the following may sound scary because it might involve something that you have never done before as a non-developer. It is not scary and you can do it too!

YouTube is part of the Google family and to interact with the Google Cloud Platform, you need a Google account - eg. what you use for Gmail. 

Once you're signed into the Google Cloud Platform you need to create a Project.

Once your project is created you will need to create an API Key to use with the YouTube API. This API Key is what will be used in a cloud flow in Power Automate. The YouTube Data API v3 is the API that will be used from the Google Cloud Platform.

Disclaimer

By having a Project with API Keys in the Google Cloud Platform and calling the YouTube API, there are quota usages involved. 

Understanding the YouTube API Request

The API request I'm using in my automation is PlaylistItems using the GET method. The API Key created from the project is used for the authentication. In the GET method there are three parameters which is explained in the YouTube API documentation
  • Required
  • Filter
  • Optional
For the required parameter of part I'm referencing snippet which provides properties that I'll be using downstream in the cloud flow.

For the filter parameter I'm referencing playlistId as I'm only interested in retrieving a random video from a single playlist. I have not tried this with multiple playlists by referencing id for the filter parameter.

For the optional parameter maxResults is referenced as there can only be a maximum of 50 items (videos) returned from a playlist. This means if there are more than 50 videos in a playlist, another request is performed to retrieve the next lot of items.

This is where the pageToken parameter comes in handy as it will be used in the next API request to retrieve the next lot of items.

The logic applied

The cloud flow is going to use the HTTP request action to call the YouTube API and loop through each page and 
  • retrieve a random video and append to an array
  • use the nextPageToken value returned in the response to process the next page
From the array created of random videos from each page, a random video will be selected.

The selected random video is then shared to a Microsoft Teams channel.

Example for your learning

The following is a diagram I shared in my WTF episode.


Let's say there are a total of 180 videos in a playlist. There will be a total of 4 pages to loop through. This means 4 random videos will be selected from each page and then finally a random video will be selected from the 4 random videos (the array) which will be shared to a Microsoft Teams channel.

What the playlistItems API response looks like

The following is what the API returns and the property values will be using are highlighted in red.
  • nextPageToken
  • url of the VideoThumbnail
  • videoId

The playlist I'm retrieving a random video from

I'm a fan of at home workouts and one channel I do follow that has awesome workout videos for all levels is Mr and Mrs Muscle. Their video formats are really great and they also provide modified movements to help viewers out. They have a large variety off themes such as
  • Knee friendly workouts
  • No equipment HIIT workouts
  • Chair only home workouts
The playlist I'm using in this WTF episode is their Full Body HIIT Workouts.

Let's Automate

This is what my cloud flow in Power Automate looks like.

The trigger

For learning purposes the trigger is Manually trigger a flow. In real life the Schedule trigger would be used where you define the frequency of when the cloud flow should be triggered.

Initialize nextPageToken variable

Since YouTube allows a maximum of 50 videos to be retrieve from a playlist, an Initialize variable action is used to reference the nextPageToken in response returned by the YouTube API. 

This nextPageToken value will be used for the HTTP request in order to retrieve the next page in the playlist so that the array of random videos can be created.

Initialize random videos array

This is another Initialize variable action to that will be the array of random videos from each page of a YouTube playlist.

Do until

This is the first time I believe I'm using this action in a WTF episode. It's an action that performs the criteria defined until it has been met. In this use case the criteria is to process the actions inside the Do Until action, until the nextPageToken is blank - no longer exists. When there is no nextPageToken in the response it means that there's no page left to retrieve videos in the playlist.

HTTP request

  • The Method is GET
  • The URI is the YouTube API request
  • The content-Type in the header is the usual application/JSON
  • For the values in Queries,
    • pageToken is the optional parameter and the variable is referenced
    • part is the required parameter where snippet is referenced
    • maxResults is the optional parameter where 50 is the maximum value of items returned
    • playlistId is the ID of the YouTube playlist id which can be found in the URL of the YouTube
  • key is the API Key created in the project within the Google Cloud Platform

Set variable - nextPageToken continuous

Using a Set variable action, the nextPageToken value returned from the HTTP request is referenced by the Initialize nextPageToken variable. This is so that the Do until action can continue to perform the HTTP request action that calls the YouTube API in order to retrieve the next page of videos.


Append array - secondary videos

Using an Append array action, a random video (row) in the array of the page retrieved will be selected. A reminder that a maximum of 50 videos will be returned per page of a playlist.

The expression is
body('HTTP_request')?['items'][rand(0, length(body('HTTP_request')?['items']))]


Array value - EXPLANATION PURPOSES ONLY

This is a Compose action that I used in the WTF episode to show you the array of the random videos selected from each page returned by the API response. In the WTF episode I showed how there were only two videos selected as there were only two pages.

Random video selected

This is a Compose action to select a random video from the Random selected videos array (from the Initialize random videos array action).

The expression is
variables('Random selected videos')[rand(0, length(variables('Random selected videos')))]

Post your own adaptive card as the Flow bot to a channel

To share the random YouTube video with colleagues/peers, I am using the the Post your own adaptive card as the Flow bot to a channel action. This will post an adaptive card to a channel in Microsoft Teams. I modified the Activity update sample for adaptive cards 

There is a Product video sample for adaptive cards but at the time of writing this WTF blog post, it is not supported with Microsoft Teams.

I kept the adaptive card simple by having
  • some text
  • an image which is the thumbnail of the YouTube video
  • an action which launches a browser (web or mobile) based on the embedded URL when clciked. This will be the YouTube video URL

This was all built in the adaptive cards designer site and then I copied the card payload into the action in my Power Automate cloud flow.


For the expression that is used for the image of the adapative card, it is
outputs('Random_video_selected')?['snippet']

For the expression that is used for the action that launches the embedded URL in a browser, it is
outputs('Random_video_selected')?['snippet']['resourceId']['videoId']

Cloud flow in action

When the cloud flow runs on the scheduled time, it will call the YouTube API to retrieve the available pages from the defined YouTube playlist and will select a random video which will be shared to a channel in Microsoft Teams for learning or motivation 😄

Summary

For some daily or weekly motivation why not use Power Automate with cloud flows to share a random YouTube video to help spark some motivation in the team? It can be a workout video that you can do from home, a cooking video for "Cook off Fridays" or an educational video from the Power Platform YouTube channel. Give it a go and when it works, give me a shout on Twitter 🙂