Monday, 30 October 2017

Part 1 of Dynamics Portals Web Forms - Save and Close, and Submit

20:59 Posted by Benitez Here , , , No comments
Dynamics Portals was launched in May 2016 where the foundations derive from Adxstudio Portals. One of the features available is Web Forms where Web Form Steps can be configured to replicate a step-by-step form experience for portal end users.

As always when learning for the first time, you pick up on the basic functionality such as configuring a Dynamics Portal Entity Form to point to a Dynamics 365 entity form. For example, the "Customer Service - Create Case" Dynamics Portals form that end users see when creating a new Case is the "Web - Create Case" Dynamics 365 entity form.

Once you get past the basics there's the second part of learning - unlocking what you don't know by exploring and working with what's available to create a cool output. This is what I cover in Part 1 of my Web Form vlog series by showing other configuration within Web Form Steps that can be utilized to change the end user experience. Watch my vlog below to learn more.

Scenario

The Dynamics Portal I've provisioned uses the Community Portal and since I'm a Game of Thrones fan, this is the theme of my portal. It's recruitment for individuals in Westoros where applications can be submitted for different positions. Good luck surviving in Westoros ;)


I created two custom entities for the application process,
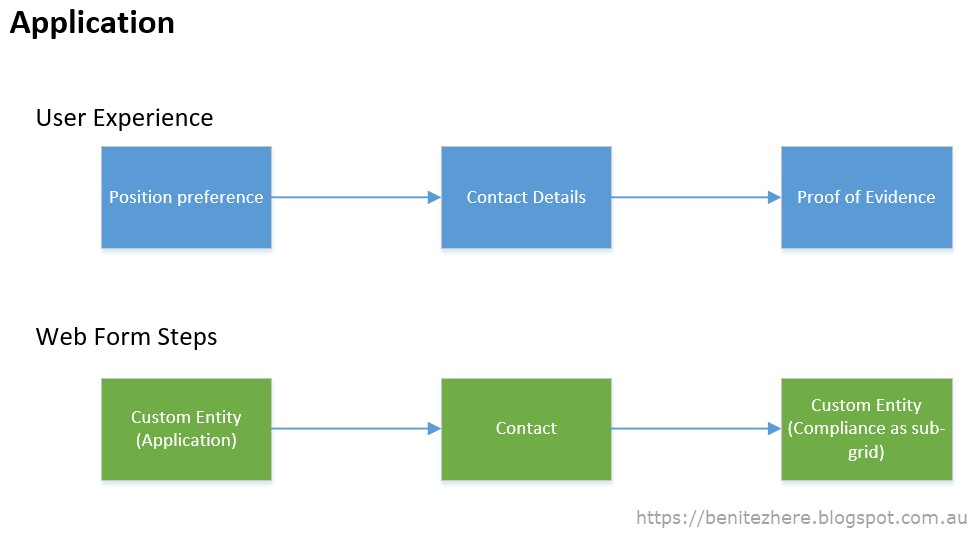
  1. Application - details of the position they are applying for.
  2. Compliance - proof of evidence that needs to be supplied such as Passport. This is inserted as a sub-grid in the Web Form Step.
I then created two Web Forms where each one has Web Form Steps,
  1. New Application
  2. Edit Application
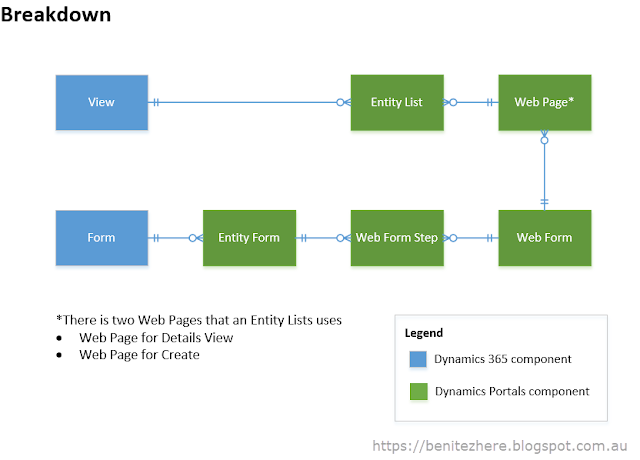
How this ties in altogether is illustrated in the ERD diagram below. ERD probably isn't the best method for outlining how it all works but I find it helps whenever I teach people about Dynamics Portals.
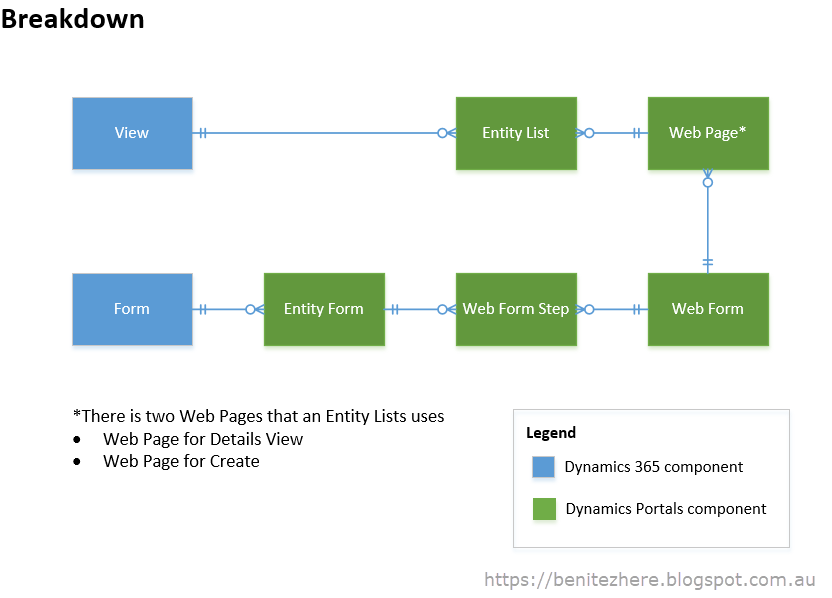

The above is how you would configure Dynamics Portals Web Forms and Web Form Steps. These are the components required to set up a flow of information an end use needs to complete.

The end user experience for the Application process is as follows which is represented by the Web Forms Steps.
I had a different expectation

What you don't realize until you configure Web Form Steps and do a run through is that the Previous, Next and Submit button isn't quite what you think it is.

When your first Web Form Step is an Insert in a "New Application" process, the record will be created in Dynamics 365 when the end user clicks on the Next button. Any other clicks within the Web Form of Previous, Next or Submit (in the last Web Form Step) will save any changes made along the way. They are all a "Save" button in the context of Dynamics 365.


If you have used other portals before, there is functionality where end users can go back to a saved form to complete at a later date and submit when ready. 

Due to the nature of Dynamics Portals with Dynamics 365, this is not the immediate experience as by default in Dynamics 365 when a record is Saved, it is created or updated. Dynamics Portals respects this.

With additional configuration methods, you can achieve a similar outcome to the Save and Submit experience.

Tell me more...

The following can be applied
  1. Relabel the the step labels
  2. Add an additional Web Form Step in the Web Form where it will redirect back to the view (Entity List)
  3. Use a workflow to update the record Status Reason

1. Update the labels in Web Form Steps

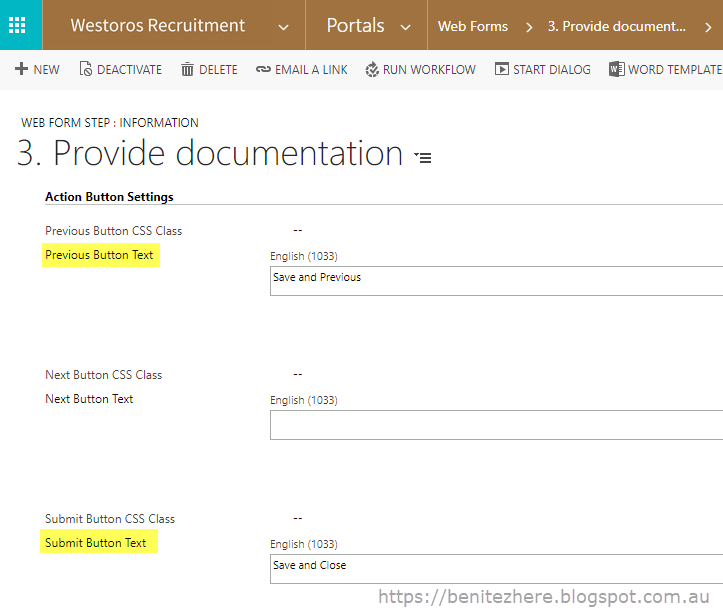
To make it more clear to the end user that what they are entering will be saved, rename the labels in all the Web Form Steps
  • Previous = Save and Previous
  • Next = Save and Next
  • Submit = Save and Close


2.  Create a new Web Form Step of Redirect

As you would have seen in my vlog (please watch if you haven't already done so!) when a end user clicks on "Submit" in the last step, a message is displayed and the end user remains in the last Web Form Step. 


If they wanted to go back to the My Applications view (this is an Entity List), they need to click within the top navigation menu. This is an extra click and in my opinion not the best user experience. They should automatically be redirected back to the My Applications view.

To achieve this, you can create a new Web Form Step where the type is "Redirect." This way when they click on the relabeled Save and Close button in the last Web Form Step, the Redirect will be executed taking them back to the My Applications view.

BUT FIRST...

Hold on to your horses, there's actually something else you need to configure before hand. One thing to know about Dynamics Portals is that there's quite a number of configurations to complete to get one process to work as it's all native within Dynamics 365. So for a Web Form Step to redirect to an Entity List, you need to first create a Web Page that references the Entity List. 

In the screenshot below, you'll see that my Web Page is linked to the My Applications Entity List.

OK CONTINUE...

Once you have a Web Page that points to the desired area in Dynamics Portal, select the Web Page in the redirect Web Form Step.

3. Create a workflow to update Status Reason

The last bit of the jigsaw puzzle is to utilize a workflow that will update the Status Reason to allow the end user to "Submit." I created a new Status Reason of Submitted and updated the default value to Unsubmitted. I then created an on-demand workflow that will update the Status Reason from Unsubmitted to Submitted.


After the workflow is created, you then need to create an action within the Entity List. Why? Well the last Web Form Step is redirecting back to the Entity List. Entity Lists can have additional actions where one of them is calling a workflow. In this case, we want to link the workflow so that the Application Status Reason can be updated to Submitted.

Simply associate the on-demand workflow to the Entity List and update the label to something more meaningful such as "Submit Application."

Bonus Tip

Update the message of the workflow to something more meaningful such as "Thank you, your application has been submitted." By default, the success message is "Workflow was initiated" which doesn't really make sense to the end user.

BUT FIRST...

Hold on to your horses (again), there's something else I recommend you configure before hand. Make sure you have two filtered views that the Entity List will display. 
  1. Unsubmitted applications where Status Reason is Unsubmitted.
  2. Submitted applications where aStatus Reason is Submitted. 
This will allow the end user to switch between the views.

Hammer time! Ready to test

Once the configuration has been completed, the end user will now be redirected back to the My Applications view in the last Web Form Step.


The end user can then submit their application when they are ready by clicking on the Submit Application "button." Once the workflow is successfully completed the application will drop off from the Unsubmitted Applications view and appear in the Submitted Applications view. Ta-da!

Summary

Dynamics Portals is native to Dynamics 365 and respects how it works out-of-the-box which is why the buttons will create and/or save a record when using Web Forms (or Entity Forms). In this vlog post, I showed you how you can use other configuration methods to achieve the save and close, and submit functionality. Be open minded and explore what else can be done to achieve a similar outcome.

Make sure you subscribe to my YouTube channel and follow me on Twitter
I'm new to Twitter and so far it's going OK! Thank you to those who have followed me so far on Twitter.

Stay tuned for Part 2 of Dynamics Portal Web Forms with me.

Toodles.

Monday, 2 October 2017

Summary of Customer Engagement (Enterprise Edition) Updates

20:27 Posted by Benitez Here , , No comments
In the first week of October 2017, version 9 of Dynamics 365 became available and is now the version applied when provisioning a new Dynamics 365 trial instance. I've reviewed most of the updates outlined in Microsoft's list of features which is outlined in this post. As usual, I've outlined my observations and findings so far in the end of this post.

I've broken down my review into three areas:

  1. Visual Changes
  2. Customization and Configuration Changes
  3. End User Features

Visual Changes

The entire look and feel of entity forms has since been updated for end-users.

Entity Forms

  1. There are borders around the different components of sections on the form 
  2. You will also notice that the form header is different. The fields that are in the header form will not appear as being "cut-off." A lot of Customers found this annoying but now is resolved, hooray!

System Views and Dashboards

The system views and dashboard user interface appear differently as well. The same heading scheme and borders is consistent to the entity forms.


Wrapping of field labels

You no longer need to play with the field label length when the Display Name is long due to a high number of characters. Dynamics 365 will automatically adjust by wrapping the field Display Name.

Customer Service Hub formerly known as Interactive Service Hub

Previously you'd see this window when trying to load the Interactive Service Hub and it would take a while. 


In version 9, there's been more improvements to the Unified Interface Framework. As a result, the Interactive Service Hub has changed and is now called Customer Service Hub. It loads instantly too.


If you also click on the Hamburger icon on the left hand side, a vertical menu appears which is pretty cool.


The Knowledge Articles have also had a user interface refresh.

Before


After

Accessibility features available

Accessibility within Dynamics 365 is now available. This is great for Australian government agencies that are required to be WCAG compliant. This is something that has been asked for in the past from government agency clients I've worked with and can now be reviewed and tested by accessibility readers out there. I don't have a reader myself to test this.

Below is a summary from the Microsoft's list of features.
  • People with screen readers can skip to content directly and navigate to sections that are important to them.
  • People using reading plugins receive great results.
  • People using browser plugins can jump to specific sections on a page.
  • Keyboard users can save time and effort by using the tab key and keyboard shortcuts. In the screenshot below I’ve hit tab from the Topic field.

Customization and Configuration Changes

Ability to change sub-grid colour

You can now change the sub-grid colour on entity forms. A CRM super user can update the hex colour of a sub-grid in the form customizations. Customers of Dynamics 365 will need to plan their colour palette according to their company branding or adopt a new colour scheme for the different components such as Blue for Connections across all entity forms that displays a Connection sub-grid and Orange for Contacts across all entity forms that displays a Contact sub-grid. This allows easy identification of record types when viewing sub-grids.


Multi Select Option Set

This a feature that a few people have asked for over the years. It's now available, hooray! There's a new attribute type of MultiSelect Option Set. In my screenshot below, I've created a Remoteness Area field. Remoteness Area is common in Australian government agencies.


New default themes

Three new themes are available. I've made the assumption here that existing Dynamics 365 Customers will already have their Dynamics 365 theme for Production in alignment to their company branding. In my opinion this is useful for Sandbox environments to have a different theme to Production for users to easily identify non-Production environments.


App Designer

I covered the App Designer in a previous post. It's one of the neat features of Dynamics 365 and I'm a fan of it.

You can inline edit the Title of a component in the Site Map designer.


You can configure an App to load a Welcome Page that will appear when an end user opens the App. This is great for Dynamics 365 Customers that want to make the experience more personal or display some quick tips outlined to the end user. You need to upload a .html file as a Web Resource into Dynamics 365.

I created a simple web page using Microsoft Word and uploaded it as a Web Resource in a solution.


End User Features

NOT IN query

You can now build a query that allows users to search for data that does not exist, such as Opportunities that do not have an email activity.


WYSIWYG Editor available in Email Activity

You can now use the WYSIWYG Editor in Email Activity.


Observations and Findings

Below is a list of things I've found while reviewing the new updates to Dynamics 365 in version 9.

Customer Service Hub

It wasn't displayed under the usual area within Settings > Application.


However you can still browse to it using the following URL:
https://yourinstancename.crm6.dynamics.com/nga/engagementhub.aspx

Or you can get to it through the Apps menu.

NOT IN - not quite (yet)

I was excited about this but then after doing a thorough review, I'll be more excited for a future release.

Even though you can use the "NOT IN" condition in Advanced Find, currently it can't be applied in the following
  • Entity System Views - when using Edit Filter Criteria.
  • Workflows - when creating a conditional step.
  • Marketing Lists - since System Views can't be configured. However workaround is to create a Personal View and then this can be used in the Marketing List. I tested this and it works.
It's limited to Advanced Find only for now. I'm hoping the Dynamics 365 Products team will expand on this feature across the functionality outlined above.

If you still want to create NOT IN Entity System Views, you still need to use XrmToolBox for it. However a reminder that when using XrmToolBox FetchXMLBuilder for NOT IN views, you can only configure it through the XrmToolBox. You won't be able to edit the view through Customizations.

WYSIWYG Editor in Email Activity

It still leverages what we saw back in version 4. I'm hoping the Dynamics 365 Products team will expand on this feature by bringing across the WYSIWYG Editor from the Customer Service Hub Knowledge Article.

Welcome Page in App Designer

I found a couple of odd behaviours with this.
  1. If I went back to the App to change the Welcome Page to point to a different web resource as my Web Page, it would not save. I tried both in Google and in Internet Explorer Edge. I had to create a brand new App which was inconvenient. So be careful here! Make sure you are 100% certain that the Web Page is finalized before building your App.
  2. If I inserted an image in the Word file, it would not load. I tried both Web Page and Web Page, Filtered as the file type but still didn't work. Therefore I opted to insert text instead of a .png image.

I'll be logging a new item in Microsoft Connect when I find the time to do so.

Process Stage

I came across another odd behaviour with the Opporutunity entity. Usually as you progress in the stage of a Business Process Flow, the Process Stage record will update as the entity has a N:1 relationship to Process Stage which captures the Business Process Flow Stage information of an Opportunity.

In version 9, this information is not being automatically populated.


I tested this in another version 8 instance trial that I have access to still and it works as expected.


I found this when I was testing a workflow I built that was updating a custom field with the Stage Category Name. I was scratching my head trying to figure out why it wasn't working and then discovered the Process Stage fields is NULL.

When I then tried progressing to the next stage in a customized Business Process Flow, an error was being thrown which was referencing an out-of-the-box plugin. I think it's caused by the NULL Process Stage fields.


I'll be logging a new item in Microsoft Connect when I find the time to do so.

Opportunity Main Form

I noticed a couple of things with the reboot of the Opportunity Main Form.
  1. The Opportunity Sales Stage field displayed is a global option set that can't be customized. Refer to my other blog post that somewhat touched base on this field. Since it can't be customized to reflect configured Business Process Flow stages, it's best to remove it on the form otherwise it will confuse end users.
  2. The Contact Quick View form is duplicated. I recommend removing one of the duplicated Quick View forms.

Summary

Overall the above is my review on the new features of Dynamics 365. It's improved a lot and it's really cool to see what the Dynamics 365 Products team have accomplished to date.

If you are reviewing Microsoft's list of features, I couldn't figure out some of them such as the Timeline or Business process flow as Action steps. Either I was looking in the wrong place or they're not available just yet.

What I haven't reviewed yet is the following:
  • New LinkedIn Connector solution
  • Outlook app
  • Dynamics 365 mobile app
  • Multi-step workflow automation with embedded Microsoft Flow
  • Power BI enhancements
  • Web resource dependencies and localization
  • Unified Service Desk
  • Virtual Entities
Sign up for a Dynamics 365 trial today and start exploring :)

Other

I've finally joined Twitter. Please follow me, thanks :)
I'm new to it so any tips, do share with me!

Sunday, 10 September 2017

Using App Designer to change the end user experience with Dynamics 365

22:38 Posted by Benitez Here , , , No comments
In my last blog post I shared customization and configuration tips for Dynamics 365 where the last tip I shared was to use the App Designer to change the end user experience. The App Designer was introduced towards the end of last year (I think) and it's a step up from what we previously knew about configuring Site Maps. It's one of those features that has made me appreciate how far Dynamics CRM has come as it's a neat way of reducing the noise and distraction for end users without having to resort to code.

One of the recurring themes I had in my last post was to minimize "clutter" for end users, hide anything that is not of use to them when they're interacting with Dynamics 365. When they log in, they should only see what they need to see when navigating within the menu and only have access to entity forms, views and charts that are relevant to them. This can be achieved using the App Designer.

Tell me more...

Previously if we wanted to change the default menu that comes with Dynamics 365, we would turn to the Sitemap Editor in XrmToolBox. The Sitemap Editor was our best friend for those who weren't familiar with editing the raw FetchXML. However if we go back to the principles of Dynamics CRM, the sitemap is a "global" function - it applies to all end users. A change you make such as removing the Service tile from the menu/site map means any end user when they log in will only see Sales, Marketing, Settings and Help. You're not able to show and hide the Service tile and it's respective records based on an end user's security role. You could add a privilege node for the entity that needs to be displayed or hidden but 
  1. You'd have to be confident in doing this with the Sitemap Editor in XrmToolbox.
  2. It can be confusing if you're not familiar with the security role privileges and is hard to maintain in the long term as the configuration resides within XrmToolbox. It's not something you can see within Dynamics 365 administration or customization settings.
  3. This is a risky configuration option and I have not worked with a customer who has chosen to go down this path as once I've explained it to them, they are confused and prefer to display the entity in the menu but restrict the Read access through the security role privileges. Plus you can also hide an entity from the menu within the customization settings of the entity.
This is where the App Designer comes in handy as
  1. It's configurable within Dynamics 365 which means the customer can update it themselves in the future post go-live.
  2. It's simple for end users to configure. They simply click or drag and drop to configure the Site Map.
  3. You can create many Site Maps through the concept of an "App" and assign security roles to the App. No need to create privilege nodes and be in fear of whether you correctly configured the privilege node in alignment to the security roles. You're no longer tied to a single Site Map and can restrict the Apps to certain security roles.
BUT... you can do more than Site Map configuration with the App Designer. This is what I cover in my vlog. Check it out by watching my vlog below.

How to create a new Dynamics 365 App

What you need prior to creating a new App
  1. An unmanaged solution to create the App in.
  2. System Administrator or System Customizer security role.
  3. A plan of what entities you would like displayed in the menu, as well as the what other entity components you would like the end user to have access to.
  4. A plan of the security roles that are permitted to use the App.

Creating the App

Open your unmanaged solution and on the left hand side you'll see a new component called Apps.
Click on New.

A new window will appear where you can
  1. Enter a Name for the App. This is what the end users will see.
  2. Unique Name is the schema name for the App.
  3. Select an icon. By default, there will be a default icon that is used. However if you have uploaded a web resource with a .png that is to be used as the icon, simply untick the box and a dropdown field will appear where you can select the web resource.
  4. Enter in a suffix for the url of the App.


Once you're happy with the details, click Done. You'll have a new window appear where you can configure a Site Map for the App.


Click on the arrow icon to configure the Site Map. You'll now be able to add 
  1. Area which is a menu tile (eg. Sales).
  2. Group which is the heading or category of what will sit underneath it.
  3. Subarea with is either a dashboard, entity, web resource or URL.


To add the components, you can either
  1. Click on Add and select what component you want to add.
  2. Drag and drop the component from the right.


For each component you add in, enter in the details on the right hand side. 

When adding a new Area, you enter in a Title and select an icon. Icons are web resources so if you have a custom icon, make sure it's a web resource within the unmanaged solution the App resides in.


For a Group, all you need is a Title.


For a Sub Area, this is where you can pick what type you would like to be displayed. A majority of the time it will be an entity but there are other options that can be selected. If the entity has an icon associated to it, it will automatically load by default.


Once you're done with configuring the Site Map, it should look something like this:


Save and Publish your Site Map. When it has completed, you'll see the buttons disabled as per the above.

Click Save and Close. You'll be directed back to the App Designer where you can do extra configuration on top of the Site Map.

Do tell me more...

Remember earlier when I mentioned you can do more than configure the Site Map the App Designer? You can also hide other elements to minimize clutter for end users #winning

Displaying dashboards

If you click on dashboards, it will display the list of dashboards available within the Dynamics 365 instance on the right hand side. You can select what dashboards you want to be visible for the App. Continuing with the last screen shot, I've created an app for the Service Desk team. I only want them to see dashboards related to Cases. I simply tick the check boxes for the dashboards I want the end users to see.


Displaying Business Process Flows

Same applies to Business Process Flows, it will display the list of Business Process Flows available within the Dynamics 365 instance on the right hand side. You can select what Business Process Flows you want to be visible for the App. 

Displaying entity level components

This one is my personal favourite :) 

You can hide and show Forms, Views and Charts for each entity! Why am I excited about this? Because I get asked to hide Views all the times by customers. Now you can do it with the App Designer.


You can also hide the Forms as well within the App Designer. You can also still use the existing configuration feature of hiding it based on security roles (you do this with the form customization). 


Side note: hiding Forms is something I come across more frequently in my projects these days as I work with customers who are also implementing Dynamics Portals. In Dynamics Portal, you do create new entity forms for the purpose of displaying them on the portal. These forms often don't need to be seen by end users.

Same with Charts, you can select which charts you want to be displayed to end users.


When you're done selecting what you want to be displayed, save and Publish the App. Exit out of the App and you're good to go :)

Enabling security roles to access Apps

The next thing you will need to do is enable security roles for any Apps that have been configured.

Normally you browse to Settings and you see Apps under Applications. However I have found that in the latest version of Dynamics 365 it's not appearing where it should be.


Fear not, Benitez is here! You can view your list of Apps by browsing to https://<instancename>.crm6.dynamics.com/apps. Simply end apps as a suffix your Dynamics 365 instance URL.

You'll see a list of Apps and to enable security roles for an App that has been created, click on the ellipsis and select manage roles.


You can then select the security roles that you would like to have access to the App. Select the security roles and then hit Save.


Time to test. Log in as an end user with the security role and they will now have access to the App.


Check out your components that you configured to display certain records such as Views. In my example, I restricted the Case Views for the Service Desk app.


Bonus Tip

Before you export your unmanaged solution, you need to add the sitemap component to your solution. It's not obvious the first time you create an App and you only find out when you do a deployment for the unmanaged solution. You'll get a prompt that it's missing from your solution.

Simply go to Components in the unmanaged solution and select Site Map.


Select the Site Map for the App and it will be added to the unmanaged solution.


My learnings

Copying and restoring Production

I found that if you copy and restore the Production instance into a Sandbox instance, the App URL's will point to Production. I'm not sure if the Dynamics 365 Product team is aware of this behaviour but I came across this when working with a customer earlier this year.

Apps simply hide components on the surface

If a entity is not displayed on the Site Map of an App, the end user can still get to the entity through Advanced Find. So don't think this will prevent the end user in accessing entities they 100% should not be allowed to access. You still need to work with security roles in removing access to entities.

More analysis and customization time required

Don't get me wrong, I love the App Designer. However there is something all consultants and customers need to be aware of. Due to the App Designer allowing more than one App to be created, more time and effort is required here. The customer needs to invest in planning what Apps are to be created and what end users will have access to these Apps. 

If there is a desire by the customer to have "regional" based Apps, this requires careful considerations. A customer I have worked with here in Australia wanted Apps based on the State and Territories such as an App for Victoria based end users. I advised the customer that they need to put more thought into this as this will require a number of views across Dynamics 365 entities to be created that will fit the requirement of State based Apps. For example, when viewing Contacts what constitutes a Contact as being in the Victoria region? Is it by the Territory record associated to the CRM User record that is the Owner of the Contact? Or is it the Address 1: State/Province field where it equals "VIC" or "VICTORIA?"

Regional Apps can be created but need to think about how the views will be impacted. Plus the maintenance of the views can be cumbersome long term as you'll have to update all the regional views that have been created.

Summary

The App Designer allows the configuration of the Site Map and the visibility of components for the end users when navigating in Dynamics 365. The best bit is that no code is required. It is also available within the Dynamics 365 interface which is good for the customer as they can go to one place to edit any Apps.

By displaying Areas and Sub Areas tailored to specific security roles changes the end user experience. You can make end users focus on what they need to see to do their job or daily tasks within Dynamics 365 by removing any unnecessary noise. Keeping it clutter free makes their experience with Dynamics 365 much smoother.

Till next time, toodles.