Thursday, 25 October 2018

Referencing a Two Option field in a Flow condition step

22:39 Posted by Benitez Here , , , , , No comments
In my previous blog post, I share how you can reference an Option Set field in a Flow condition step. This time round I'm showing you how to configure a Two Option field in a Flow condition step.

In Dynamics 365 workflows we can reference a Two Option field in a workflow step.


As defined in the https://docs.microsoft.com site:

This field provides two options. Each option has a number value of 0 or 1 corresponding to a false or true value. Each option also has a label so that true or false values can be represented as “Yes” and “No”, “Hot” and “Cold”, “On” and “Off” or any pair of labels you want to display.

How many ways can you go wrong with this in Flow? You'd be surprised. A true #WTF moment.
I experienced the frustration and wanted to share this in case someone else is going through this same pain.

Welcome to another WTF blog post where I share with you how to replicate this in Flow.

What did not work and what worked

Here's a table summary of the different values I tried in my expression.

Summary

For the Two Option value of 0, use false.
For the Two Option value of 1, use true.

Both are applicable to Dynamics 365 connector or CDS connector.

Tweet if you came across this post so that I know I helped you out 😁

I think this is my shortest blog post ever.

Till next time, toodles.

Thursday, 18 October 2018

Referencing an Option Set in a Flow condition step

20:48 Posted by Benitez Here , , , , , No comments
A field type that can be referenced in a Dynamics 365 workflow condition step is an Option Set. As defined in the https://docs.microsoft.com site:
This field provides a set of options. Each option has a number value and label. When added to a form, this field displays a control for users to select only one option.
In Dynamics 365 workflows we are used to configuring a condition step in a clicking manner when referencing an Option Set.

How do I replicate this in Flow?

Welcome to another WTF blog post where I share with you how to replicate this in Flow.

Two Dynamic Contents to choose from

When referencing an Option Set in Flow through a Dynamics 365 connector, there will be two options (no pun intended) presented to you. 


1. This will reference the number values of the options in the Option Set
2. This will reference the the labels of the options in the Option Set

Using Dynamic Content No.2

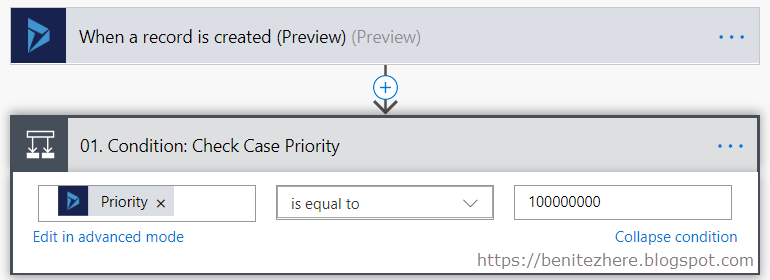
This is displayed as <field name> Label in the Dynamics Content selector. In my scenario, I see Priority and Priority Label.

Selecting Priority Label is a valid approach as it allows you to configure the Flow condition step by entering the label of  an option such as "VIP" in the criteria of the expression.

Why this is useful

If the person configuring the Flow is not familiar with customizing Dynamics 365 they will only know of the options displayed in the Option Set field through their regular interactions with the field on a daily basis. You simply navigate to the field, then click on the Option Set field to see the options that can be selected. 

Why this is not useful

Using the Priority Label will not safeguard the Flow from future changes to the label of the option. As seen in my vlog, if I were to change VIP to Very Important, the Flow will not pass the expression of the Flow condition step the next time it is executed. This is due to the Flow condition step being told in the expression that the Priority Label criteria must be VIP, not Very Important.

Using Dynamic Content No.1

Priority is another valid approach in the Flow condition step when the trigger is a Dynamics 365 connector. Rather than using the label of the option the number value will be used instead.

When using the number value in Flow, the commas need to be removed. If you leave the commas of the number value after copying from the field configuration record in Dynamics 365 and pasting into Flow the expression will fail. So remove the commas!

NOTE: If using CDS connector you will only be able to use Priority in your expression. 

Why this is useful

If in the future the label value changes, such as from VIP to Very Important, the Flow condition step will continue to pass the expression because the number value is used, rather than the label.

Why this is not useful

The person configuring the Flow is required to know the number values of the options in the Option Set fields. The person may not know or have the required access to view the option set number values. However one could argue that only certain users in Dynamics 365 or CDS would only ever be allowed to configure workflows in the first place, therefore would have a security role that would provide them with the ability to do so.

Summary

If you are restricted to using the Dynamics 365 connectors because you don't have a Flow Plan 1 or Plan 2 to use CDS connectors, recommend to use the Dynamic Content that will reference the number values of the options in the Option Set instead of the Dynamic Content that will reference the labels in a Flow condition step. This way if the label is changed in the future, the Flow condition step will continue to execute as the number values are being referenced.

If you use a CDS connector as a trigger for the Flow, then you can only use the Dynamic Content that will reference the number values of the options in the Option Set.

Whether it is Dynamics 365 connector or a CDS connector, you will need to know the number values of the Option Set for your Flow condition step. This requires access to viewing the Field configuration record in Dynamics 365 or in CDS.

Thursday, 11 October 2018

Triggering a Flow when Dynamics 365 fields have changed

21:42 Posted by Benitez Here , , , , No comments
When you configure a Dynamics 365 workflow to be triggered on update of a record, it is defined by fields that have changed.

How do I replicate this in Flow?

Welcome to another WTF blog post where I share with you on how to replicate this in Flow.

Can I do this using a Dynamics 365 trigger?

The answer is no. Not what you wanted to hear right?

When you use the Dynamics 365 trigger of "When a record is updated" or "When a record is created or Updated" the Flow will always execute because you are unable to define the fields that the Flow needs to validate as a result of an update in Dynamics 365. There's two reasons why this is not ideal.

Reason one

If you have other Flows that are executing for the same entity where you have selected the "When a record is updated" trigger, all your other Flows will execute. If there is a Flow that is updating a field whenever an update has occurred for the record, you'll experience the Flows to continuously execute.

I experienced this when I was experimenting with what I could do with Flow in the beginning for my Dynamics 365 Saturday New Zealand presentation. I had a few Flows executing for the same entity whenever the record is updated and one of them ended up being continuously triggered.

Reason two

If you have a large volume of Flows that will execute in a month and you are on the free plan of Flow, i'ts possible that you may reach that limit. You don't want to burn through your threshold.

Oh dear. What can I do then in Flow?

If you have a Flow Plan 1 or Flow Plan 2, you are entitled to use Premium connectors. A Premium connector that is available to use is the Common Data Services connectors. I showed you this in WTF Episode 1.

When you select the "When a record is updated" CDS trigger, you'll see Show advanced options. When you click on this, the step will expand where you can select your field(s) to define when the Flow is executed.

Does it work?

Yes as seen in my vlog. If you update any other field that is not defined in the trigger step of Flow, the Flow will not execute. The moment you do update a field that is defined in the trigger step of the Flow, the Flow will execute. This means the number of Flows executed whenever a record is updated will be low in comparison to when a Dynamics 365 trigger is used.

Summary

If you want to replicate the same functionality that you are used to in Dynamics 365 workflows where it will only start when fields have been updated, you must have a Flow Plan 1 or Flow Plan 2 licence to use the CDS connector. In the "When a record is updated" CDS trigger, you can define the fields through advanced options.

If you don't have a Flow Plan 1 or Flow Plan 2, you will need to create some additional fields to prevent other Flows that reference the same entity to continue to execute. However the Flow will still execute whenever an update has been made to the record.

Another #FlowFever blogger to follow

Thanura, aka T or Thunder ⚡ has a blog post that provides a side by side comparison of Dynamics 365 connectors and CDS connectors. I recommend you check it out as it's a great blog post that will help you understand the limitations.

T blogs about Flow in the context of Dynamics 365 in our community, follow him.

Till next time, toodles!

Wednesday, 3 October 2018

Does not contain data and Does contain data in Flow

22:32 Posted by Benitez Here , , , , No comments
Another type of configuration that we are familiar with in Dynamics 365 workflows is Does not contain data and Contains data in a condition step. This is typically used to check whether a field is populated with data for the next workflow steps to take place.

When you use basic mode, you'll be presented with the click and select style you're familiar with in Dynamics 365 workflows however what is missing is Does not contain data and Does contain data.


It is not as obvious on how to achieve this in Flow compared to Dynamics 365 as the two are visible in Dynamics 365 workflows. 


Welcome to another WTF post on replicating Dynamics 365 workflow functionality in Flow!

Replicating Does not contain data

In Flow we have to edit in Advanced mode instead of using basic mode. I covered Advanced mode for AND OR statements in my previous blog so check it it out if you haven't already done so.

When you select the field you're after in basic mode, switch to advanced mode. Your expression will look something like this:


The expression to use for Does not contain data is

@empty(triggerBody()?['_productid_value'])
  • You replace the condition expression with empty 
  • Remove the comma 
  • Remove the field reference of  ' '
The step will now pass the function with the logic of checking that the field does not contain data, in other words is NULL.

Replicating Does contain data

To achieve the same for Does contain data, use an additional condition of not( ).

@not(empty(triggerBody()?['_productid_value']))

This will now pass the function with the logic of checking that the field does contain data, in other words is not NULL.

Summary

Use edit in Advanced mode to achieve Does not contain data or Does contain data in Flow. You'll need to enter the expression as outlined in this post within the Condition step in Flow.

Happy Flow'ing 🙂 #wtf #FlowFever

Wednesday, 26 September 2018

AND OR statements in Flow

21:16 Posted by Benitez Here , , , , , No comments
When using a Check Condition step in Dynamics 365 workflows, you have the ability to to the following
  • AND
  • OR
  • Group a combination of AND OR

In this #WTF post I will cover how to do this in Flow as the configuration is different. Remember, Flow uses the odata APIs of Dynamics 365 which results in different configuration. However our Dynamics 365 knowledge still applies 😁

Two types of modes

When using a condition step in Flow there's two modes that you can apply. 
  1. Edit in Basic mode
  2. Edit in Advanced mode

Basic mode

This is the familiar "click and select" concept where you choose your condition and the field value.

Advanced mode

This is where you can make additional adjustments that is not available through basic mode. This is what we will use for AND OR statements. Why? In basic mode you cannot set more than one condition in a Flow condition step.

Breaking down Advanced mode

OK, this is where I give you my explanation. Disclaimer: I am not a developer and the terms I use is what makes sense to me. It is not the official explanation but this is how I have understood it which has helped my learning and adoption of Flow.

In a Flow condition step, it is calling a function to pass single or multiple parameters using some logic.

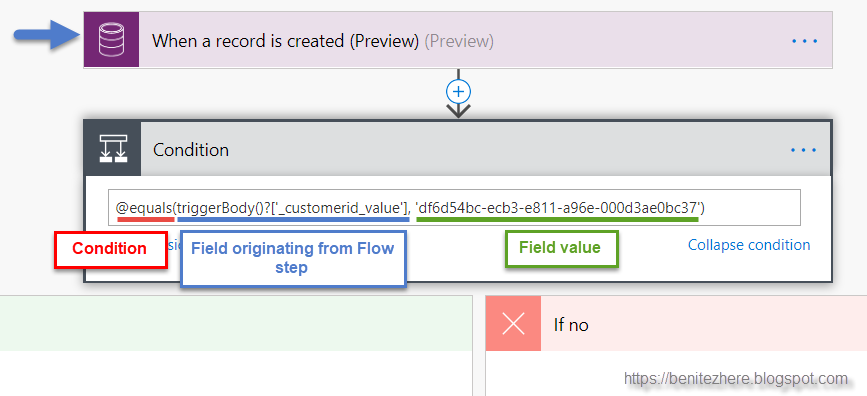
When we review the funky looking string in Advanced mode, this is how I see it:


Hopefully this makes sense to you.

How to do AND

You must use Advanced mode to be able to extend the function to have more than one criteria.

In my Flow condition, I was checking that the Customer equals Stark Industries and Product equals AI Support.

Again, here's my explanation of what the function is in Advanced mode.

How to do OR

Similar to AND but this time using OR instead.

How to group OR and AND statements

This one I figured out on my own. What I was able to work out is there's different parts to the function.

In Dynamics 365 workflows we are used to configuring it like the below,


We use "Group And" and "Group Or" clauses.

In Flow we apply the same logic in the following manner,

  1. In blue is the AND OR conditions
  2. In red is the two grouped OR conditions where the Product field value equals AI Support or Iron Man Armor.
  3. In green is the condition where customer equals Stark Industries

Bonus tips

Use GUID when referencing a lookup in a condition

In Dynamics 365 we are used to seeing the Name of the lookup value when referencing a related record in a condition.

In Flow we need to reference the GUID of a lookup value since it uses the odata APIs of Dynamics 365. In Unified Interface, it's easy to get the GUID in the URL.

Lookup record exists in target instance

If you export and import a Dynamics 365 workflow from a source instance into a target instance that references a related record through a lookup in a condition step, the workflow will not execute as expected if the record does not exist in the target instance.

Same principle applies in Flow so make sure the record does exist in the target instance. Otherwise when the Flow is imported into the target instance and the GUID does not exist, you're going to run into a problem.

Use Notepad++

Notepad++ is your best friend when it comes to making sure that you are not missing any close brackets which is what I demonstrated in my vlog. Notepad++ will highlight your brackets in red and it makes it easy to see where you are missing a close bracket.

Summary

To perform multiple conditions to use AND OR statements, and Group, you need to edit in Advanced mode to enter the correct function. It might appear as hard at first however you will get the hang of it. As mentioned earlier I am not a developer, but I was able to understand the concept of edit in Advanced mode when configuring the Flow condition step.

More #WTF coming. Stay tuned 😎
#FlowFever

Thursday, 20 September 2018

How to configure Dynamics 365 workflow scope in Flow

07:20 Posted by Benitez Here , , , ,

#WTF 

In case you haven't watched my announcement video on my new WTF vlog series (What the Flow), here it is.


The purpose of my WTF vlog series is to help you extend your existing knowledge of configuring Dynamics 365 workflows and how to replicate this in Flow. Flow uses the odata APIs of Dynamics 365 and as a result of this, how you configure in Flow is somewhat different to Dynamics 365 workflows.

You may freak out. You may pull your hair out. You may think Flow is stupid.

Yes - I have mentally experienced this but once I overcame it I loved Flow. There's so much capability that Flow unlocks that we didn't have in Dynamics 365 workflows. I know, it is hard sometimes to let go of what you are already familiar with however you're not going to know unless you try.

Have I motivated you in learning Flow? Let's begin 😁💙

Episode 1 -  Scope in Flow

This is my first episode of my WTF vlog series. In this episode I talk about the difference between a Dynamics 365 connector and a Common Data Service [CDS] connector in the context of defining scope for Flow.

"Scope" is already a configuration we are familiar with in Dynamics 365 workflows. I thought it would be a good idea to kick-off my WTF vlog series with this since it is a configuration you normally set prior to configuring the Dynamics 365 workflow steps.

In case you are new to Dynamics 365

When configuring Dynamics 365 workflows one of the configurations is to set the scope of a workflow as this will determine which users will trigger the workflow. For more information on scope for Dynamics 365 workflows please check this out.

How do I replicate scope in Flow?

There are two types of connectors in Flow that is applicable to Dynamics 365:
  • Dynamics 365 connector
  • CDS connector

What's the difference?

In a Dynamics 365 connector, you cannot set the scope. The Flow will always be triggered organisation-wide.

Screenshot from Flow Dynamics 365 connector:

In a CDS connector, you can set the scope like how you currently can in a Dynamics 365 Flow.

Screenshot from Dynamics 365 workflow:


Screenshot from Flow CDS connector:


However as Andrew Ly pointed out in his blog, there are Flow premium connectors. Notice how some CDS connectors have a Premium label. 

I'm not a licensing expert but here are details of Flow plans. If you have questions on licensing I suggest you ask them in the Microsoft Flow community.

Steps

This will be familiar to you if you already know how to configure Dynamics 365 workflows in Flow. Set the desired scope in the CDS connector such as "Organization." 


That's it. You've learnt your first "how-to" in Flow. Congratulations!

Flow respects Dynamics 365 principles

Setting the scope in the CDS connector will replicate the existing functionality of Dynamics 365 workflows in scope. This means that the OWNER of the Flow defines which users will trigger the Flow.

What I demonstrated in the vlog is the following use case scenarios.


In terms of the security structure I have: 
  • The users Elaiza and CE Admin are in the same Business Unit
  • The user Aaron is in another Business Unit
In the use case where I set the CDS scope to Business Unit: 
  • when Aaron created the Case in Dynamics 365 the Flow would not trigger 
  • when CE Admin created the Case in Dynamics 365, the Flow triggered since CE Admin is in the same Business Unit as Elaiza, who is the owner of the Flow
The same Dynamics 365 workflow principles apply to Flow in regards to the defined scope.

Summary

Although the vlog was longer than this blog post, the vlog demonstrates that what you already know about configuring scope for a Dynamics 365 workflow and how it defines which users can trigger the workflow also apply to Flow.

In the next episodes I will begin to cover the configuration steps in Flow. I will start with how to do AND OR statements in a condition step. This is something you are already familiar with in Dynamics 365 workflows today but in Flow it's different which you'll learn in my next episode.

Stay tuned for more #wtf

#FlowFever

Sunday, 12 August 2018

Creating data-driven process mapping flowcharts using Microsoft Excel and Microsoft Visio

If you use flowcharts in your organisation this is the blog post for you.

The inspiration came from reading Ryan Maclean's blog post where he reflected on the importance of articulating a process logically through a flowchart. Ryan creates his flowchart using Microsoft Visio which is loved by many including myself. Go check it, it's tea-riffic.

In the Microsoft Office suite there are "siblings." Microsoft Excel was initially released in 1987 and then its adopted younger sibling came into the picture in 1992. These two siblings seem to have gotten closer over the years and have become more advanced.

Today, I'm excited to share with you the power of Microsoft Excel and Microsoft Visio to create data--driven process mapping flowcharts.

Wait, what?

Data-driven process mapping flowcharts. Yeah, exactly.

Watch my vlog and be prepared to be amazed by what you see.

Microsoft Excel and Microsoft Visio

Even though I am a Dynamics 365 consultant, I've always supported Microsoft products as I grew up with it in my household. My dad taught me Microsoft Excel when I was little and eventually I came across Microsoft Visio in highschool. I never thought I'd be using the two together years later.

Like Ryan, I use Microsoft Visio for what I do as a consultant. If it's available to you, try it out.

My first encounter with the two siblings playing together nicely was back in NZ where I learnt that I can define the shape data and the data graphic to create a Microsoft Visio template file that can link data to the shapes from an Excel spreadsheet.

Back then I used to work as a Sales Administrator for the General Manager of Sales and I created a Sales "pursuit" template that allowed the salesperson to colour code the existing platforms or the targeted to-be platforms of a client. The data was entered in an Excel spreadsheet by the salesperson and all they needed to do was link it to the Microsoft Visio template file. Microsoft Visio then associated the rows to the shapes and the shape formatting kicked in automatically. The sales team then had a visualization of each client they were pursuing.

Fast forward nine years and now you can create data-drive flowcharts from a Microsoft Excel spreadsheet. It's truly amazing and if you've read the Microsoft Business Applications release notes, soon you'll be able to create Microsoft Flows from Microsoft Visio.

And yes, I am a nerd when it comes to Microsoft Visio in case you hadn't worked that out already 😁

How can I use the export to Microsoft Visio feature from Microsoft Excel?

You need a Visio Online Plan 2 licence with an Office 365 subscription. Below is a screenshot of what the pricing looks like in Australian dollars.

Remember, to take advantage of creating Microsoft Flows from Microsoft Visio in the future you will need Visio Online Plan 2.

When you open Excel, search for "process" and there will be two templates you can choose from:
  1. Process Map for Basic Flowchart
  2. Process Map for Cross-Functional Flowchart

Select the template that suits you.

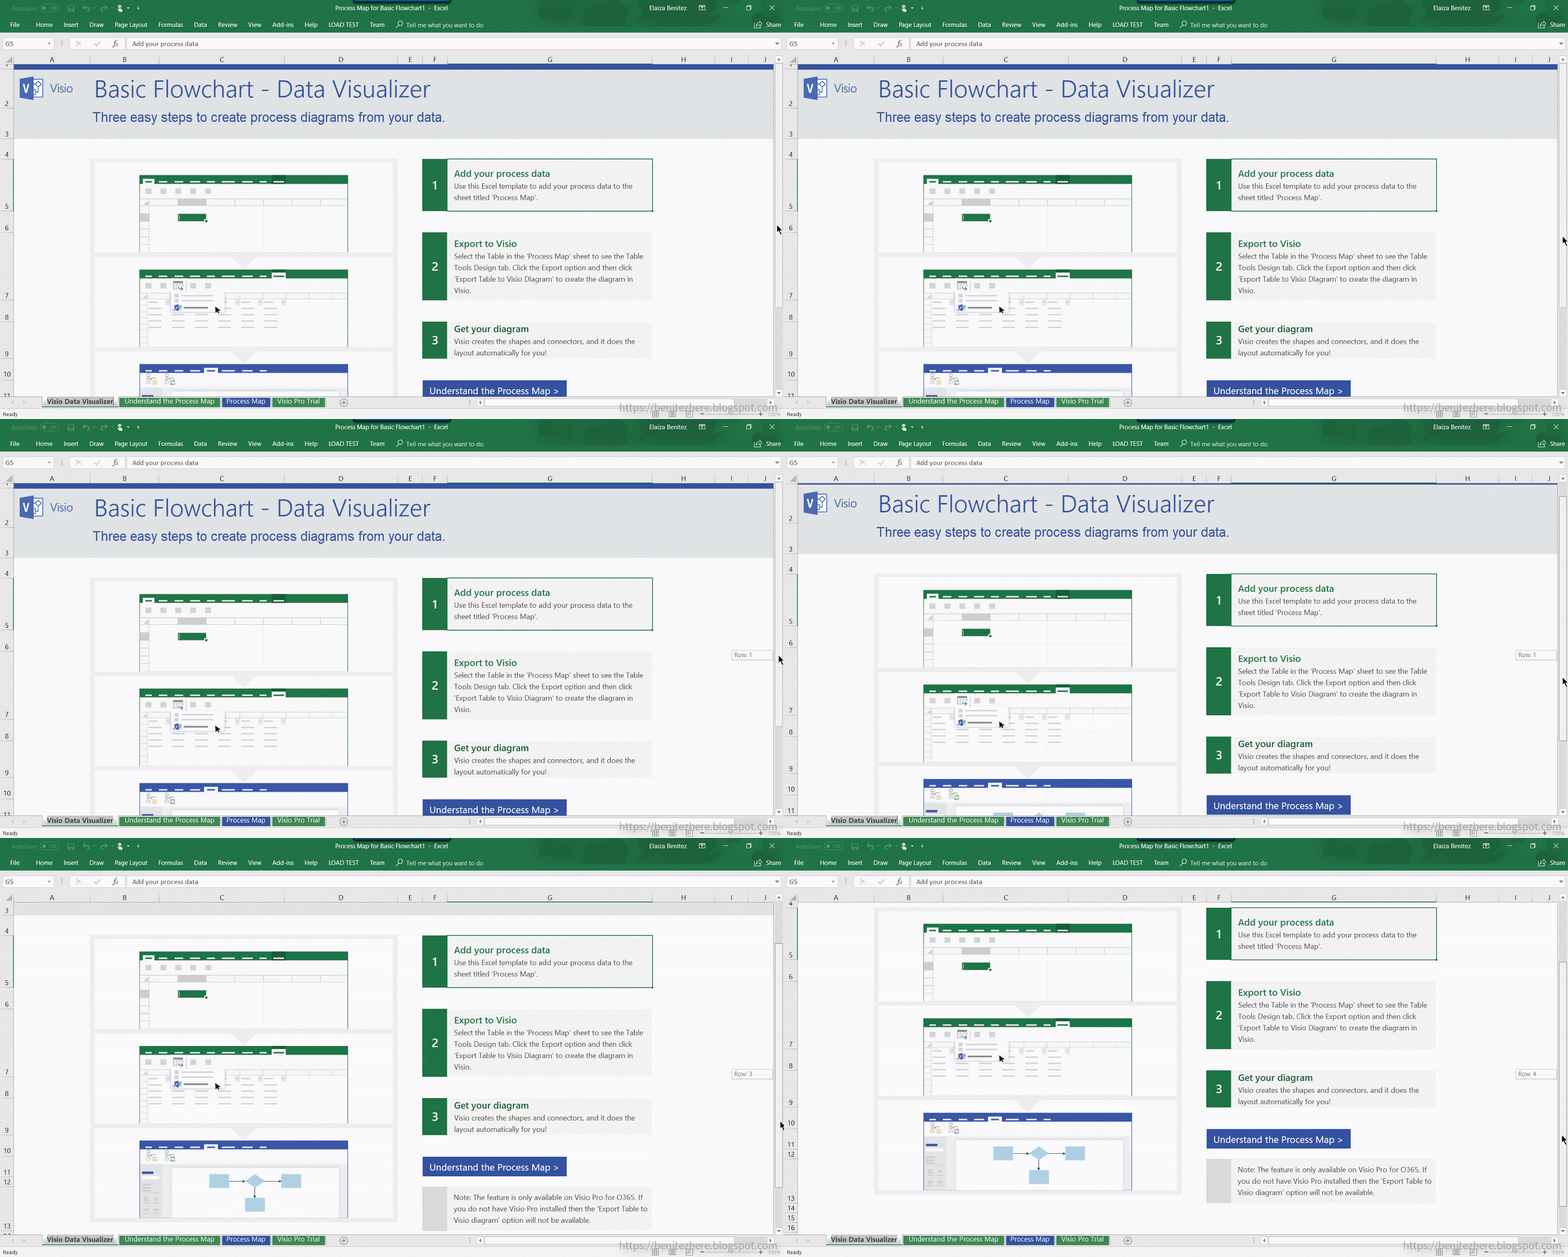
Once the template loads there will be tabs that are self-explanatory.

Visio data visualizer tab

This is an introduction to the template.

Understand the Process Map tab

This will outline what you need to know when entering your process into the table in the third tab.
Basically it tells you what the definitions are in the table. I'm not going to re-write the explanations here as it's straightforward to understand in the tab.

Process Map tab

In this tab this where you enter in your process steps. By default there will always be two rows so you need to remember that when you add your steps, the first start step needs to point to the next process step id otherwise it will continue to point to the default "Stop" step.

Ready to have a part-tea in Visio?
Once all your information is entered into the Process Map tab you can now hit the magic button in the Design tab. The magic button is "Export table to Visio Diagram."


Microsoft Visio will then load shortly followed by your flowchart based on the data entered in the Microsoft Excel source file.


You can then adjust
  • the positioning of any shapes that look out of line
  • the positioning of text
As seen in my vlog, if you insert a new shape into the flowchart in Microsoft Visio, you also have the ability to update the source Microsoft Excel file.


If you also update the source Microsoft Excel file with new process steps by adding new rows, you also have the ability to update the Microsoft Visio flowchart.

Truly amazing what the Microsoft Product Group team has created. Power of Microsoft Excel and Microsoft Visio!

Troubleshooting

I had some trouble installing Microsoft Visio from Office 365 as I had a conflicting version of Office products installed.


I uninstalled through programs and features.

What to do if you can't install after downloading from Office 365?

In my case, not all the files were uninstalled through program and features. I then had a phone call with Office 365 support to help me through it. Also, Office 365 support was awesome. The lady who helped me was great.

She pointed me to this link to run a program to take care of uninstalling all the files for you. I used "Option 2 - Completely uninstall Office 2016 with the easy fix tool."

The next thing I was advised to do is to use the diagnostics tool to install the Office suite first, followed by Microsoft Visio. The rest is magic and it works.


If you didn't know this existed, now you do. It helped me with my installation issues.
There also seems to be a tool available for Dynamics 365 which is interesting. I took a quick peek and looks like you can have assistance with the Dynamics 365 Outlook Client.

What if you can't see the Export table to Visio diagram button as seen in my vlog?

You need to opt in for the monthly channel for the Office 365 suite to make use of the new features available. To do this, you can head over to this link and download the program to help you switch from Semi-Annual Channel to Monthly Channel for the Office 365 suite.

Summary

To create data driven flowcharts from a Microsoft Excel spreadsheet, you need Visio Online Plan 2 to be able to export to Microsoft Visio. You can have two sources of data and whether you update either source, it will always be reflected by its sibling. You may think why have both an Excel spreadsheet and a Microsoft Visio file? Why not only one? Well here's my final thoughts
  • the Excel spreadsheet can be handy as it can provide the information in a tabular format
  • you may have users who are not familiar with creating flowcharts. They can start with entering the logic into an Excel spreadsheet and then export to Microsoft Visio for the diagram
  • for beginners with Microsoft Visio, it's not a bad way to introduce them to it and understand the underlying concept of a flowchart
If you're happy with creating only the Microsoft Visio file, then you can continue to do so. However since I've tried this out, I love it and I know it's going to make my documentation easier.

Watch the original video by the Microsoft Product Group team.

Go on. try it out. Indulge in your curiosi-tea. Feel like royal-tea and live in a high socie-tea. 
Cool story, bro brew.
Microsoft Excel and Microsoft Visio get oolong well.

OK OK, I'll stop 😂

Toodles.