Wednesday, 30 May 2018

Grant Application Management Part 1: Universal Resource Scheduling

20:56 Posted by Benitez Here , , ,
A few months ago I was wondering what could I present at Melbourne's Dynamics 365 Saturday which took place in May. I knew I wanted to present something on Dynamics Portals as I'm quite fond of it.

One evening after the Melbourne Dynamics 365 User Group, Yawer Iqbal who is known in our Dynamics community here, suggested I present a solution around application management.

I did some research into grants application across five different organisations.
  • Three of the five provided an application form that could be downloaded from their public facing website and emailed to an email address. 
  • Two of the five appeared to have a portal for the grant application.
I decided to go ahead with grant application management and gave myself two challenges
  1. Can I use Universal Resource Scheduling for assigning grants to be reviewed by external reviewers? I wanted to see if it can be used as the term "Universal" suggests the feature can be used for anything.
  2. Can I do this with configuration, try without development?
Away I went and this is what I came up with as a proof of concept in terms of yes, you can use Dynamics 365 Universal Resource Scheduling and Dynamics Portals for a grant application management solution.

I presented this at Melbourne's Dynamics 365 Saturday. Thanks Dan for the pic!


The solution and interaction is as follows:
  • Application submits their grant application through Dynamics Portals.
  • End user from the organisation schedules an external reviewer. External reviewers is required in some organisations as there needs to be a review conducted by an expert in that area. External reviewers would receive an email regarding the application to be reviewed which is to be done through Dynamics Portals.
  • The external reviewer can ask for more information or for the applicant to verify information. In return, the applicant can respond back to the external reviewer. 
  • When the external reviewer makes a decision, they can approve or decline the application.
  • Until two approvals are made (one by the external reviewer and the other by the internal reviewer), the application will be updated to approved.
Since this is a bit to get through, this is Part 1 of grant application management where I briefly talk about the applicant process using Dynamics Portals and the main focus is on Universal Resource Scheduling in Dynamics 365.

Watch my vlog for a detailed explanation. This blog covers it lightly compared to the vlog.

Applicant process

For the applicant process, Dynamics Portals is what applicants use to submit and comment on their application using a combination of Web Page, Entity List, Web Form, Web Form Steps, Web Metadata, Web Roles, Entity Permissions, Web Page Access controls... the usual suspects. I have previous blogs and vlogs configuration methods for setting up an application-like process.

Scheduling an External Reviewer using Universal Resource Scheduling

The cool bit that comes into play is the Universal Resource Scheduling. From this point onwards, I will refer to Universal Resource Scheduling as "URS."

I did follow these two learning materials:
I chose URS because typically an organisation who provides grants will require a reviewer. Some require external reviewers who are experts in the space of what the grant application relates to.

Base records

To use URS there's some base data you need which are
  • Resources - I used Contacts to represent the external reviewers.
  • Work Hours of the resource - this defines the availability of the resource. In my case, the resources are humans where I entered the work hours of the external reviewers. Make sure you set the correct time zone too cause this tripped me up.
  • Resource role - do you want to differentiate your resources? I did by creating one that represented "External reviewers."
  • Resource characteristic - do you want to find resources based on skills? I did so I created characteristics that can be linked to the Industry of the submitted grant application.

Enable URS for custom entity

The next step I had to go through was enabling URS for my custom entity, applications. This is configured through the resource settings where you

1. Select the custom entity.


2. Select a relationship or create a new relationship.


3. Then set the metadata to be used by URS.


In my case, I opted for creating new relationships. This wasn't the best approach as what I found out later was that the relationship was created in the default solution. Live and learn! Next time I will create the relationship in a solution and so should you.

By enabling the custom entity for URS, there will now be a book button displayed on the Application entity form in the command bar. If you're old school, you call this ribbon 😉


After setting up the base data and configuring URS to be used for the custom entity, you can start using the schedule board to book your resources. It will look like this:


Booking resource requirement

To go one step further where you only want to see suggested resources for the application based on some criteria, this is where you can use a booking resource requirement.

What I did was create a workflow that is triggered when the status reason gets updated to Submitted, and the next workflow steps was configured to create a booking resource requirement and associate a resource characteristic to the booking resource requirement. I set up the From and To date fields in the booking resource requirement by using the date of when the application was submitted and adding 6 days to the submitted date to work out the To date value.

This way when the "book" button is clicked on and the schedule board is launched, suggested resources will be displayed rather than displaying all resources. This makes the Dynamics 365 end user experience better when fulfilling the need of finding an external reviewer.


As you can see from the schedule board, there are resources displayed and it will tell you which resources are valid. You can also see the availability of the resources in the form of hours which is driven by the Work Hours that are defined for the resource. This is why you can see Bruce Sanchez being available Monday - Friday for 8 hours whereas Holden Caulfield is available through out the week 24/7.

The other cool thing that I had found was that the default work hour template also kicks in as during the time of me creating the above booking requirement, Dynamics 365 recognized it was a Sunday and made the first day be the Monday.

Once a resource is booked, the bookable resource bookings will be created and associated to the application. You will also see that the start time and end time respects the work hours of the resource.


I also have another workflow that sets the External Reviewer lookup on the application when the Bookable Resource Bookings is created. I forgot to show this in my vlog.


What you need for URS

Currently to use URS, you must have a licence for Field Services or Project Service Automation. You're out of luck if you think you can get away with using Teams licencing.

Additional thoughts

Wonky hours

I did have some trouble if I was submitting the application during my working hours (eg 10am or 4pm) as it would throw my schedule board out of whack. Below is an example screenshot.
As I'm still learning URS, I couldn't figure it out so if you know why or something I need to try then please comment in my YouTube video.


Only considers one external reviewer

For the workflows that I set up for the booking resource requirement and to update the external reviewer lookup field, this worked as there was only one external reviewer required.
If there are multiple external reviewers required there would need to be custom fields or additional logic to handle creating more than one booking resource requirement to represent the multiple external reviewers and updating the external reviewer lookup fields back in the application.

Summary

Pretty cool right? Or am I nerd burger in thinking that it is cool that you can use URS for finding external reviewers available to review grant applications?

I put URS to the test by using it for scheduling external reviewers to review the grant application and it turned out great.

What's next

Part 2 is covering the external reviewer process including notifying the external reviewers and applicants when further information is required.

In part 2 I will show you a cool solution that has been built by a fellow MVP Aiden Kaskela.
Stay tuned and make sure you subscribe to my blog, my YouTube channel or Twitter to find out about Part 2.

Monday, 21 May 2018

Unboxing my Microsoft MVP award

22:41 Posted by Benitez Here , , , ,
Earlier this month I was awarded by Microsoft as a MVP in Business Solutions. Around the world, there's 200+ Business Solutions MVPs and in Australia there is now 13 MVPs. Being the first female in the Australia/NZ region is an incredible feeling and it was truly a special moment for me when I found out I had been awarded.

*Edit: actually I'm the second, found out there was another female awarded a few years ago. I am currently the only awarded female*

I thought I'd share the moment I opened my Microsoft MVP gift package through a vlog. I hope this inspires others, especially those who have started their journey with Dynamics, PowerBI, PowerApps (list goes on) to share what they know by contributing to the community whether it be a podcast, blog or vlog.

Notable mentions

Andre Margono - one of the nicest and kindest people I've worked with to date. He nominated me last year after our first Dynamics 365 Saturday here in Australia.

Julie Yack, Leon Tribe and Neil Benson - for supporting my nomination.

Sophie Khun-Hammond - I learnt CRM4 from her back in 2009 and she was more than happy to show me the ropes. She is the foundation of my learning and really appreciated her guidance during that period of my career.

Lastly, Ben Hosking - in 2014 I reached out to Ben and said I always wanted to blog and do video blogs but had been afraid to do so. Through his encouragement from the other side of the world, I plucked up the courage to start blogging and vlogging. A little bit of encouragement goes a long way.

Ben, I still have that message if you're reading this. Thank you.


Thanks everyone. More vlogs coming.


Tuesday, 27 March 2018

Updating the redeem invitation URL in the Send Invitation workflow in Dynamics Portals

21:31 Posted by Benitez Here , , , No comments
The Send Invitation workflow in Dynamics Portals is what is used to invite Contacts to access the portal by redeeming an invitation code. One of the workflow steps is a Create Email step where there is a URL that outlines the web address of the portal and an embedded invitation code from the Invitation record.

In case you're not familiar with the Dynamics Portals redeem invitation process it looks like this:
  • An Invitation record is created and associated to a Contact. 
  • When the Invitation record is created, an invitation code is automatically generated that is unique for the invitation of that Contact.
  • An email is sent to the Contact once a Dynamics 365 end user runs the Send Invitation workflow. 
  • In the email there is a redeem invitation URL that contains the page address for the Contact (user) to sign up with an invitation code and the invitation code is embedded.
  • When the Contact clicks on the URL they are directed to the Sign up with an invitation code web page.
Those who have tried to update the URL in the email step may have experienced some loss of time. I say this cause there's a trick to it and I get asked about it frequently where I currently work at Barhead Solutions.

In my vlog I go through what people think would work (note I have experienced these scenarios myself and so have colleagues) and I also show you the trick into successfully making the URL work. Watch my vlog for a detailed walk through.

Most common mistake

The most obvious path to take initially when doing this for the first time is copying the Dynamics Portals URL address into the hyperlink that's already provided in the Send Invitation workflow. This won't work.

Almost there

OK I am going to try my best to explain this in written format. This is one of those occasions where a video demonstrates the steps better compared to written instructions.

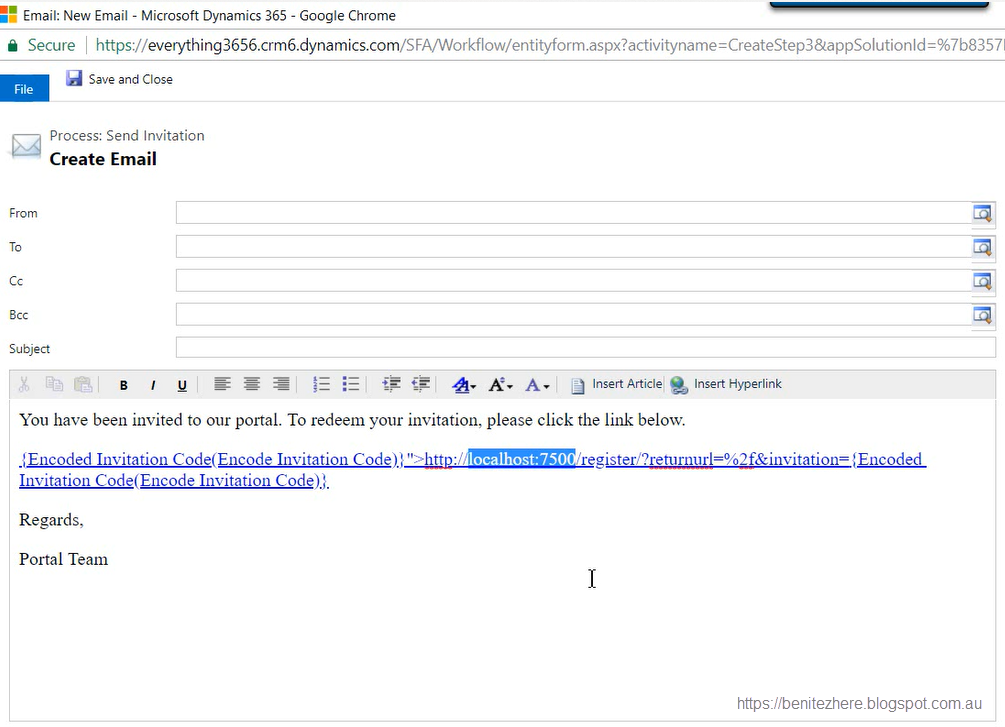
First insert your hyperlink using the hyperlink wizard (is it a wizard?). Make sure you use your Dynamics Portals address. Save and Close.

When the hyperlink is displayed in the email message, you want to set your mouse cursor after the =%f and select Encode Invitation Code in the form assistant. Make sure you remove any extra spaces after =%f and before the </value> statement of the hyperlink. It should look like the following below underlined in red once you've inserted the slug.

Bonus Tip

If you only apply the Encode Invitation Code, the user experience is that the Invitation Code field in the Sign up with an invitation code web page will be blank.

A user is not going to know what to insert in the field. Even if you did expose the invitation code in the email and explicitly stated "Hey user, copy and design this long piece of code below to access the portal," there's still the risk of the user entering it wrong or copying and pasting with spaces or missing characters. The user may try again and can still get it wrong. Not a happy user experience.

To have the Invitation Code automatically populate with the generated code from the Invitation record in Dynamics 365, there's extra string/text to enter in the hyperlink:

&invitation=

You want to insert this before the Encoded Invitation Code slug in the email.


By doing this, the user experience will be that they are directed to the Sign up with an invitation code web page and the invitation code is automatically updated without input from the user.

Side Note

You can choose to expose the raw URL with the invitation code in the email message as seen in the original URL provided in the Send Invitation workflow. I think it's better to show it as a hyperlink where more user friendly text is provided such as the standard "Click here to ...."

Sometimes seeing a long raw URL with funky characters can be a bit too much for a user. This is my personal opinion, you don't have to follow it.

Summary

Updating the redeem invitation URL in the Send Invitation workflow isn't so bad after you know how to do it. I've found this works for me 100% every time I apply the above steps.

If you have something else that works let me know by leaving a comment in my YouTube video. Otherwise if you did give it a go yourself and it works, leave me a comment too :)

Thanks for stopping by and toodles till next time.

Tuesday, 20 March 2018

Preventing users from seeing the Search feature in Dynamics Portals

22:04 Posted by Benitez Here , , , No comments
In every Dynamics Portals project I've worked on customers will always ask "Can the search in portals find results in custom entities?" The search feature of Dynamics Portals unfortunately does not allow custom entities to be enabled (yet).

Refer to Colin Vermander's answer in this Dynamics Community Forum post.
Colin's suggestion is to vote for it on the Microsoft Ideas site: Ability to search custom entities in Portals. Please vote :) Thank you.

The next question I get asked is "Can we prevent users in seeing it then?"
Yes, this can be done and I can help with this. Check out my vlog below.

Steps

There is no code required to prevents users in seeing the search feature in Dynamics Portals. You don't need to fiddle with the .css or use JavaScript. It's a matter of clicks. 

Update a Site Setting record

In Dynamics 365, navigate to Site Settings and open the "Search/Enabled" record.

Update the Value field from "true" to "false." Save and close the Site Setting.


Browse to your Dynamics Portals and hit the refresh button. You'll now see that the search feature no longer appears.

Summary

By updating the Site Setting record, the search feature will no longer display in Dynamics Portals. It's done in a few clicks without the need for code.

Till next time.

Monday, 26 February 2018

Allowing users to see a lookup field as a dropdown field in Dynamics Portals

21:53 Posted by Benitez Here , , , No comments
End user experience for Dynamics Portals is key for making Dynamics Portals feel less like Dynamics 365 and more like an actual portal. Errr, does this makes sense? Hopefully it does.

One of the end user experiences that can be changed in a supported manner is the display of a Lookup field in Dynamics Portals. When you configure an Entity Form or a Web Form Step that has a Lookup field, it behaves like the following.


Not a problem but put yourself in a Dynamics Portals end users' shoes:

If I only see eight values, why can't I just select it in two clicks? 
Why do I have to see this pop up window and then select the value from this list? 
Oh... what does this search field do?

Exactly. By default since there is a Lookup field on the Entity Form or Web Form Step, it will behave similar to the Dynamics 365 out-of-the-box functionality of a Lookup field. As a Dynamics 365 user you would be familiar with this layout. As a Dynamics Portals end user this would be unfamiliar.

The Lookup functionality for Dynamics Portals is valid when there's a large volume of records/information for an end user to select but when there is only a few to select from, it's over kill to display the Lookup. Keep it simple for the end user.

What can you do to make this end user experience better? Take a look at my vlog to learn more.

Web Form Metadata

Yeah, it's my favourite. You would have guessed it from my previous vlogs as I've shared a couple of tricks with Web Form Metadata.

To make a Dynamics 365 lookup field appear as a dropdown field for a Dynamics Portals Entity Form or Web Form Step,
  • Create a Metadata record
  • Set the Type to Attribute
  • Select the Dynamics 365 lookup field
In the Control Style section, there is a field called "Style." In this field there is an option you can select called "Render Lookup as Dropdown."


Select this option and away you go.

Gotcha

If you are using Filtered Lookups in your Dynamics Portals Entity Form or Web Form Step I'm afraid this option is not valid. The field in Dynamics Portals will display all values instead of conforming to the Dynamics 365 behaviour of Filtered Lookups.

Summary

By using Web Form Metadata you can change how an end user interacts with a Dynamics 365 lookup field by displaying it as as a dropdown field in Dynamics Portals. You're keeping the end user experience simple in the scenario where there isn't a large volume of values (records) to select.

Hope you enjoyed this tip.

Till next time.

Monday, 19 February 2018

Increasing the field label length beyond the 100 characters limit in Dynamics Portals

22:00 Posted by Benitez Here , , , No comments
Dynamics Portals surfaces Dynamics 365 entity forms that are linked to a Dynamics Portals Entity Form or Web Form Step. Whatever you configure in the Dynamics 365 entity form will show on Dynamics Portals. Therefore you are abiding to the Dynamics 365 configuration principles.

By default the field label in Dynamics 365 fields is limited to 100 characters including spaces. This is true however as seen in my previous vlog, there's some nifty tricks you can do with Dynamics Portals. 

This time round I'm sharing with you all on how you can increase the field label length in Dynamics Portals without being in conflict of the Dynamics 365 field label limit of 100 characters. 


Show me this magic

Web Form Metadata! I love this feature of Dynamics Portals. There's different things you can do by applying Web Form Metadata to a Dynamics Portals Entity Form or Web Form Step.

To change a field label of a Dynamics 365 field for a Dynamics Portals Entity Form or Web Form Step, 
  • Create a Metadata record
  • Set the Type to Attribute
  • Select the field of the label you want to increase 

In the "Label" section this is where you can insert your long field label that is beyond the 100 character limit.


Once you update the value for the Dynamics 365 field using the Web Form Metadata, the text entered will appear in Dynamics Portals. You won't cross paths with the default Dynamics 365 behaviour of  the 100 characters limit in field labels.


Summary

Web Form Metadata will allow the length of a field label to be increased for a Dynamics Portals Entity Form or a Web Form Step. You simply select the field that needs to have an increased field label and away you go!!! Awesome sauce.

Till next time, toodles.

Tuesday, 13 February 2018

Allowing users to click on a hyperlink and more with helper text in Dynamics Portals

22:00 Posted by Benitez Here , , , No comments
Ever wanted to display helper text in Dynamics Portals with a hyperlink to either a document stored online or to a different web page that may list the terms and conditions to users?

If the answer is Yes, you have come to the right place.

What is helper text?

I didn't know the official terminology until I Googled it one day and sure enough I found a website with design guidelines that described what I was looking for as "helper text." It's text that is usually displayed by a field to help the user understand what they need to enter in the field.

Can I do this in Dynamics Portals?

You most certainly can my grasshopper. There's no need to use content snippets and then modifying the template for the form to display the content snippet by the field. Well you could but it's more time consuming and general rule of thumb is to work with what's available out-of-the-box if you can.

In my vlog I show you how to achieve displaying a clickable hyperlink to a user in Dynamics Portals.

What are the configuration steps?

Create a Web Form Metadata record against the Entity Form or Web Form Step that is displaying the fields to the user in Dynamics Portals. You want to select "Attribute" as the Type value. Then proceed in selecting the field for the helper text.


Scroll down till you see the Description/Instructions section.
  • The Position field outlines where the helper text is going to display against the field. I personally like "Above the field" as it looks better than the other two options.
  • The Use Attribute's Description Property field should be set to No otherwise it will use the description entered in the field in the field customization settings.
  • The Description is where you enter in your text.


If you enter in text, that's fine. Your text will show as required.

A more common scenario is providing a hyperlink for the Dynamics Portals users to click on for additional information that cannot be displayed on the form. An example is a link to terms and conditions. If you want to enter in a hyperlink for users to click on, simply use HTML to do so. 

Example I used in the vlog is:

Click <a href="https://docs.microsoft.com/en-au/dynamics365/">here</a> for full terms and conditions.

When you refresh your web page of the form, you'll see the helper text displayed.

Hold on...

If you use this HTML it will open the target URL in the current browser tab which is not ideal as the user needs to remain in the Dynamics Portals form.


Recommendation

The HTML that should be used in the following as seen in my vlog. You need the highlighted yellow part:

Click <a href="https://docs.microsoft.com/en-au/dynamics365/" target="_blank">here</a> for full terms and conditions.

Quick question - how come this Dynamics 365 field supports HTML?

If you look closely at the field, it's not actually a standard Dynamics 365 field. Our friends at Dynamics Portals have used iframes in some of the records to allow more functionality beyond a standard Dynamics 365 field.

Other HTML that can be used to change the appearance

The following is what I went through in the vlog that is supported in Dynamics Portals
  • Centered Text
  • Right Align Text
  • Left Align Text
  • Bold Text
  • Italics Text
  • Underline Text
  • Bold, Italics and Underline Text
  • Change The Font Size
  • Change The Font Colour
  • Bullet Points
  • Numbered Points
  • Ping Pong Style Marquee
  • Marquee That Scrolls Left
  • Marquee That Scrolls Right
  • Marquee That Scrolls Up
  • Marquee That Scrolls Down
  • Emojis - check out Megan's blog post if you haven't already done so
  • Rainbow
  • ASCII Art - I showed a bunny :)
  • GIF
Now you do need to be practical about what you display. GIF, ASCII Art or Marquees is probably not appropriate (well in a live/production environment ;) ). You get the idea though, if you know HTML you can manipulate the appearance of what's entered as helper text.

I'm not a HTML guru, I had Google help me with some of the HTML above.

Marquee was a personal favourite of mine when I learnt simple HTML back in high school ages ago so it made the cut.


Summary

Displaying helper text is supported and 100% configurable using a Web Form Metadata record of type "attribute." You don't need to do any additional development to provide this functionality, it's supported with Dynamics Portals already.

I hope you enjoyed the vlog. I had a lot of fun with it.

Till next time, toodles.