Tuesday, 9 June 2020

PDF automation series - Part 1: How to create a Word Template in Dynamics 365

If you're a new comer to Dynamics 365, Part 1 covers how to create a Word Template in Dynamics 365.
The API that the Dynamics 365 product team released in 2019 references a Document Template record which has a Word Template associated to it which acts as the backbone of a PDF generated from Dynamics 365. For more information about Convert to PDF refer to this docs.microsoft.com article.

**I'd like to make it clear that as of today, Convert to PDF is configured and supported in the Dynamics 365 Sales Hub app**

In this WTF episode I will cover
  • A brief overview of the Convert to PDF functionality
  • How to create a Word Template from scratch
  • How to update an existing Word Template

Use Case

Before we jump into the How To's, the use case for this series will be

As a customer,

I want to receive a Tax Receipt of my purchase in an email,

so that I have confirmation of my purchase.

The life cycle of the process will be
  1. A Dynamics 365 Invoice record is updated to paid.
  2. A flow in Power Automate is triggered that handles all the magic.
  3. The customer associated to the Invoice will receive an email with a PDF attached that represents their Tax Receipt.

Overview of the Convert to PDF functionality

The Convert to PDF functionality that exists today in Dynamics 365 Sales Hub can be used against the following entities
  • Account
  • Contact
  • Lead
  • Opportunity
  • Quote
  • Order
  • Invoice
This is what it will look like to an end user when viewing a record in the Dynamics 365 Sales Hub app,


Regardless of what option the end user chooses, the end user is required to select a Word Template that has been created for that particular entity. In my case it is the Invoice entity. This is due the Dynamics 365 API request, ExportPdfDocument, as it will generate a PDF based on a Word Template that is associated to a Document Template record. More details regarding the Dynamics 365 ExportPdfDocument API request in Part 2 😉


In order for the Convert to PDF functionality to appear in the Dynamics 365 Sales Hub app they need to be enabled for the desired entities. Head to App Settings and you'll see the Convert to PDF configuration, click Manage.


Enable the entities you'd like and hit that Save button. Refresh your browser and you should now see the Convert to PDF functionality in Dynamics 365 Sales Hub.


Cool on to the How To's.

How to create a Word Template from scratch

Any Word Template or Excel Template created and uploaded into Dynamics 365 will be associated to a Document Template record. This functionality has existed for a few years now and this is the official docs.microsoft.com article.

In my vlog I misbehaved by not showing you how to navigate to Document Templates from the Power Platform Admin Centre - my bad 😅 Old habits since I started with Dynamics CRM 4.0. The following steps will reference the Power Platform Admin Centre.

Head over to the Power Platform admin center and select Settings.


Expand the Templates settings and select Document Templates.


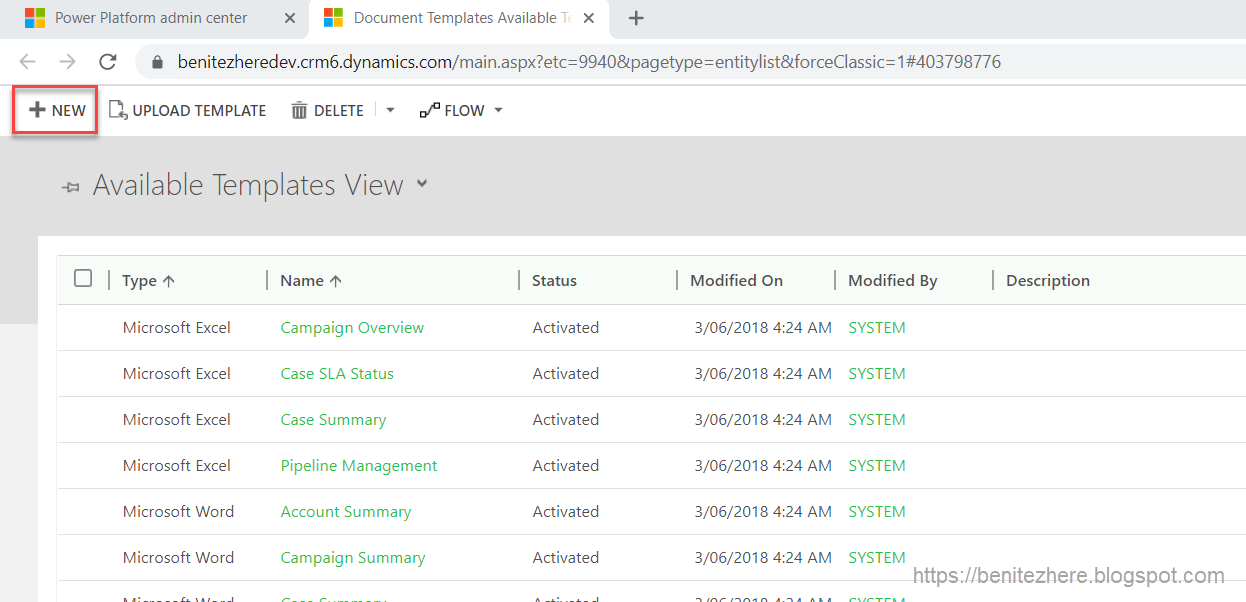
A new browser tab will appear where you click +NEW to create a new Document Template.


Select Word Template and the entity of your choice. In my use case it is the Invoice entity. Click Select entity


Next, the entity relationships are required to be selected in order for data to be displayed in the generated Word document using the Word Template. Since I'm going to be generating a Tax Receipt from a paid Invoice I'll be referencing the Invoice Line Items and information about the customer so I have selected the Invoice Product, Account and Contact entity relationships. Once you're ready click the Download Template button.


Enable Editing on the Word Template and head over to File > Options and in the Customize Ribbon tab enable the Developer command.


Head to the Developer tab and select the XML Mapping Pane from the ribbon. This is where we can define the XML Mapping to the Invoice entity in Dynamics 365. Select the Custom XML Part drop down field and there should be a reference to the Dynamics 365 entity that was defined when the Word Template was downloaded from Dynamics 365.


Once the XML Mapping is pointing to Dynamics 365 reference the fields for the Invoice entity will be displayed.

If you scroll down the entities based on the entity relationships defined for the Word Template will also be visible which will allow you to select the fields from those entities.


You can start creating your desired Word Template by selecting a field from the entity relationships. For example to select the Invoice Number field from the Invoice record,
  1. Scroll down to the Invoice Number field.
  2. Right click and select Insert Content Control.
  3. Select Plain Text.
This will display your select field where you have positioned it in the Word document.


Continue to build the rest of your Word Template to your requirements. If there will be a table in your Word Template, you'll want to display the rows of that related data. In my use case this will the Invoice Line Items. Previously we were selecting fields but since we're dealing with rows for a table the content control is sightly different.

Create a table and in your first row select the content controls for the fields. Then highlight your first row, select the entity from the related entities and right click to select insert content control followed by "Repeating."


When the Word Template has been defined it can be uploaded into Dynamics 365. Save your Word Template and head back to the Document Templates view to create a new Document Template record.


Select your Word Template file to upload.


Click on Upload.


A new window will appear with the newly created Document Template record. By default the file name will be the value in the Name field. This can be updated to whatever value you like.


To check out your newly created Word Template, open an existing Invoice record and select the Word Template to see it in action.

How to update an existing Word Template

If you were to open a Word Template record in Dynamics 365 you won't see anything that indicates a way of updating the previously uploaded Word Template.


The solution? XrmToolBox. Microsoft MVP Tanguy Touzard is the legend behind XrmToolBox and there are many people in the Microsoft community who have contributed their time by creating and adding tools to XrmToolBox. One of these souls is Microsoft MVP James Novak who created and shared his tool called "Document Template Manager" which allows you to download existing Word templates and edit them.

When you open XrmToolBox head over to the Tool Library and select Document Template Manager to install.


Once it has been installed and select the Document Template Manager Tool which will connect to the environment that you were last connected to.


If you are not connected to an environment already you can select an existing environment or create a new environment in the "Connected To" settings of XrmToolBox which will be at the bottom on the left.


To load all the templates available in the Dynamics 365 instance you are connected to click on the Load Templates button. To update one of the out-of-the-box Word Templates such as Invoice Summary, select the document and click on Download Templates.


Once the Word Template has been downloaded you can open the file and view the existing template with the references to the content controls that have been defined. If you want to add any additional content controls, head to the XML Mapping Pane in the Developer tab of the ribbon. Select the Custom XML Part drop down field and there should be a reference to the Dynamics 365 entity that was defined fro the Word Template.


When you're ready to upload the Word Template document you can do this directly from Jim's Document Template Manager tool as well. Select the Word Template you want to overwrite with your updated template and select Single Upload. A warning message will appear to inform you that the file uploaded will overwrite the document template for that select Document Template record.


Once it has completed you can then navigate to your Invoice record and select the updated Document Template record.

Summary

You can either create a Word Template from scratch or create a Word Template based on an existing template by downloading it through XrmToolBox using Jim's Document Template Manager tool.

A Document Template record will be referenced in my flow in Power Automate that will generate a PDF of an Invoice automatically. Stay tuned for Part 2 where I will share how to create a custom Dynamics 365 custom connector to handle the API request to generate the PDF.

Your Vote Counts!

If you want Convert to PDF across custom entities then vote for this Dynamics 365 Idea to gain momentum. I would love to see this functionality across the Dynamics 365 platform so let's do our part by voting for it.

via GIPHY

Where my Starship Troopers fans at?! 😁

Monday, 8 June 2020

Upcoming PDF Automation 3 part series - generating a PDF and emailing it automatically

I have an upcoming PDF automation series series where I'll be breaking down how to automate generating a PDF and emailing the PDF.

By the end of the series you'll be able to understand how to create your own Word template in Dynamics 365 that can be used for the automation of generating a PDF and attaching it to an email that can be sent out to the customer through a custom connector for Dynamics 365.

Stay tuned! Don't forget to subscribe to my YouTube channel so that you don't miss out 🙂

Thursday, 16 April 2020

Sending an email from a Queue with Power Automate

When using the native email message capability of CDS or Dynamics 365, there are two options that can be used as the sender
  1. A system user - this is achieved from a licensed CDS or Dynamics 365 end user that also has the relevant Office 365 subscription 
  2. A queue - this is achieved from a queue that has been configured against a shared mailbox in Exchange

When would you use one over the other?

It depends on your business use case. If you have a team managing incoming emails where the entire team needs visibility, a queue is appropriate. This is typical in customer service centres or insurance claim teams where enquires, cases, support and so forth is emailed to a shared mailbox.

If you're a manager and you want to remind your colleagues in your team that they have not submitted their time sheet for dates of the week, a system user is appropriate.

In this WTF episode I'll be covering how to send an email from a Queue using flow in Power Automate as I've covered sending from a system user in previous WTF episodes.

Setting up your Queue in CDS or Dynamics 365

One of my friends who is also a Microsoft MVP, Megan Walker, has already done a blog post of how to set up a queue and send from a queue in classic workflows.

I'll reiterate her instructions in my own words and share what I usually do.

The steps I'm about to share is under the assumption that
  • the end user has the relevant licences for CDS or Dynamics 365 and Office 365
  • the end user has the relevant security role in CDS or Dynamics 365 to create a queue and set up the mailbox profile
  • the end user also has the relevant Office 365 permissions to set up a mailbox
If the end user's organisation has an IT ops or infrastructure team in-house (or even external party) then it's best for those teams to handle it in case they have policies set up. I have made the mistake in the past where I do it myself and when it comes to testing it doesn't work so then I hand it over to the organisation's in-house team or external party. Best to check first.

1. Create a shared mailbox in Office 365

The first thing I do is create a shared mailbox in Office 365 where I also add the relevant users to the mailbox as well.


For really good instructions on how to do this plus additional configuration, refer to this docs.microsoft.com article.

2. Configure the environment email settings

Head to Power Platform Admin Center and click on the . . . (aka ellipsis) against the environment you're going to be sending the email from. 


Expand the Business Settings and you'll see the Email Settings option. Select this option.


In the Outgoing Emails setting, select server-side synchronisation.


Cool, on to the next task.

3. Create a queue in CDS or Dynamics 365

Once again head to Power Platform Admin Center and click on the . . . (aka ellipsis) against the environment you need to create the Queue in. Expand the Business Settings and you'll see the option called Queues. Select this option.


Click on +New to create a new Queue record and fill in the fields.


For more configuration details of Queues please refer to this docs.microsoft.com article.

3. Configure the Shared Mailbox

In the Queue record, there will be a command called "Open Mailbox." 


Select this option which will launch a new window that displays the mailbox associated to the Queue. Set the Outgoing Email to Server-Side synchronisation and double check the email address is the same as the shared mailbox email address.


The final steps you want to do is
  1. Click Approve Email
  2. Click Test & Enable Mailbox

Head back to the Power Platform Admin Centre and head into Email Settings again. Select the Mailboxes option.


In here you should see that the mailbox has successfully been enabled.


If your shared mailbox profile in CDS or in Dynamics 365 was not successfully enabled, please raise a new support request through the Power Platform admin center for assistance with your environment.

4. Test your Shared Mailbox works

I don't stop after I configure the Shared Mailbox because experience has taught me that until you perform an outbound email from the Queue, it's not all green! I tripped up years ago when I didn't perform a test myself and since then have always tested my outbound emails after completing the set up and configuration of a Queue.

Create a new email message activity in CDS or Dynamics 365 and update the From field to the Queue you created. Also make sure you are selecting either a user (in other words a colleague) or a test contact as the recipient in the To field because if the email sends, it will send so do not use a real customer email address.


Hit send and the status should eventually update to Completed. Check with the recipient that they have received the email.

Sending from a Queue in a flow with Power Automate

Once the queue is all good to go, the queue can now be used as the sender for email messages. This is what my flow in Power Automate for this WTF episode looks like.

1.0 Trigger is when a Case is created

The trigger will be the same as WTF episode 21 where it will be when a Case is created.

Use the CDS List records action

The technique I shared with you in my WTF vlog is one I do use as it's one of those things that years have experience has taught me. Yes you could explicitly reference the GUID of the queue in your flow but that can result to deployment issues. Why? Chill for a couple of minutes and let me spill the tea #teatime

There may be times when a queue was not migrated from DEV to a target instance such as UAT. The queues will have different GUIDs which will cause either your flow in Power Automate or classic workflow to fail. To get around this in flow, use a CDS List records (current environment connector) with a query to the name of the queue. This means you need to create your flow in a solution in Power Automate to use the current environment connector.


I did warn during the WTF vlog this should work but there is a chance that for whatever reason the queue in the target instance may not have the same name as the originating instance. In this scenario you're going to have to use another type of query that will work for you.

Hack time

I feel like John Liu in this part of the blog post lol. This is #flowninja hack 115 😁
If you don't know what I am referring to, you must follow him on Twitter to understand his tweets on hacks he shares for flows in Power Automate 🐱‍👤💙

Currently there is a known issue where some entities will return a 200 status response instead of the full JSON response which makes it hard to validate if your CDS List records (current environment) action has correctly retrieve the correct record(s). My hack as a workaround right now is to use a Compose action and reference the body of the CDS List records (current environment) action. This will then give you the JSON response which you can review in Visual Studio Code or Notepad++ to confirm the correct Queue record was retrieved.

Final step - perform an unbound action

In WTF episode 21, the CDS action (current environment) used was the perform an unbound action where the action is SendTemplate. Same unbound action is used in this WTF episode and in the Sender field of the action, the queue is referenced instead of the system user. This is the difference when sending from a queue through a flow in Power Automate.


My expression to reference the queueid is

outputs('1.1_Retrieve_queues')?['body']?['value'][0]?['queueid']

This expression will prevent the Apply To Each from appearing which I covered in WTF episode 20.

Power Automate in action

Good to go, trigger the flow and away it goes in Power Automate! The sender will now be the Queue rather than a user.

Summary

Like classic workflows, queues can also be used as the sender of emails in flows with Power Automate which is what I shared in this WTF episode. The following is a checklist in order for queues to be used as the sender,
  1. A shared mailbox has been set up
  2. The email settings for the environment have been enabled to allow outbound emails
  3. A queue is created in Dynamics 365 and the mailbox profile has been configured to use the shared mailbox
  4. A test outbound email has been created and successfully sent
Thanks and don't forget to subscribe to my YouTube channel and hit the notification bell so that you don't miss out on my next WTF episode 🙂

Friday, 13 March 2020

How to send an email to multiple recipients using an Email Template with Power Automate

In my last WTF episode I shared how to send an email using an Email Template defined in Dynamics 365 or CDS. The constraint of that method is that it is valid for the use case of sending to a single recipient. When multiple recipients are required in the email, the SendTemplate unbound action is not suitable because of how you need to explicitly add the the recipient by clicking on "+ Add new item" within the action.

In today's WTF episode I share a different method in my flow in Power Automate for the use case of sending an email to multiple recipients dynamically using an email template.

Replicating sending an email with multiple recipients using an Email Template in Power Automate

The thing is, today in classic workflows it's not possible to achieve this out-of-the-box. You can elect to send to multiple recipients by selecting values from lookup fields when configuring the send email step and applying the "Use Template" option. However this is an explicit reference as it requires someone to reference those lookup fields within the send email step.


Another option is to add records directly through the To field in the send email step but again, this is an explicit reference.


You're not dynamically adding recipients to the send email step, and you definitely cannot do this without a custom workflow activity in the scenario where you want to send an email to contacts based on associated records from a 1:N relationship. It is common to come across a business process where an email is required to be sent based on Contacts that live in related records. Refer to the use case.

Use Case

I'm referring to a use that is relates to the insurance industry.

"As an insurance advisor,

I want to send Trustees an email reminder that their policy is due to expire,

so that their policy can be renewed."

Using a flow in Power Automate, this is achievable 😊💙

Process

The process will be that a Case is created and an insurance advisor will update a field to trigger the Power Automate. This can be automated where a scheduled Power Automate runs daily but for the purpose of this WTF episode I am triggering it manually. Once triggered an email is sent to all Trustees associated to the Trust using an Email Template.

Sounds like a piece of cake right? 😅

The data model in Dynamics 365 or CDS

I am using the out-of-the-box entity of Connections which is used to link a record to another record in Dynamics 365 or CDS. You can associate a connection role which represents the relationship of a record to another. What I have done is used Connections to link a Contact to an Account where the role associated to the Contact is "Trustee" and role associated to the Account is "Trust."


This is because Trustees can exist as contacts but are associated to their primary account already. To prevent duplicate contact records, connections is a good way to link a Trustee to a Trust which may also be an existing account record.

I have chosen to send the email to the Trustees where they are Bcc'd so that I can show you that my flow in Power Automate is flexible to cater for any activity party types that Dynamics 365 or CDS supports.

What my flow in Power Automate looks like

It has more actions than the previous flow you saw in my last WTF episode however don't forget that we can't do this out-of-the-box in a classic workflow today. My flow in Power Automate enables emails to be sent to multiple recipients that are dynamically referenced. You can have 30 Trustees or 5 Trustees, my flow in Power Automate will handle the recipients dynamically.


The last three actions in my flow is a result of AK's investigation and the core part of it is from my method that I figured out on how to form the email activity parties array and the recipient + sender objects dynamically. Combining our findings resulted in my pretty cool flow. Thanks AK.

This flow was created within a solution and I am using the CDS current environment connector.

1.0 Trigger - when a Case field is updated

I created a custom Two Option field called Send Trust policy renewal in the Case entity and placed it on the Case entity form so that I can update it to trigger my Power Automate. I set the filtering attribute to this field.


I have also configured the trigger condition where the field must equal Yes.

1.1 Get Account record

Using the CDS Get record action, retrieve the account record based on the Customer lookup value of the Case.

1.2 Retrieve connection records

Using the CDS List records action a FetchXml query can be applied which is defined using Advanced Find in Dynamics 365 or CDS. My FetchXml query will display all connections that have a connection role of Trustee and is associated to a specific account. The following is a screenshot of what my query looks like in Advanced Find.


The following is a screenshot of what my FetchXml looks like when downloaded.


Copy and paste this into the FetchXml query of the CDS List records action and replace the explicit references of account name and the account ID with the dynamic content values from the Get Account record. This is ensure that my Power Automate will work for any Trust and its associated Trustees that are represented by connections.

1.3 Temporary - Body of list

This is a Compose action where I am referencing the output of the CDS List records action. Currently as of writing this blog post there is a known issue where a status reason of 200 will display without an output of the JSON response. I am using the Compose action to verify that the correct connections records are returned since I don't have visibility in the CDS List records action while this issue is occurring. This is an optional action.

1.10 odata.type workaround + 1.11 Email target + 1.12 Perform an unbound action

I'm going to jump to two actions later in my flow because to understand the core part of my flow, I need to explain AK's method.

AK pointed out that there is another unbound action called SendEmailFromTarget. The part that tripped us up was the Target payload. It's documented how to define this through the SDK but as JSON, well that's another challenge which AK figured out. AK figured out the JSON payload for the Email Target from another fellow Microsoft MVP's blog post, Andrew Butenko. You can read Andrew Butenko's blog post here

AK figured out that he needed to serialize the @odata.type in order for it to be applicable in the Initialize Variable action that forms the Email Target object in the JSON payload. The Email Target object is an array of the email activity parties and the odata.type of email.

In my action 1.10 odata.type workaround, I'm using AK's method where Initialize Variable is used to form the @odata property.


This is then referenced in the Initialize Variable to form the Email Target object.

Problem solving time

While AK was investigating, I too was doing the exact same thing and found a different forum post from our community. When I was reviewing the screenshot in the bottom of the forum post I studied the email_activity_party array in the Target object.

  • I knew that the each of the rows in the array represented an email activity party. 
  • I knew that I also had to dynamically loop through the connections to identify the contact that would be used as the Bcc recipients.

Essentially when you study the JSON payload in the screenshot there's three elements (errr not sure if this is the right word but I'll go with it):

  1. The array which is the email activity parties.
  2. The object that represents the sender including the activity party type value.
  3. The object that represents the recipient including the activity party type value.

Since it is an array, I figured there can be more than one recipient which would be represented by multiple rows in the array where the type of recipient is defined by the ActivityParty.ParticipationTypeMask attribute.

The technique that I've applied is to use the following actions

  1. Initialize Variables
  2. Append to array variable
  3. Set Variable
I'll explain the core of my Power Automate in the next few sections.

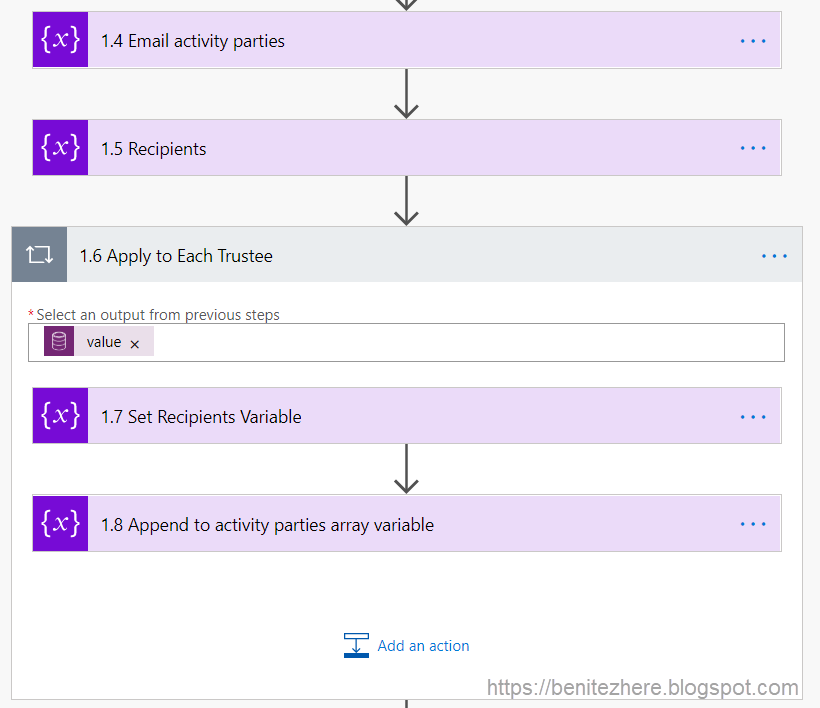
1.4 Email activity parties

To form the array the Initialize Variable action is used where Type is equal to array.

1.5 Recipients

To form the row in each array the Initialize Variable action is used where Type is equal to Object.

1.6 Apply to each Trustee

Since connections are retrieved from my FetchXml query in the CDS List records action, I needed to loop through each record to reference the contact ID which would be used in the email activity parties array.


1.7 Set Recipients Variable

To form the row for the contact to be used in the email activity parties array, the Set Variable action is used where I'm referencing my recipients variable from my action 1.5 Recipients. I am also forming the object that will represent the row in the array by the following,
  1. Reference the contact using the contact ID from the CDS List records action. This is defined by the Connected To field in the Connection entity.
  2. Reference the activity party type. Since the activity party type is Bcc, the value of 4 is used.

My expression to reference the contact ID in No.1 is
item()?['_record2id_value']

1.8 Append to activity parties array variable

The final action within the Apply to each control is to append the recipients variable defined in 1.7 Set Recipients Variable to the array variable in 1.4 Email activity parties. The Append to array variable action is used.


This action is important because it will dynamically form the row in the email activity parties array. Essentially when all connections have been looped through, all of the recipients will be appended to the activity parties array.

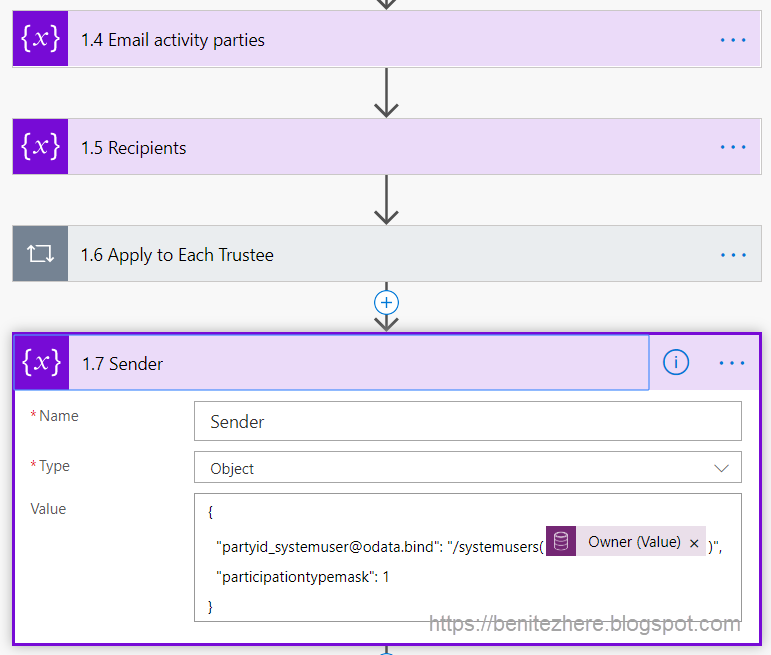
1.7 Sender

**note this should be named as 1.9 but I only noticed my mistake in the naming convention for the later half of my flow in Power Automate after filming. To keep it consistent with the vlog I'll keep it as-is in case you're creating your own flow by watching my vlog and reading this blog post at the same time**

Now that the recipients have been taken care of, the sender needs some TLC. It's essentially the same technique as 1.5 Recipients where an Initialize Variable action is used to form the Sender object but this time we define the JSON payload for the object since we do not need to loop through records. There is always going to be one sender whereas the number of recipients can be dynamic.

1.8 Append Sender to array variable

Using an Append to array variable action, the sender variable is appended to the array variable in 1.4 Email activity parties.

1.9 Email activity parties array

This action is optional, you do not need this at all. I have this Compose action that's referencing the array variable output for two reasons,
  1. To check that my array that was from the appended variables of recipients and senders was correct.
  2. To show you in the vlog what the array variable looks like to validate that it is in fact correctly structured and defined.

1.10 odata.type workaround

As mentioned earlier this was a hack AK originally came up with to serialize the @odata.type.

**💡 BUT WAIT 💡**

Since filming another Microsoft community person, Ryan Maclean, tweeted an issue about his unbound action and I commented to share AK's method which then also led to Andrew Butenko chipping in to solve it.

Then came the question of why from Matt, why does flow behave like this?

Whenever the flow life gives me lemons 🍋🍋🍋 I turn to the Flow Ninja, John Liu 🐱‍👤. John is a supreme flow being (no joke) cause he's super intelligent when it comes to Logic Apps or flow in Power Automate. John shared this microsoft.com article with me (scroll down) which I then shared in Ryan's thread. He takes it one step further by sharing a hack. Ryan also came up with a hack too.
  1. John Liu's Hack
  2. Ryan Maclean's Hack
Go follow these two on Twitter if you haven't already done so! Do it.

So you can now skip action 1.10 odata.type workaround by following John or Ryan's hack.

1.11 Email target

Now that we have the email activity parties array from the appended variables of recipients and senders, it can now be referenced in the overall JSON payload. I am using an Initialize Variable to honour AK's method but you could probably define this directly in the final action.


This is based on AK's investigation and my investigation where I studied the JSON payload from the Dynamics 365 Community Forum post I provided earlier.

1.12 Perform an unbound action

The final action is to use the CDS perform an unbound action where the SendEmailFromTemplate action is used.

The information required by this action are
  1. The action which is SendEmailFromTemplate
  2. The ID of the email template. This can be found in the URL of your email template record (refer to vlog)
  3. Regarding which is the Case record
  4. Target which is the JSON payload defined in my 1.11 Email target action

Woo hoo, we are ready to automate! #LetsAutomate

Power Automate in action

Good to go, update the Send Trust policy renewal field in my Case record and away it goes!

Summary

What previously couldn't be achieved using out-of-the-box classic workflows can be achieved with flow in Power Automate - sending emails to multiple recipients (dynamically) using an Email Template. This excites me because it takes Dynamics 365 and CDS to the next level as use cases can be met using flows in Power Automate.

Thanks for checking out this WTF episode and catch you in my next one.

Toodles.

Thursday, 5 March 2020

How to send an email using an Email Template with Power Automate

Sending an email using an email template in Dynamics 365 and CDS is straight forward in a classic workflow. It's simply a send email step and applying the "Use Template" option. If you want to replicate it via flows in Power Automate, there is an action available called SendTemplate for the Common Data Service Web API.

This Part 1 WTF episode came about as a result of another Microsoft MVP in our community, Sara Lagerquist. She was trying to figure out how to send an email using an email template through Power Automate. Initially I thought it couldn't be done but then chances are if it can be done in a classic workflow, it CAN be done in Power Automate using a different method. We know that there are APIs available and Power Automate plays well with APIs so I investigated it further. At the same time another Microsoft MVP in our community Aung Khaing, who is more known as AK, also investigated and beat me to it. Well, what you see in Part 2 originates from mine and AK's investigation.

In this WTF episode I share what AK came across and also outline the constraint of this method.

What is an email template?

It's self explanatory - it's a template you create for an email and you can associate it to an email activity record in Dynamics 365 or CDS. I am referring to the native email functionality of Dynamics 365 and CDS, this is different to an Outlook email.

When you create an email template, the template type is defined which is the entity the email template is associated to. A list of out-of-the-box entities will be available for you to select when creating an email template.

Replicating sending an email using an Email Template in Power Automate

Use Case

I'm referring to a use case that is common across all organisations that have a customer service centre.

"As a customer,

I want to receive an email confirming my request has been created as a Case,

so that I have acknowledgement from Company ABC of my request."

An email is required to be automatically send to an individual who has engaged with the organisation. The email usually provides details of the request and a reference ID. 

What my flow in Power Automate looks like

It's straight forward (except for the constraint) in Power Automate as an unbound action is used where you provide the details required by the action. Not exactly the same steps as a classic workflow but it works.

1.0 Trigger - when a Case is created

In my Power Automate the trigger is when a Case is created. Whenever a Case is created, send an email to the contact associated to the account in the Customer field.

1.1 Perform an unbound action

The unbound action will only be available if you have created your Power Automate in a solution and you are selecting CDS actions from the CDS current environment connector.


If you don't create your Power Automate in a solution you won't be able to use this particular action so make sure it is in a solution.

The information required by this action are
  1. The action which is SendTemplate
  2. The ID of the email template. This can be found in the URL of your email template record (refer to vlog)
  3. The Sender which I've made as the Owner of the Case
  4. The Recipient which I've made as the Customer of the Case. If an account is the customer value, the primary contact will be the recipient.
The following are optional
  1. The regarding value can be left blank where the email will not be associated to a record.
  2. The deliveryprioritycode which I have set to 1 which represents Normal. By default if you leave this blank Power Automate will set it to 0 which is Low.

Side note

When using the CDS current environment connector, make sure you enclose your dynamic content value with brackets and reference the entity as plural. Sara Lagerquist has a blog post on this.

Power Automate in action

Good to go, trigger Power Automate and away it goes.


If you have attached a file to the email template, this will also be included in the email.

Constraint

Using the SendTemplate action is useful when you have a single recipient to send to. In the use case where you have multiple recipients and it can vary based on the scenario, this action is not valid because of how you need to explictly add the the recipient by clicking on "+ Add new item". Ideally the recipients should be added dynamically so that it's 100% automated.

Stay tuned cause I'll share what you need to do in Power Automate when you want to send an email using an email template to multiple recipients.

Summary

The SendTemplate unbound action can be used when you have created your Power Automate in a solution. 

I also want to point out that it respects the design principles of email templates in Dynamics 365 (or CDS). If you are sending an email where the recipient is not of the same entity as the defined template type of the email template, an error will be thrown in the Power Automate run history. For example, if you want to send an email template related to a Case, the recipient must be defined using the Case entity. If you try referencing the Contact entity an error will be thrown because of how the email template is for the Case entity and not the Contact entity.

Credit goes to AK and cheers to Sara's question that sparked all of this.