Today integration with SharePoint for Document Management with Dynamics 365 is supported out-of-the-box. When you go through the Document Management configuration for Dynamics 365 you define which tables you want to enable for the integration and it will also automatically create default Document Libraries for each table in your SharePoint Site.
When the configuration has been completed the end user experience will be as follows:
End user views a record, such as Case.
The end user uploads a file by navigating to Documents under the Related tab.
A Dynamics 365 Document Location record (row) is created which represents the folder in SharePoint under the default Document Library of Case.
The file is uploaded against the Document Location and from the Case record the file can be viewed, as well as browsed to in SharePoint.
An issue you don't know of until it hits...
One of the known SharePoint issues is that
A library (or list) cannot have greater than 50,000 unique security scopes
The Microsoft documentation implies that the recommendation is to have less than 5,000 unique scopes and one of the methods to apply is to split your SharePoint structure in a manner where documents can live under different Document Libraries.
What can I do to manage my Document Libraries?
Well there are many ways but in this WTF episode you'll learn how to manage your Document Libraries using a period structure to split the document libraries based on a date column's year value.
In the Case table I created a new column that represents when the Case was acknowledged. For example any files associated to a Case that was acknowledged/raised/received in the year 2020 will be stored in a Document Library that represents the year - Case 2020. This applies continuously,
Case 2020
Case 2019
Case 2018
etc...
The logic
Whenever a document is uploaded for a Case, check if a Document Library for the period exists based on the year of the date column's value.
If it does not exist create a new Document Library in SharePoint using the year value and naming convention of "Case - YYYY."
The same needs to be applied to Dynamics 365 where a Document Location record is created. A Dynamics 365 Document Location can represent both a Document Library and a Document Location (folder) for SharePoint.
The document would have initially been uploaded in a Document Location (folder) that lives under the default Document Library of "Case" in SharePoint. This folder needs to be moved to the Document Library that represents the period of the Case. This is done within SharePoint so Dynamics 365 also needs to be updated to point to the new Document Library after the folder has been moved.
The Dynamics 365 Document Location record needs to be updated to point to the Document Library that represents the period so that
It's not under the default Document Library of "Case"
The end user experience is not broken if they view the Documents tab from within the Case record and click on the button that directly opens the SharePoint document location in a new browser tab.
With regards to No.2, if the Dynamics 365 Document Location is not updated an error will be encountered by the end user because in SharePoint the folder has moved but the Document Location record in Dynamics 365 is still pointing to the default Document Library where the folder no longer lives.
If you're scratching your head, don't worry - keep reading + watch my vlog and it will make sense 😅
[BTW Ryan Maclean if you're inspecting my diagram and thinking about the lack of thoroughness, I'm sorry! Lol. I know you're into diagrams correctly reflecting a process.]
Let's Automate
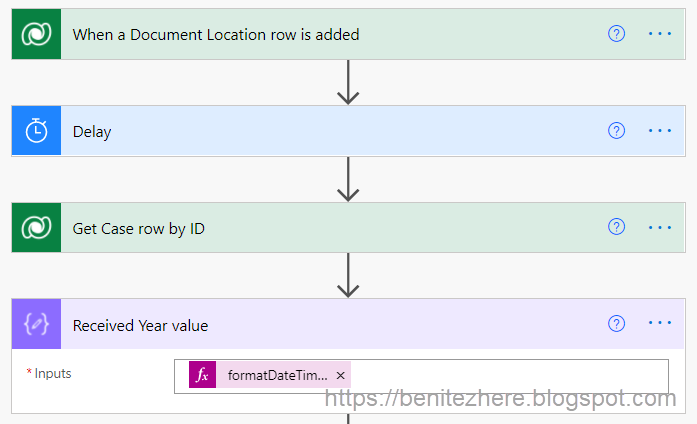
This is what my cloud flow in Power Automate looks like.
Some details before we dive into the steps
I configured the Dynamics 365 integration with SharePoint by linking it to a SharePoint site in the same tenant.
The table I am using in my automation that has the Regarding lookup column is Document Location.
The table of the Regarding object type that will be used in the trigger condition is Case.
In the Case table I have a custom date column called "Date Acknowledge" which is used to identify the period the Case is associated with so that it is reflected in the Document Library structure. I chose not to use the Created On date field as customers I have worked with in the past can retrospectively enter in a past date when a Case is created in Dynamics 365.
The naming convention I am using is "Case - YYYY"
The trigger
The Dataverse trigger is "When a row is added" where the table referenced is Document Locations.
Delay
In my vlog I explained the purpose of using the Delay action in the cloud flow. As soon as an end user clicks on the "Upload Document" button within the Case record, a Document Location record is automatically created which is by system design for the Dynamics 365 integration with SharePoint. This Document Location record is created before the document is actually uploaded. The automation in this cloud flow is only applicable when a document is uploaded so we need to give it time to identify a document is uploaded.
The delay I'm using is 2 minutes.
Note: As I write this I now realise that I should have additional logic to handle when a document is not uploaded (end user can choose to cancel the upload within the Dynamics 365 Case record) to terminate the cloud flow. That's something you should factor if you follow the steps in this WTF episode.
Get Case row by ID
This is the Dataverse Get row by ID action. In this action the Case is retrieved through the Regarding object value (remember this is the GUID of the row) and only returning my date column that represents the date the case was acknowledge. This is so that we can extract the year value from the date column to identify the period of the Case and be reflected in the Document Library structure.
Received Year value
This is a Compose action where only the year value is extracted from the Date Acknowledged column of the Case the Document Location is in regards to. The date field is referenced from the previous Dataverse action.
In this step the Dataverse List rows action is used to retrieve a Dynamics 365 Document Location where the relativeurl column equals the period of the Case. The relativeurl is the Document Library.
Initialize Parent SiteLocation variable
An Initialize variable action is used so that we can set the document location based on
the Document Location record that represents the Document Library for the period if it already exists. This is from the previous Dataverse List row action
the Document Location record that represents the newly created Document Library for the period if it does not already exist.
Condition
The condition action is checking whether a record is returned in the Dataverse List Document Location rows action.
And the operation used is "is equal to" where the value is "0"
If the value is equal to 0 then the cloud flow will proceed to the Yes path where
A new Document Library is created in SharePoint
A new Document Location is created in Dataverse
If the value is not equal to 0 then the cloud will proceed to the No path as it means a Document Location exists for the period which will be used downstream in the cloud flow to move the folder from the Default Document Library to the Document Library that represents the period.
If Yes - Send an HTTP request to SharePoint
I couldn't see an action to create a new Document Library in SharePoint using the SharePoint connector but I did find this blog post by Alan which I followed. Cheers Alan! 😃
In this action I'm providing a Description and the using my naming convention of "Case YYYY" for the SharePoint Document Library which references my year value that was extracted from the Date Acknowledged column from the Case table as per my earlier Received Year value Composed action. This is so that a new Document Library in SharePoint is created for the period the folder should live in instead of the default Document Library.
Add a new Document Location row
In the previous step we created the SharePoint Documentation and now the Dynamics 365 Document Location needs to be created so that it can be used for any documents uploaded against a Case. In this Dataverse Add a new row action I am creating a new Document Location record using the same naming convention as per the previous step where the year value from the Date Acknowledged column is used.
Three more fields that need to be configured for the Dataverse action is the
Location Type
Parent Site or Location field
Now I have explicitly referenced the GUID of the SharePoint Site record in Dynamics 365, best practice is to use an environment variable but that's something I am not covering in this WTF episode. For purpose of learning I am explicitly reference the GUID.
Relative URL
The relative URL is set using the same naming convention. This is important as this points to the Document Library and is used whenever a new Document Location is created that needs to refer to the Document Library that represents the period. In other words, this will be what is used in the "No" path of the condition.
Set Parent SiteLocation variable
In this Set variable action the GUID of the newly created SharePoint Document Location is to define the Parent SiteLocation variable value in the earlier step of Initialize Parent SiteLocation variable.
If No - Set Parent SiteLocation variable 2
In this Set variable action the GUID of the SharePoint Document Location is retrieved from the earlier step that uses the Dataverse List rows action -List Document Location rows. A Document Location exists for the period and the GUID will be used to define the Parent SiteLocation variable value in the earlier step of Initialize Parent SiteLocation variable.
Move folder
In this SharePoint action we are moving the folder in SharePoint from the default library to the Document Library that represents the period of the Case. The relative url value from the trigger is referenced in the Folder to Move field by using the expression of
/incident/triggerOutputs()?['body/relativeurl']
The Destination Folder represents where the folder should be moved to which will be the Document Library that represents the period so again, the year value from the Date Acknowledged column in the Case table is referenced. The expression is
/Case outputs('Received_Year_value')
Upload Document Locations for Case
In this Dataverse action the Document Location that was originally created from when the end user clicked on the "Upload document" button in the ribbon within the Document tab in Dynamics 365 needs to be updated to point to the correct Document Library that represents the period.
This is where the Parent SiteLocation variable is referenced to set the GUID of the Document Library based on the Yes or No path taken.
Cloud flow in action
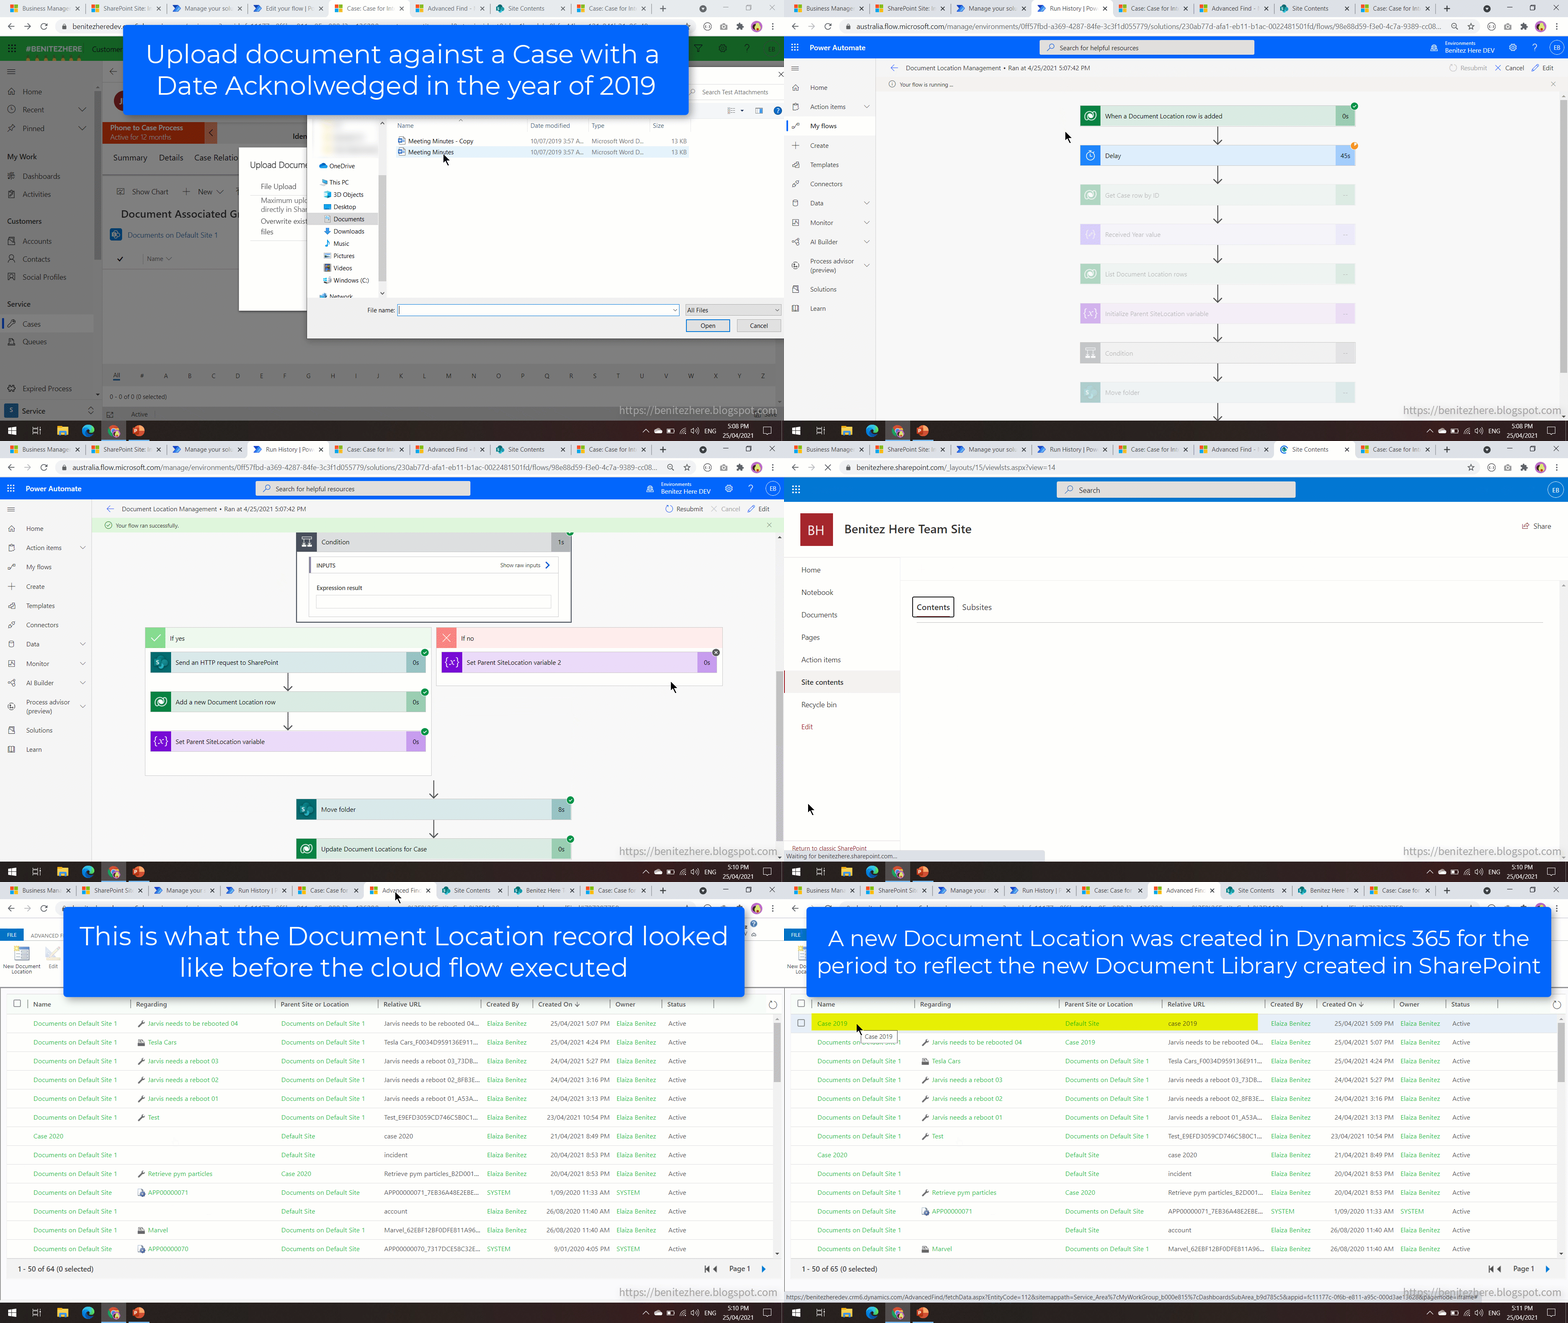
Time to give this automation a whirl. When a document is uploaded where the Regarding is Case and it is for a period that does not already exist as a Document Library in SharePoint, the Yes path will be processed.
When a document is uploaded where the Regarding is Case and it is for a period that does exist as a Document Library in SharePoint, the No path will be processed.
An alternative to Power Automate
I shared in my vlog that there is an ISV provider called Connecting Software that provides an add-on to one of their products to resolve the unique permissions issue I mentioned earlier. This product is called SharePoint Structure Creator, it will automatically manage your Document Libraries in SharePoint whenever a file is uploaded from Dynamics 365 into SharePoint.
I came to know of Connecting Software as one of the customers I work with uses their CB SharePoint Permissions Replicator product and they provide great support. I had a good support experience with them, the person was awesome.
It is important to note that the SharePoint Structure Creator is an add-on to the CB SharePoint Permissions Replicator.
I also want to make it clear this is not a sponsored blog post by Connecting Software, this is me simply sharing that this is an alternative as what I share in this WTF episode is limited to a single table whereas their add-on product can provide automation across all tables through simple configuration.
Summary
Structuring Document Libraries for a table in Dynamics 365 can be achieved using a cloud flow in Power Automate. It's a matter of using a date column that can be used to determined the period the Case is associated to and checking if a Document Library in SharePoint exists for the period.
I hope you found this useful and learnt something from this WTF episode.
Shout out to...
My former work bestie Rex 🦖 for helping me out with my cloud flow in a couple of areas that needed to be refined. Miss you my friend.
Another SharePoint + Dynamics 365 + Power Automate blog post
If you want to learn other methods that can be applied to SharePoint integration with Dynamics 365, I recommend checking out this blog post by Ryan Maclean. Ryan shares how you can configure SharePoint differently to the default set up that is defined by Dynamics 365 using Power Automate.
This WTF episode is how to trigger your cloud flow for Dynamics 365 or Dataverse based on the Regarding object type. The trigger I refer to in this WTF episode is the When a row is added, modified or deleted trigger from the Dataverse connector.
In an activity record and some other tables such as the SharePoint Document Location table, there is a lookup field/column that goes by the name of Regarding. This field on a form allows you to select another record/row from a table that it is in regards to. For example,
An email is associated to a Case. The case would be the value in the Regarding field.
A document has been uploaded against the Case. Behind the scenes, a SharePoint Document Location record is created to represent the location of where the file has been uploaded to in SharePoint.
What if you need to trigger your cloud flow only when a document is uploaded against a Case and not trigger when a document is uploaded against an Account? This is what you'll learn in this WTF episode.
Anatomy of the Regarding lookup column
There are different types of lookups and as mentioned earlier, the Regarding field in a form will also you to select another record/row from a table. Refer to this blog post for more details.
In model-driven apps, you see it as "Regarding," where you select the table followed by the record/row.
If you review the attribute settings of the column you'll see there is a reference to "Target Record Type" which represents the table of the Regarding object. Below is a screenshot from the classic editor.
Underneath the hood there's two parts to the Regarding column (regardingobjectid),
Regarding object value - this is the GUID of the record/row
Regarding object type - this is the table of where the record/row resides in
In my earlier screenshot of the Document Location the Regarding lookup column is a row from the Case (incident) table.
Why can't I use the Filter row field in the trigger?
You can try like I did but you're going to run around in circles. You'll be asking yourself why the cloud flow does not trigger.
If you attempt to perform the filter by calling the web API directly, you're also going to find it difficult to achieve. If you search for it online using your Google powers, you'll see what I mean when you read the responses to people who have tried to filter by the Regarding object type.
The other clue is when you review the properties returned in the API after calling it directly, you won't see a property that is in reference to the Regarding object type, only the value.
So what can you do?
One of the beautiful things about cloud flows is that we can reference any property returned in the response of a trigger or an action. This can be a blessing in disguise and in this scenario, it is.
In my vlog I showed you that I had a cloud flow with the When a row is added, modified or deleted trigger and a compose action with a dummy value so that I could show you what properties are available in the response of the trigger.
Let's take a look at the run history and review the properties returned. As you can see one of the properties returned is _regardingobjectid_type
This is a property we can reference but it's not going to be in the Filter row field of the trigger. It's going to be in the old school Conditions option within the Settings of the trigger. Click on the ellipsis and select Settings.
In here you'll see the ability to add a Condition and this is where we can enter an expression that references the property.
In my second WTF episode (#throwback) I explained how to write expressions using the legacy Conditions action (note this no longer exists) where it's separated into three parts as per the screenshot below.
The first part represents the condition and in our use case we want the Regarding object type to equal the Case table.
The second part represents where the attribute (column) is being retrieved from and in our use case it will be retrieved from the Trigger.
The third part represents what value of the attribute needs to equal and in our use case it is the entitysetname of the Case table which is incidents.
The expression to use when filtering by table based on the Regarding object type is
Upload a document against the Case and the cloud flow will be triggered.
If a document is uploaded against an Account, the cloud flow will not be triggered.
Summary
By using the trigger conditions within the Settings of the trigger, you can use an expression that allows you to reference properties from the response of the trigger. This is something we can't do today in Dynamics 365 classic workflows or when you call the API directly. Thanks Power Automate!
#LetsAutomate
The truth
It took me hours when I couldn't get it working with the Filter row field and when I reviewed all the questions + responses in stackoverflow about trying directly through the Dynamics 365 API, it wasn't leading anywhere either. Then I thought - hey why not try the trigger conditions since we can call properties of the trigger. It worked and I slept peacefully that night lol 😆
If you do use this, please let me know by giving me a shout out on Twitter - @benitezhere 😊
About a month ago we had the annual Scottish Summit. It's a fantastic event organised by an amazing crew with support from sponsors and volunteers. The last in-person event was last year before different countries started to head into lockdown due to the global pandemic. This year it was a virtual event and it was fun. I myself did not stay awake for the whole event as I'm in a timezone where it gets late in the night as the event progresses but waking up to see the commotion on Twitter was cool which shows the global reach of Scottish Summit.
This year I presented alongside Daniel Laskewitz, a good friend and Microsoft MVP in the Netherlands, who also has a YouTube channel. We presented on Teams loves Dataverse for Teams, specifically on the Power Apps side.
What we presented
I covered how you can create an environment for a team and create a Canvas app from scratch within teams, including creating your own tables. For the use case I created a simple timesheet entry app. Note the emphasis on simple as this is not something I would recommend if you're an organisation that requires a timesheet entry for your internal and external resources as that's better suited by an enterprise solution. This was merely for the purpose to show you how straight forward it is to create your own tables and Canvas app from scratch in Dataverse for Teams.
Daniel covered how you can get started with the templates that are available today. A couple of weeks before the event, two new templates were released which Daniel did not cover. The Dataverse templates available today are
When I was explaining how to default the current user in the Name field, what I forgot to explain is best practice in applying a variable and condition that checks the mode the form is in. A variable will help with the performance of the app and when defaulting to the current user based on the form mode as explained by Shane Young in this vlog. Shane's YouTube channel is full of great Power Apps content so make sure you subscribe. You won't get bored by watching his videos, he is quite the entertainer 😄
How to learn about the other two Dataverse for Teams templates
April Dunnam, another well known person in our Microsoft community has a couple of vlogs that were published shortly after the two templates were released so I recommend you check these out too.
Like Shane's, April's YouTube channel is a giant library of content so subscribe to her channel too. Both release weekly videos.
April also recently appeared in the #LessCodeMorePower Channel 9 show with Dona Sarkar and Sarah Critchley in creating Canvas apps in Microsoft Teams which I highly recommend you watch too.
How to keep up to date on what's next for Dataverse for Teams
In my previous WTF episode I outlined how you can display line breaks in a Teams Meeting invite created from Microsoft Dataverse and Dynamics 365. What I mentioned towards the end was that in the next WTF episode I'd share how to apply HTML to the Teams Meeting.
Let's Automate
This is what my cloud flow looks like in Power Automate
This should look similar to my original WTF episode where the difference here is using a different function in the expression.
Expression for the Content property
In the final HTTP action the expression is updated to the following
As mentioned in my previous WTF episode, when the Description column is null you want to be able to account for this otherwise the cloud flow will fail. The Coalesce function helps by ensuring that it will treat any null values as null, whereas non-null values are defined by the reference in the Coalesce function. In this scenario it will be the value in the Description column.
Enabling the Rich Text Editor Control for the multiline text column
If you didn't already know, Microsoft Dataverse and Dynamics 365 have controls that can be enabled for columns.
The Rich Text Editor control is what we want to enable for the Description column.
Steps
In the make.powerapps.com site, navigate to the form and click on the Switch to classic button.
Select the multiline text column (in my case it is Description) and click on Change Properties.
Click Add Control.
Select Rich Text Editor Control and click Add.
Select the Web radio button for the Rich Text Editor Control and click OK.
Click Save and Publish.
Refresh your browser and create a new Teams Meeting activity record in Microsoft Dataverse or Dynamics 365. The Rich Text Editor (also known as WYSIWYG editor) will be displayed where end users can start applying formatting.
Cloud flow in action
Create a new Teams Meeting Activity in Microsoft Dataverse or Dynamics 365 and let the magic flow ✨
When there is a description provided, the Teams Meeting will render the value in the multiline text column as HTML.
When there is no description provided, the Teams Meeting will display the content as blank. The cloud flow will not fail.
Summary
By enabling the Rich Text Editor control for the multiline text column and referencing the column in an expressions will render the formatting from Microsoft Dataverse or Dynamics 365 as HTML in the Teams Meeting. The Coalese function was used to ensure the cloud flow does not fail when no details is entered in the multiline text column.
Thanks
Would like to say thank you to all my #WTF followers to date. I reached my 2000 subscribe milestone on YouTube recently 🎉
In my previous WTF episode I outlined how you can create and send a Teams Meeting invite from Microsoft Dataverse and Dynamics 365. What I mentioned towards the end was that in the next WTF episode I'd share how to display line breaks in the Teams Meeting as it was rendering the value from the Description column as a single line of text.
Let's Automate
This is what my cloud flow looks in Power Automate.
This should look similar to the previous WTF episode where the difference here is
The addition of a Compose action
A change of expression in the final HTTP action
Since I already covered the cloud flow in detail in my previous WTF episode, I will only cover the above two in this WTF episode.
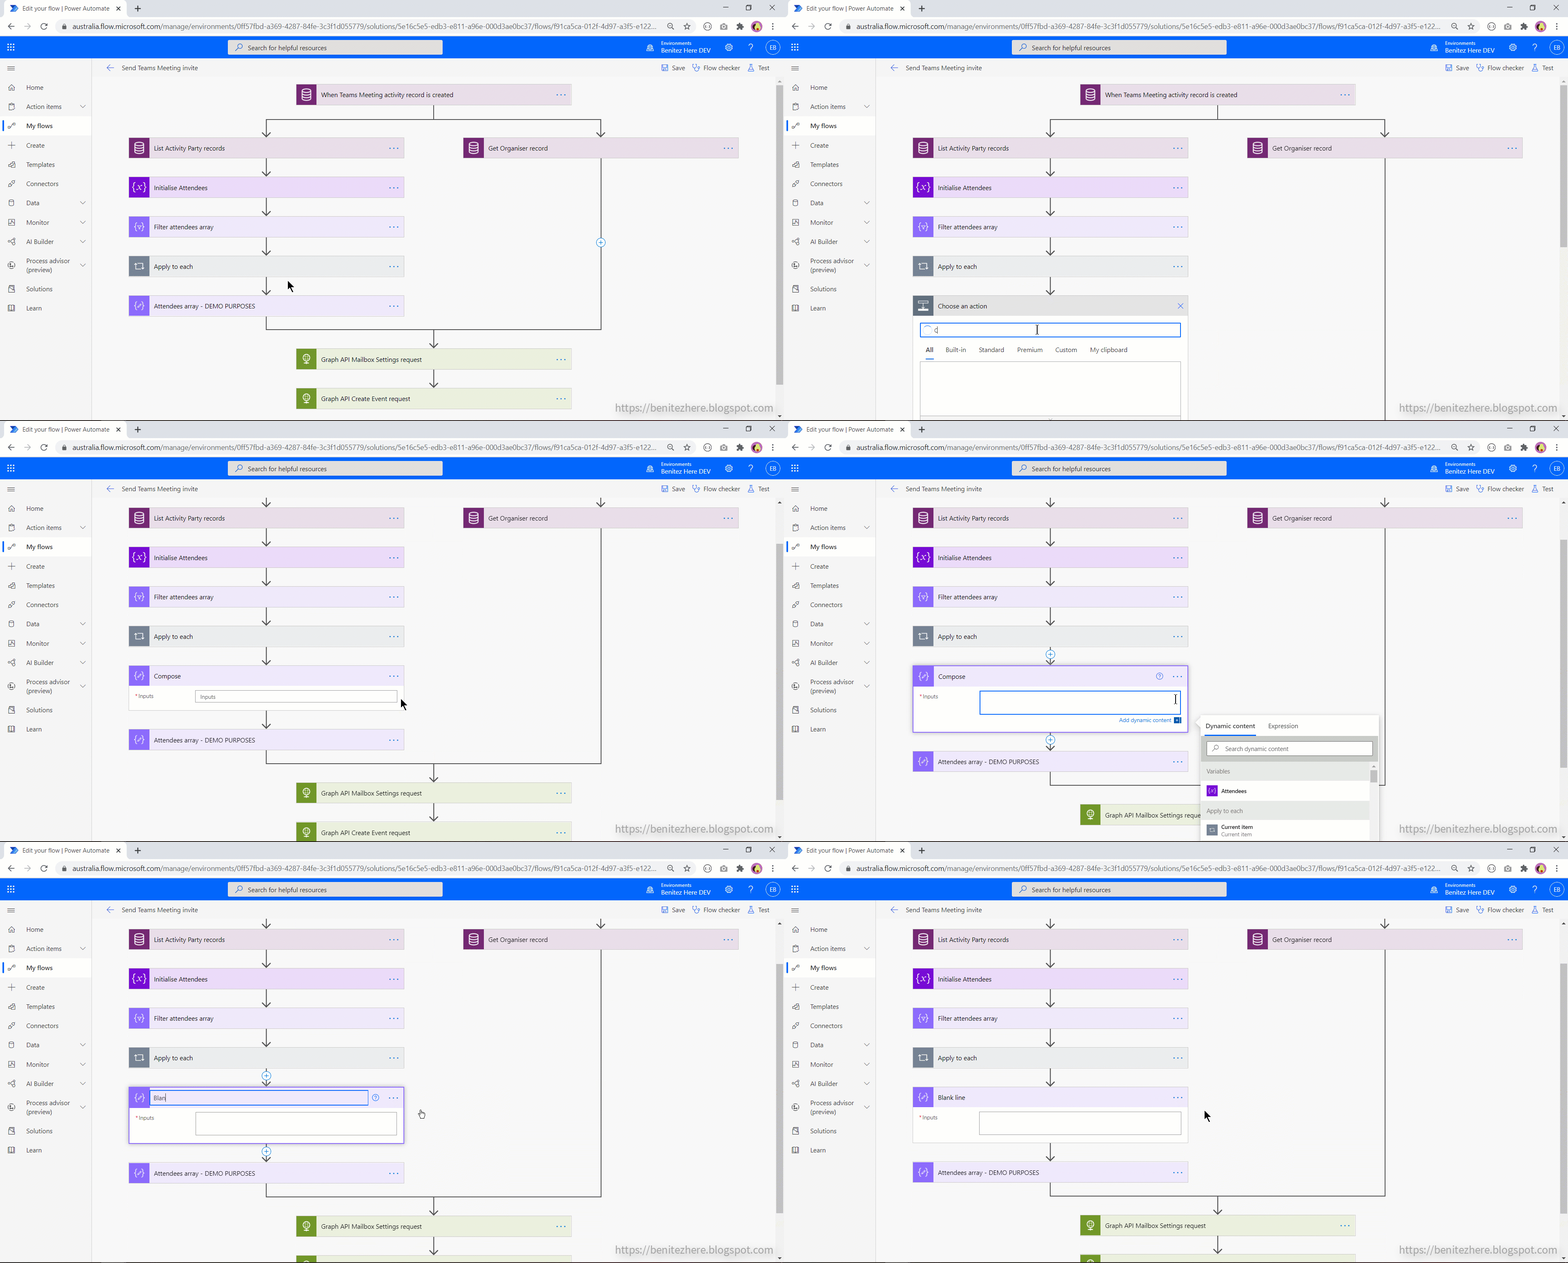
The Compose action
This action is for the purpose of referencing a new line in the expression used for the "Content" property in the Body of the HTTP action that calls the Create Event Graph API request.
As seen in my vlog I simply hit enter on my keyboard in the Compose action. Nothing else is required.
Expression for the Content property
In the final HTTP action the expression is updated to the following
In the scenario where the Description column is null and you don't have logic to be able to deal with null values, the cloud flow will fail. Therefore the expression incorporates two functions to handle when the Description column in the Teams Meeting Activity record in Microsoft Dataverse or Dynamics 365 is null. This is good practice when using expressions for columns where there is a possibility that the column value can be null. For more best practices on what you should be doing with cloud flows check out the white paper, A Guide to Building Enterprise-ready Flows that was authored by Jerry Weinstock and other prominent experts including input from the product team.
The If function provides a conditional check where the true or false value defined is used in the output.
In this use case, the cloud flow will check if the Description field is null and if it equals true, the cloud flow will return null as the output. Otherwise if the Description field is not null, the cloud flow will return the false value.
Replace
The Replace function is used for the false value where its purpose is to find all the blank lines and replace it with the HTML <br> tag so that it will render as line breaks in the Teams Meeting created and sent via the Create Event Graph API request from the HTTP action.
Cloud flow in action
Create a new Teams Meeting Activity in Microsoft Dataverse or Dynamics 365 and let the magic flow ✨
When there is a description provided, the Teams Meeting will render the line breaks.
When there is no description provided, the Teams Meeting will display the content as blank. The cloud flow will not fail.
Summary
By using a Compose action and referencing this in an expression will display the value from the Multiline Text column with line breaks in the Teams Meeting that is created and sent from Microsoft Dataverse or Dynamics 365.
Stay tuned as in the next WTF episode I'll show you how to easily apply HTML next when creating and sending a Teams Meeting from Microsoft Dataverse or Dynamics 365.
Sending a Teams Meeting invite from Microsoft Dataverse or Dynamics 365 is not supported out-of-the-box (yet as of when this WTF episode was published). It also seems to be a requested feature,
Fear not my Power Platform citizens as you'll learn in this WTF episode how you can achieve it with my best friend Power Automate.
Note: since my last WTF episode, flow has been renamed to cloud flows so will stick with this from now on.
Brief background before we start
I originally came up with Version 1.0 of this solution at the end of 2019 and presented it at the Power Platform Saturday 2020 event in Sydney - yes a time when travel was still a thing.
Back then there was no action in the Microsoft Teams connector to create a Teams Meeting. Fast forward to today,
There is an action available that will allow you to create a Teams Meeting
My super powers with Power Automate have since level'd up, this is Version 2.0 - it's even more beautiful 😍
Can I use the Create a Teams meeting action?
Initially you think you can use the Create a Teams meeting action that's currently in Preview in the Teams connector for Power Automate.
However as mentioned in my previous WTF episode, any connector that is tied to Microsoft 365 will use the cloud flow maker's user account as the authentication. This means the Teams connector will use the cloud flow maker's user account for any of the actions. In the case of a Teams meeting action this is a no-go as when the Teams meeting is created and sent, it will only show in the cloud flow maker's Outlook calendar. It will not show in the Outlook calendar of the organiser who created it from Microsoft Dataverse or Dynamics 365.
For example Aaron creates a Teams Meeting Activity from Microsoft Dataverse/Dynamics 365.
The cloud flow is triggered and the "Create a Teams meeting" action is used. When the Teams Meeting is created and sent it will not show in Aaron's calendar. It will show in the the user's calendar who created the cloud flow - in other words the cloud flow maker.
This is not going to cut the cheese because for an enterprise ready solution... this ain't it.
A Teams Meeting can be created through Graph API by authenticating as an application instead of a user. In the previous WTF episode I showed you how to authenticate as an application with Graph API using the HTTP action.
The process will be whenever a Teams Meeting Activity is created from Microsoft Dataverse or Dynamics 365, a cloud flow in Power Automate will be triggered and perform a couple of requests to the Graph API so that the Teams Meeting can be created and sent to the attendees.
Prerequisites
New custom activity table
You will need to create a custom activity table in Microsoft Dataverse or Dynamics 365. I created a custom activity table called Teams Meeting Activity which is what you would have seen in my WTF vlog.
Why? We need to have a table that represents the Teams Meeting in Microsoft Dataverse or Dynamics 365 to allow users to associate the attendees and so forth.
But why can I not use the Appointment activity table? When server-side synchronisation is enabled for appointments in Microsoft Dataverse or Dynamics 365 and the user creates an appointment, it will automatically appear in a user's Outlook calendar. This means if my solution used the Appointment activity table there would be a double up in the Outlook calendar,
The synchronised Appointment from Microsoft Dataverse and Dynamics 365
And a Teams Meeting
In my vlog I had a custom activity table which I named Teams Meeting Activity and added the relevant fields to the form.
I will refer to my custom activity table as Teams Meeting Activity for the remainder of this blog post.
App registration in Azure portal
The cloud flow performs a couple of Graph API requests which requires the HTTP action authenticating as an application. Refer to my previous WTF episode on how to do this as this is applied in my cloud flow in Power Automate.
Understanding the anatomy of a Teams Meeting
From an end user perspective this is what they see as the organiser from the Teams application.
Subject of the Teams Meeting
Required Attendees
Optional Attendees
Scheduled Start Date and Scheduled End Date
The timezone that the dates go by - this is usually in the context of the Organiser's timezone
Whether the Teams Meeting is a recurring meeting (note I do not explain this in this WTF episode)
The location of the Teams Meeting
The content of the Teams Meeting
The hyperlink which contains the URL for attendees to join the Teams Meeting
The Organiser - I completely forgot to mention this one in my WTF vlog
All of these elements need to be defined for the Graph API request which is what we need to build in the cloud flow. A majority of these elements happen to be reflected in the out-of-the-box columns that come with a custom activity table in Microsoft Dataverse or Dynamics 365 so it really is a perfect pair 🍐
The Graph API requests used in this solution
The first Graph API request that will be used is the Get user mailbox settings which enables the ability to retrieve an Organiser's timezone defined in their Outlook profile.
The second Graph API request that we're using is Create Event. In the sample request you can see the elements I mentioned earlier which is what we're going to build in our cloud flow. The key part here is the Attendees array where we need to ensure that there is a row that represents each attendee (required and optional) in the Teams Meeting Activity.
Time to automate. I'll next break down the cloud flow.
By the way this cloud flow is in a solution so the CDS Current Environment connector is used.
Warning: I will be explaining a few underlying principles of Microsoft Dataverse/Dynamics 365 so grab a cup of coffee or tea to help with your learning vibes ☕😊
Let's Automate
This is what my cloud flow looks like in Power Automate.
The trigger
The trigger will be "When a record is created" where the entity value will be the custom activity table that was created.
Get the user record of the Organiser
I used a parallel branch to perform some actions in parallel. The CDS Get Record action is used to retrieve the user record based on the Organiser column of the Teams Meeting Activity. There is a column in the User table that represents the Object ID of their Active Directory User profile which is needed in the Graph API requests downstream in the cloud flow.
List Activity Party records
On the left hand side of the parallel branch, we have actions that build the Attendees array that is required in the Graph API request that creates the Teams Meeting.
The first action is the CDS List records action that retrieves all of the Activity Party records associated to the Teams Meeting Activity created which is defined in the filter query field.
What's an Activity Party record?
In Microsoft Dataverse or Dynamics 365 Activity Parties represents a person or a collection of people who are associated to the activity record. For a Teams Meeting Activity this would be
The Organiser
The Required Attendees
The Optional Attendees
The Owner of the record
The Regarding value of the record - for example a Lead
The Required Attendees and Optional Attendees is what will be referenced to build the attendee rows in the Attendees array of the Graph API Create Event request.
As you can see for the emailAddress property the values of email address and name is required. These values need to be retrieved from the selected records in the Required Attendees and Optional Attendees columns of the Teams Meeting Activity.
If you review the response of the CDS List records action of the Activity Party it will only show values from the Activity Party entity. You will not be able to see the email address and name details which is needed for the attendee row in the attendees array are within the table that represents the selected attendee.
There's only four tables that are applicable to the Required Attendees and Optional Attendees columns in the Teams Meeting Activity. These are
Contact
Account
Lead
User
Each table has their own column with its own schema name that represents the email address or the name which is what needs to be retrieved to form the emailAddress property in the Attendees array of the Graph API Create Event request. How do we get this information since these are related tables to the Activity Party?
Use the $expand query and $select query
Not a problem! The CDS List records action handles Odata queries and one of query options available is $expand which in the context of Microsoft Dataverse and Dynamics 365 allows you to retrieve related entities by expanding navigation properties.
Let's revisit the response of the Teams Meeting Activity CDS List records action. There is a property "_partyid_value@Microsoft.Dynamics.CRM.associatednavigationproperty" which can be used in the expand query field in the CDS List records action to retrieve the column values of the related table specified.
For example "partyid_lead" will return the the column values of the selected lead in the Required Attendees column. To narrow the column values returned from the Lead table, another query can be applied. Use $select to only retrieve the email address and name information from the related table.
For the four tables it will be the following columns by schema name
Contact
emailaddress1
fullname
Account
emailaddress1
This same value can be used for the Name property in the emailAddress property of the Graph API Create Event request
Lead
emailaddress1
firstname
lastname
User
internalemailaddress
fullname
Filter attendees array
As mentioned earlier only the Required Attendees and Optional Attendees activity parties is required to form the Attendeess array in the Graph API Create Event request. The CDS List records action will return the following activity parties of the Teams Meeting Activity,
Required Attendee
Optional Attendee
Owner
Regarding
Since a CDS List records action retrieves multiple records it's an array behind the scenes therefore the Filter an array action can be used. The condition expression needs to be done through Advanced mode since an OR statement needs to be applied. The filter an array action needs to only retrieve the Required Attendee and Optional Attendee.
In the Activity Party table there is a property that you won't see through the customization settings of the table but is visible in the CDS List records action response. This property is "participationtypemask" which represents the different activity party types through an integer value.
5 represents a Required Attendee
6 represents an Optional Attendee
This can be used in our condition expression in the filter an array action,
I have covered in a previous WTF episode how to do OR and AND statements in an expression which is also applicable to the advanced mode editor of a filter an array action if you need some more guidance.
Apply to each
Now that the attendees have been filtered we can loop through each of the attendees to form each row in the Attendees array for the Graph API Create Event request.
Switch
There are four tables that an Organiser can choose from when selecting the Required Attendees and Optional Attendees, and each table has their own schema name for the columns. The properties in the attendee row needs to accommodate these four tables. This can be achieved using a Switch action to perform a logical check based on a property value defined. The property that is referenced for the Switch is "_partyid_value@Microsoft.Dynamics.CRM.lookuplogicalname" as this will indicate which of the four tables the activity party derives from as defined by the selected record of the attendee.
The expression used is item()?['_party_id_value@Microsoft.Dynamics.CRM.lookuplogicalname']
Initialise variable and Append to an array variable actions
Each row needs to be built to represent an attendee for the Attendees array in the Graph API Create Event request and this is where the Initialise variable action and Append to an array variable actions can be used.
Back to the Switch action
The values used for each of the Switch cases will be the four tables and in each switch case the column values from the expand and select query are referenced in the expression associated to the properties of the attendee row that is required by the Attendees array in the Graph API Create Event request.
Contact
emailaddress1
item()?['partyid_contact']?['emailaddress1']
fullname
item()?['partyid_contact']?['fullname']
Account
emailaddress1
item()?['partyid_account']?['emailaddress1']
This same value can be used for the Name property in the emailAddress property of the Graph API Create Event request
The final property in the attendee row array is "type" which represents whether the attendee is required or optional as seen in the Graph API documenation.
This expression is quite straight forward by using the if function since the filter an array action only retrieves the required or optional attendees of the Teams Meeting activity.
The next action I had in my WTF vlog was a compose action that shows the output of the Initialise variable action. This is for the purpose of showing you that the Attendees array was correctly built.
Graph API Mailbox Settings request
The Get user mailbox settings API request will be used in this HTTP action. The azureactivedirectoryobjectid property is referenced from the Get Organiser record action in the URI and we're also narrowing the response to only return the timeZone value as defined in the Graph API documentation. The timeZone property will be used in the final action of the cloud flow.
Reminder that
you need an app registration in Azure portal to authenticate as an application via the HTTP request action in Power Automate
you need to add an application permission for the app registration in Azure portal.
The grand finale! But wait, there's more learning vibes coming so please make sure you have refilled your coffee or tea before reading this section 😉
The Create Event API request will be used in this HTTP action. Don't forget to add the application permission for this request for the app registration in Azure portal.
The azureactivedirectoryobjectid property is once again referenced from the Get Organiser record action in the URI so that the Teams Meeting is created as the Organiser but authenticating as an application with the Graph API.
You'll notice that there is an additional request header this time,
Prefer: outlook.timezone="timezone"
This request header as explained in the Graph API documentation ensures that the Teams Meeting is created in a specified timezone which in this solution will be the timezone of the Organiser as defined in their Outlook profile.
The next part of the HTTP action is the Body which represents the elements of the Teams Meeting which I explained earlier (The anatomy of a Teams Meeting).
I'll next explain the properties of the body.
subject
The subject is retrieved from the trigger, the Teams Meeting Activity record created. The expression is triggerOutputs()?['body/subject']
content
The content is retrieved from from the trigger, the Teams Meeting Activity record created. There can be scenarios where the Organiser does not provide a value in the Description column of the Teams Meeting Activity therefore this needs to be accounted for in the expression which is where the coalesce function can be used. The expression is coalesce(triggerOutputs()?['body/description'], triggerOutputs()?['body/description'], '')
isOnlineMeeting and onlineMeetingProvider
The Graph API documentation provides a list of the properties available for the Create Event API request.
The isOnlineMeeting property defines that the Team Meeting is an online meeting and the value needs to be set to true as per the Graph API documentation.
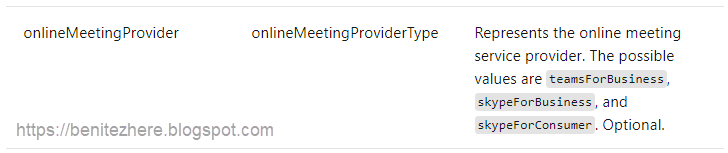
The onlineMeetingProvider property defines that Microsoft Teams is the platform used as per the Graph API documentation. Apparently you also have the ability to create Skype For Business meetings still!
start dateTime and end dateTime
I encountered issues with this so that you don't have to 😶
Any web service, application and system out there deals with dateTime as UTC - that's how it has always been. This tripped me up which is surprising because I dealt with this same issue before in an earlier WTF episode.
Attempt No. 1
If you reference the schedule start time and schedule end time from the Teams Meeting Activity (the trigger) as-is, it will deceivingly look OK when you review it in the Microsoft Teams application.
However when you review the actual Teams Meeting by editing it, the timezone shows as UTC and the scheduled start date and scheduled end date show as UTC too.
The reason why this occurs is because the scheduled start date and scheduled end date from Microsoft Dataverse and Dynamics 365 has a "Z" character at the end.
In Power Automate and LogicApps if the "Z" is still present when a local timezone has been provided, it will ignore the local timezone and continue to operate as UTC. Refer to the screenshot below and this documentation for more details.
Attempt No.2
If you then use a couple of functions to remove the "Z" character from the scheduled start date and scheduled end date, it half works 😓 The timezone will display correctly when editing the Teams Meeting in the Microsoft Teams application however the scheduled start date and scheduled end date will appear as UTC still instead of the expected times.
I should have known better because I actually knew about this from previous WTF episodes when I showed how to send a birthday email in a Contact's local timezone. So luckily, I know how to resolve this slight hiccup.
Attempt No. 3
The scheduled start date and scheduled end date values from Microsoft Dataverse and Dynamics 365 first need to be converted from UTC to the local timezone, and formatted where the "Z" is not included. This way the Graph API Create Event request will create it in the specified timezone from the request header (prefer outlook.timezone='timezone') and from the timezone properties within the body of the request.
The expression for the start and end time will be like the following
The timezone value from the previous Graph API Get user mailbox settings request is used in the expression.
location
This property is straight forward as it will be set to Teams Meeting since it's an online meeting for the attendees
attendees
This will be the array built upstream in the cloud flow where the attendee rows were formed from the Apply to each action that loops through only the required and optional attendees. All the hard work was done earlier.
Cloud flow in action
Create a new Teams Meeting Activity in Microsoft Dataverse or Dynamics 365 and let the magic flow ✨
In my WTF vlog I created the Teams Meeting Activity as myself but below I do it as Aaron Rodgers to show you that it will work for any user who creates a Teams Meeting Activity record as the HTTP request action is authenticating as an application with Microsoft Graph API.
What I forgot to show you in the WTF vlog is how the Teams Meeting Activity will also appear in the timeline of the required or optional attendees. Below is a screenshot of what it will look like in the timeline of the lead record.
Since this is an activity type table it will continue to display as active until you mark the activity as complete. This is no different to how appointments or phone calls are handled in Dynamics 365 or Microsoft Dataverse.
Constraints
This solution only accommodates when a Teams Meeting Activity is created but it's not difficult to manage update, delete and cancelations from Microsoft Dataverse or Dynamics 365 as the Graph API have all three of these requests available.
As a follow on from the first point, the Teams Meeting Activity from Microsoft Dataverse or Dynamics 365 is the trigger therefore create, update, delete and cancelation operations must be done from Microsoft Dataverse or Dynamics 365. They cannot be performed in the Microsoft Teams application.
As of today you cannot track a Teams Meeting from Outlook through the Dynamics 365 App for Outlook. This I cannot help with as I do not have the knowledge or the access to extend the Dynamics 365 App for Outlook. However as mentioned previously, since the Teams Meeting Activity is created from within Microsoft Dataverse or Dynamics 365 it will show in the timeline of the attendee or regarding record so there is visibility of Teams Meetings.
Summary
Even though the ability to create and send a Teams Meeting is not a feature available across the platform in Microsoft Dataverse or Dynamics 365 yet, it can be achieved with cloud flow in Power Automate using the Graph API. As mentioned in my previous WTF episode the Graph API is essentially our gateway to extending the Microsoft 365 ecosystem and when you combine it with Power Automate it allows you to be more creative. So get creating! #LetsAutomate
Shout outs
I'd like to thank Jim Daly in the Power Automate product team for continuing to expose more properties in the CDS Current Environment connector. When I initially came up with this solution back in 2019, I had to use the CDS standard connector at the time because there were some properties that were not returned in the JSON response of the CDS List records action when using the CDS Current Environment connector. The product team have worked on providing these additional properties and it's been a lot easier to create more beautiful cloud flows so thank you team 🙂
I'd also like to thank John Liu as it was John who introduced me to the filter an array action back in 2018 in my early days of learning clouds flows.